Tiny Oreo Cheesecakes How to Make Them
There’s something about the smell of coffee cake baking that instantly takes me back. Maybe it’s the early mornings at my grandma’s house or lazy weekend brunches with friends. I’ve made this zucchini coffee cake more times than I can count, and I swear, it’s one of those recipes that just makes the whole house smell incredible—like warm cinnamon and tangy lemon swirling together. My kids ask for this all the time, especially when zucchinis are in season and I want to sneak in some veggies without my little ones noticing. Honestly, this cake’s a lifesaver on busy nights or when I want to impress last-minute guests. It’s moist, it’s flavorful, and the lemon glaze on top adds that perfect zing. Trust me, once you try this, it’s going to become a staple in your baking repertoire—a sweet, tender reminder that simple ingredients, combined with a little love, can turn into something totally addictive.
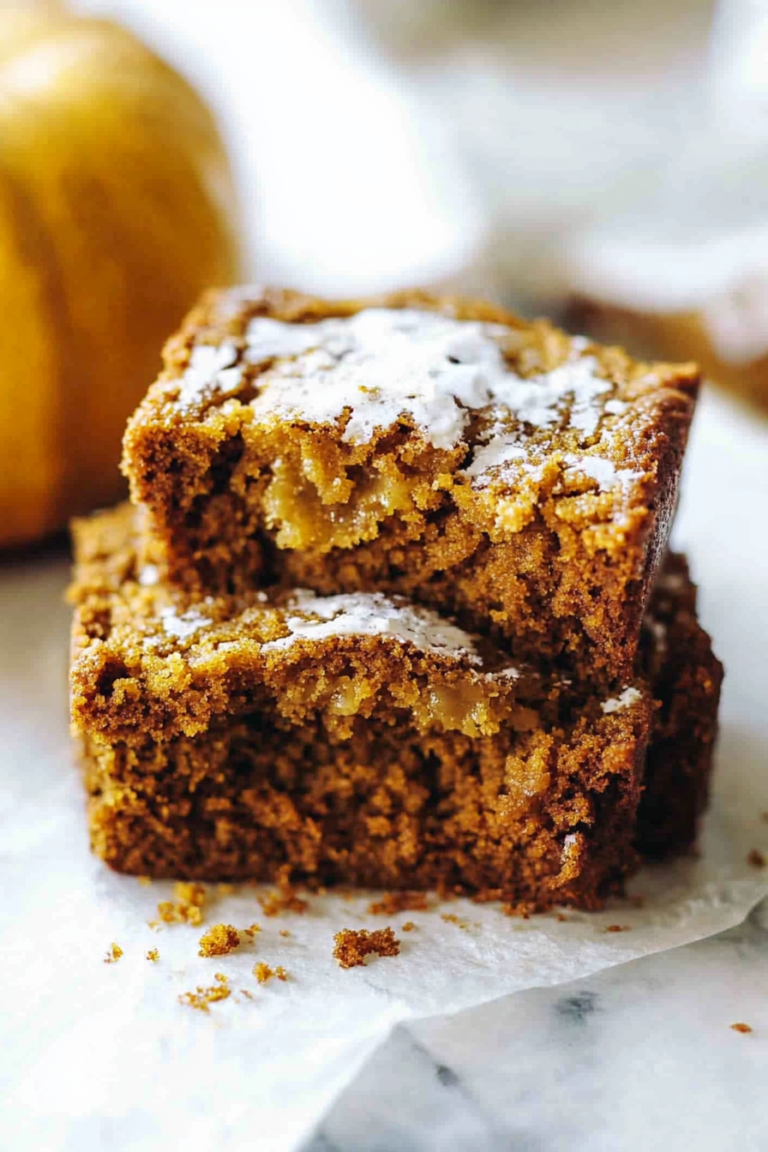
What is Zucchini Coffee Cake?
Think of zucchini coffee cake as that cozy, slightly indulgent treat that’s perfect for brunch or an afternoon pick-me-up. It’s essentially a moist, tender cake packed with grated zucchini, which keeps it beautifully soft and adds a hint of earthiness. The name “coffee cake” might make you think of a crumbly topping or a breakfast bread, but this one’s a little different—it’s more like a sweet, spongy cake that pairs wonderfully with a cup of coffee or tea. It’s inspired by classic coffee cake recipes but gets a fresh twist thanks to the zucchini and bright lemon glaze. The zucchini isn’t overpowering; it’s just enough to add moisture and a bit of nutrition, which is my way of sneaking some greens into a dessert that everyone loves. Think of it as a comforting promise that the everyday ingredients in your pantry can create something special—and downright delicious.
Why you’ll love this recipe?
Honestly, what I love most about this zucchini coffee cake is how it strikes that perfect balance between comfort and sophistication. The aroma alone is enough to bring everyone running into the kitchen—warm cinnamon, buttery richness, with that fresh lemon kick on top. It’s also crazy easy to make, which means no complicated steps or fussy ingredients. I’ve tested this with almond milk, and honestly, it made the cake even creamier—so don’t hesitate to try dairy-free options if you need to. Plus, the grated zucchini keeps the cake so moist that it stays delicious for days, making it perfect for leftovers or even freezing batches for when friends drop by unexpectedly. What’s great is that you can customize the flavor: swap out the lemon for orange or add a handful of nuts or blueberries—whatever your mood calls for. This is one of those recipes that’s versatile, budget-friendly, and taste-wise, it always feels like a little gift from the kitchen. My kids can’t get enough of it on Saturday mornings—slice after slice—and it’s become a family favorite to enjoy during lazy weekends or special brunch mornings.
How do I make Zucchini Coffee Cake?
Quick Overview
This zucchini coffee cake comes together quickly with just a few basic pantry staples. You start by preparing your grated zucchini—making sure you squeeze out excess moisture—to keep the cake tender and not soggy. Then, you mix dry ingredients first, whisking together flour, baking powder, spices, and a pinch of salt. In another bowl, you blend the wet ingredients—melted butter, eggs, vanilla, and a splash of milk—until smooth. Combine everything gently, fold in the zucchini, and pour the batter into a prepared pan. While it’s baking there’s plenty of time to whip up a simple lemon glaze. Once out of the oven, a generous drizzle of glaze makes it irresistible. And trust me, this whole process takes under an hour—perfect when you’re craving something warm and sweet after work or on lazy weekends. The beauty is how forgiving it is; even if you’re not a professional baker, you’ll get a moist, flavorful cake every time.
Ingredients
For the Main Batter:
- 2 cups finely grated zucchini (about 2 small zucchinis, grated and excess moisture squeezed out)
- 1 1/2 cups all-purpose flour (or gluten-free blend if you prefer)
- 1/2 teaspoon baking powder
- 1/2 teaspoon baking soda
- 1 teaspoon ground cinnamon
- 1/4 teaspoon nutmeg (optional but adds warmth)
- 1/4 teaspoon salt
- 1/2 cup unsalted butter, melted (or coconut oil for dairy-free)
- 1 cup granulated sugar (use coconut sugar or maple syrup for a healthier twist)
- 2 large eggs, at room temperature
- 1 teaspoon vanilla extract
- 1/4 cup milk (dairy or plant-based like almond or oat)
For the Filling (optional but nice):
- 1/4 cup brown sugar
- 1 teaspoon cinnamon
- 1/2 cup chopped nuts or blueberries (if desired)
For the Lemon Glaze:
- 1 cup powdered sugar
- 2-3 tablespoons lemon juice (freshly squeezed)
- Zest of one lemon (for extra zing)
Step-by-Step Instructions
Step 1: Preheat & Prep Pan
Set your oven to 350°F (175°C). Grease a 9-inch round or square baking pan, or line it with parchment paper. If you want a crunchier topping, you can also prepare a streusel, but I like keeping things simple. Make sure your zucchini is grated and squeeze out as much moisture as possible—that’s the secret to keeping the cake nice and moist without it turning into a soggy mess.
Step 2: Mix Dry Ingredients
In a large bowl, whisk together the flour, baking powder, baking soda, cinnamon, nutmeg, and salt. This helps break up any lumps and distributes the leavening evenly. Set this aside while you work on the wet ingredients.
Step 3: Mix Wet Ingredients
In a separate bowl, combine the melted butter and sugar. Whisk until smooth—the sugar should start dissolving slightly. Add the eggs one at a time, whisking well after each. Stir in vanilla, milk, and a pinch of zest if you’re feeling extra citrusy today. The mixture should be glossy and smooth, not curdled.
Step 4: Combine
Pour the wet ingredients into the dry, and fold gently with a spatula or spoon—don’t overmix! Just enough so everything is combined. Overmixing can lead to dense cake texture, and nobody wants that episode. Add the grated zucchini last and give it a gentle swirl — it’s okay if some streaks remain for that rustic look.
Step 5: Prepare Filling
If you’re using the cinnamon-sugar mixture and nuts, now’s the time. Spread a thin layer over the batter or sprinkle it on top. I personally love swirling the filling through the batter—makes every bite more interesting!
Step 6: Layer & Swirl
If you’re layering fillings, pour half the batter into your pan, sprinkle with the filling, then add the rest of the batter on top. Use a knife or skewer to gently swirl through the batter, creating pretty marbled streaks. It’s all about that visual appeal and making it look more homemade.
Step 7: Bake
Bake for 40-45 minutes, or until a toothpick inserted in the center comes out clean. Every oven has its quirks, so start checking at 38 minutes. If the top starts browning too fast, tent it with foil. The smell of cinnamon and lemon will fill your kitchen and make the wait nearly impossible!
Step 8: Cool & Glaze
Let the cake cool in the pan for 10-15 minutes, then transfer to a wire rack. While it cools, mix the powdered sugar with lemon juice and zest until smooth—add more juice if needed for a pourable glaze. Drizzle generously over the slightly warm cake so it seeps into every nook and cranny, adding that bright, tangy finish.
Step 9: Slice & Serve
Once fully cooled, cut into squares or slices with a sharp serrated knife. The glaze caramelizes a little at the edges, which is a wonderful contrast to the fluffy cake. Best enjoyed slightly warm or at room temperature with a cup of coffee or tea. I love serving this for brunch with fresh berries or whipped cream on the side—it’s just such a comforting treat that I can’t get enough of.
What to Serve It With
This zucchini coffee cake is so forgiving that it’s perfect for breakfast, brunch, or even a quick evening snack. For breakfast, I love pairing it with a robust brew or a tall glass of oat milk. My kids always ask for it with a side of fresh strawberries or a dollop of yogurt—anything that adds a bit of freshness. For brunch, serve slices with a side of scrambled eggs and mimosas—it’s the kind of dish everyone keeps going back for. If you’re using it as a dessert, a drizzle of honey or a scoop of vanilla ice cream turns it into a real showstopper. And honestly, it’s perfect simply on its own, warm from the oven, with nothing more than a cup of coffee or tea in hand.
Top Tips for Perfecting Your Zucchini Coffee Cake
Having tested this many times, I’ve picked up a few tricks that really make a difference. First, when grating zucchini, I always do this last minute and squeeze out moisture right before mixing—trust me, extra moisture is the enemy of fluffy cake. I’ve learned to fold ingredients gently—overmixing leads to dense, rubbery results, and nobody wants that. Swirling the filling through the batter takes a minute but adds a beautiful marbled look, plus it distributes flavor evenly. As for ingredient swaps, I’ve replaced half the sugar with honey or maple syrup and loved how it brings a richer depth. If you’re gluten-free, I recommend a 1-to-1 gluten-free baking flour—it works well as long as you keep an eye on the moisture level. Baking tips: always check your oven’s calibration; I’ve had cakes underbaked because of a too-cold oven. Also, oven racks matter—baking in the middle ensures even heat distribution. For glaze variations, try adding a splash of bourbon or vanilla for a different dimension—it’s amazing how a tiny tweak can elevate the whole experience. Honestly, I’ve made dozens of batches, and I still find new little tweaks that make it even better. But the best part? It’s always a crowd-pleaser, moist, and with that perfect citrusy zing on top.
Storing and Reheating Tips
This cake stays amazingly fresh for a couple of days when stored properly. If you’re eating it the same day, keep it covered at room temperature—just a plate and a towel do the trick. For longer storage, wrap it tightly in plastic wrap or store in an airtight container and refrigerate for up to 4 days. To keep it moist and delicious, I recommend reheating individual slices briefly in the microwave—about 15-20 seconds—then drizzling the glaze back on if needed. For freezing, wrap slices individually in plastic wrap, then place in a freezer-safe container or bag. They’ll keep for up to 2 months. Thaw at room temperature or lightly warm in the microwave. Just remember: if you plan to add fresh glaze, do it after reheating—this keeps that bright, citrusy shine intact.
Frequently Asked Questions
Final Thoughts
This zucchini coffee cake has become a family favorite that I keep coming back to. It’s the kind of recipe that feels like a warm hug—moist, flavorful, and just a little bit special. The grated zucchini keeps it incredibly tender, and that bright lemon glaze on top makes it so refreshing, balancing out the sweet spices perfectly. I love how versatile it is, whether you’re serving it for breakfast, brunch, or even as a cozy evening snack. Plus, it’s forgiving enough that even if you’re new to baking, you’ll impress yourself (and everyone else) with the results. I encourage you to try different variations—add some blueberries, swap out the lemon for orange zest, or sprinkle some chopped nuts on top. Just remember, the real magic is in the smell—that warm cinnamon and citrus aroma that fills your home—so enjoy every step! Can’t wait to hear how yours turns out—happy baking!
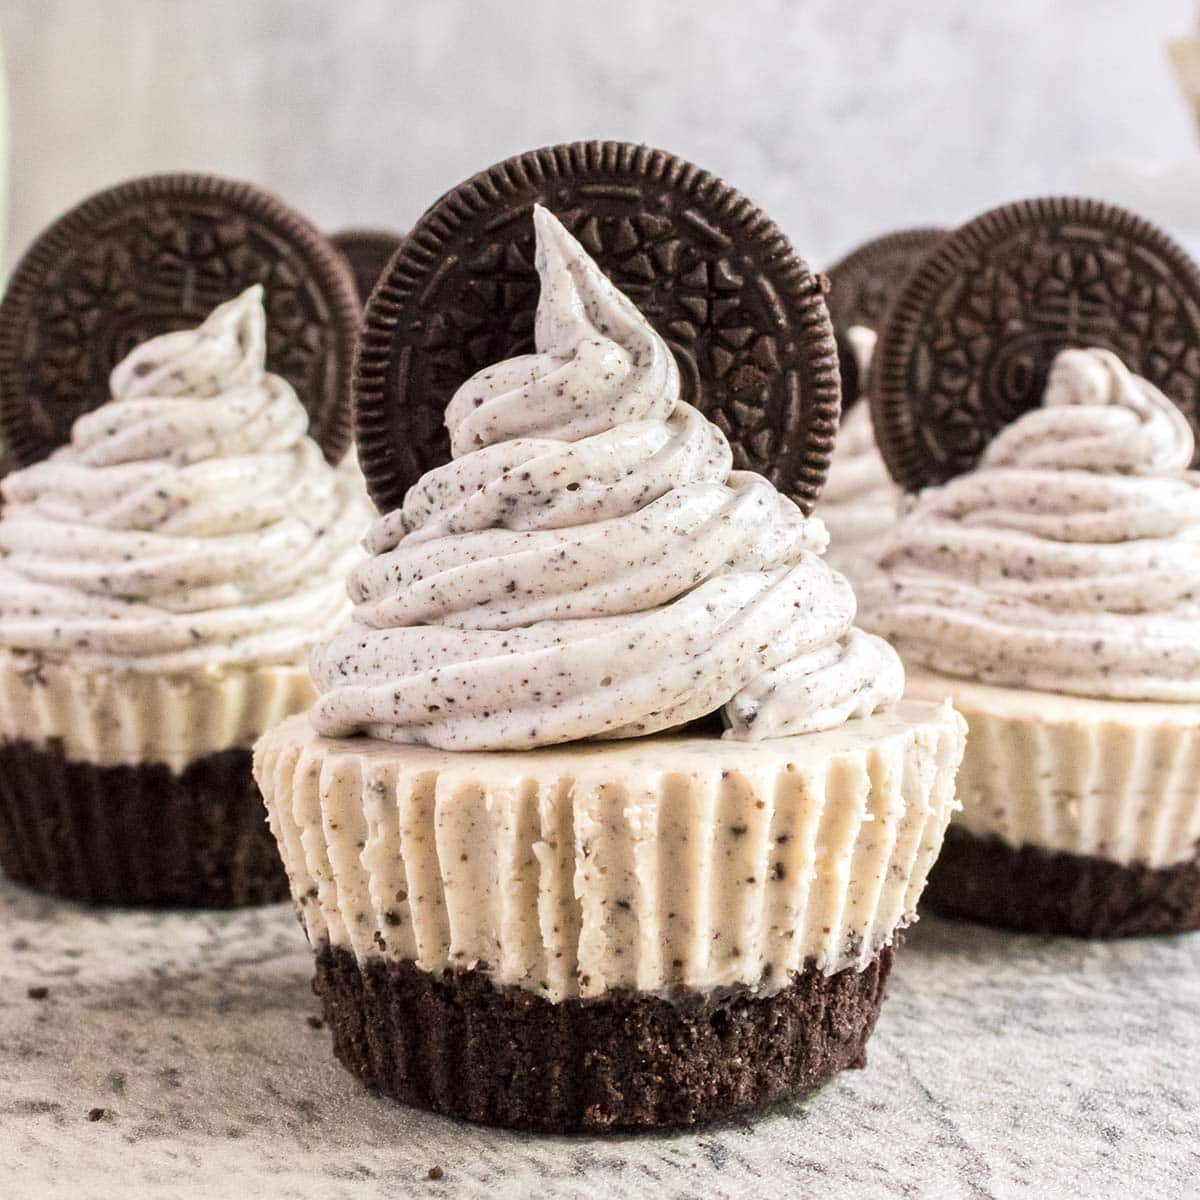
Oreo Cheesecakes
Ingredients
Method
- Prepare a muffin tin with liners, or use silicone cupcake molds.
- Process the Oreos in a food processor.
- Add in the softened butter and process that, as well.
- Press down 1-2 tablespoons of the cookie crumb mixture into the liners and place in the fridge until needed.
- Whip the frosting (only the frosting, no cookie crumbs at this point) for about 5 minutes to make it lighter, this will also increase the amount of frosting you have.
- Add the softened cashews, coconut milk, lemon juice, sugar, coconut oil, and vanilla to a high speed blender and blend for about 60 seconds, if it doesn’t seem creamy, blend for another 30-60 seconds.
- Pour into a large bowl and stir in 1 cup of whipped frosting and ¼ cup cookie crumbs, keep the rest of the frosting covered at room temperature.
- Divide the cheesecake filling among the 12 cupcake liners on top of the base and freeze til firm (about 2-3 hours).
- Whip the frosting again, add in ¼ cup of cookie crumbs, then fill a piping bag with it.
- Frost the top of all of the cheesecakes with the whipped frosting as desired, after the cheesecakes are firm.
- Add an Oreo sticking out of the whipped frosting on top. If the Oreo won’t stay straight up, stick the cheesecakes in the freezer to firm up a bit first, then enjoy!