Easy Creamy Chicken Broccoli Bake
There’s something so comforting about the smell of baking bread wafting through the house on a lazy Saturday morning. I remember as a kid, my mom would always have a batch of homemade banana bread ready when we woke up, the golden edges slightly crispy, the inside moist and bursting with flavor. It’s one of those recipes that feels like a warm hug, but recently, I discovered that adding zucchini transforms it into something even more delightful—moist, nutritious, and incredibly versatile. Honestly, this zucchini banana bread has become a staple in my house; my kids ask for it all the time—and I love that I can sneak in those extra veggies without a fuss. Plus, it’s a lifesaver on busy nights when I want a quick, comforting treat. This recipe is super forgiving, uses ingredients I usually have on hand, and each bite takes me right back to those cozy mornings—only now, it’s a little healthier too. Trust me on this—once you try it, it’ll become a go-to in your baking rotation too!
What is Zucchini Banana Bread?
Think of zucchini banana bread as the lovechild of the classic banana bread and a sneaky veggie upgrade. It’s essentially a tender, buttery loaf made with ripe bananas and freshly grated zucchini—two ingredients that, surprisingly, complement each other perfectly. The name might sound a little unusual at first, but after one bite, you realize it’s just the kind of clever, comforting treat that’s perfect for breakfast, snack time, or even dessert. The zucchini keeps the bread ultra-moist and adds a subtle earthiness that balances the sweetness of the bananas and brown sugar. This isn’t your typical “healthy” bake, either; it’s moist, rich, and full of flavor—really, it’s just good home baking. I love how adaptable it is, too: you can toss in chocolate chips, nuts, or even blueberries if you’re feeling fancy. Think of it as a cozy, slightly nutrient-boosted version of your favorite banana bread—something that makes everyone smile with every slice.
Why you’ll love this recipe?
What I love most about this zucchini banana bread is how simple and forgiving it is. Honestly, I’ve tested this so many times (because I just can’t get enough!), and I’ve learned that a few tips make all the difference. The flavor? It’s insanely good. Ripe bananas lend that classic sweet, slightly caramelized aroma, while the zucchini adds moisture and a subtle vegetal note—kind of like a sneaky health boost. The texture? Perfectly tender with a light crumb, yet moist enough that it disappears in minutes at my house. Plus, it’s budget-friendly—most of the ingredients are staples I always keep in the pantry or fridge. And the best part? It’s versatile! I’ve made it with bittersweet dark chocolate chunks, chopped walnuts, and even a sprinkle of cinnamon. This one’s a lifesaver on busy nights, or when I want to whip up something comforting for friends. My kids ask for this all the time, especially when I add a drizzle of honey glaze on top. It’s honestly become a family favorite—one I think you’ll fall in love with too!
How do you make Zucchini Banana Bread?
Quick Overview
Good news: this zucchini banana bread is as easy as it gets, with minimal fuss and maximum flavor. Basically, you mash up your ripe bananas, grate the zucchini, and mix everything together in one bowl. The batter comes together quickly, then you swirl in your favorite extras—chocolate, nuts, whatever tickles your fancy. Pour it into a loaf pan, bake at 350°F, and let that glorious smell fill your kitchen. Once it’s golden and a toothpick comes out clean, it’s time to cool and (if you want) glaze. That’s it! No fancy equipment required, and I promise, this comes together faster than you think—perfect for busy mornings or a cozy afternoon treat.
Ingredients
For the Main Batter:
– 3 ripe bananas, mashed (the sweeter, the better!)
– 1 cup grated zucchini (about 1 medium zucchini, excess moisture squeezed out)
– 1/3 cup vegetable oil or melted butter
– 2 large eggs
– 1 teaspoon vanilla extract
– 1 1/2 cups all-purpose flour (or a mix of whole wheat for a healthier twist)
– 1 teaspoon baking soda
– 1/2 teaspoon salt
– 1/2 cup packed brown sugar (less if you prefer it less sweet)
– 1 teaspoon ground cinnamon (optional but adds warmth)
For the Filling (optional):
– 1/2 cup chocolate chips or chopped nuts
– 1/2 teaspoon nutmeg or ginger for extra spice
For the Glaze (optional):
– 1/2 cup powdered sugar
– 1-2 teaspoons milk or lemon juice
– A splash of vanilla
– Additional toppings like chopped nuts or zest
Step-by-Step Instructions
Step 1: Preheat & Prep Pan
Set your oven to 350°F (175°C). Grease a standard loaf pan with butter or non-stick spray, and lightly dust with flour to prevent sticking. If you have parchment paper—awesome! Line your pan for easy removal. I always do this because it saves so much hassle when it’s time to slice.
Step 2: Mix Dry Ingredients
In a small bowl, whisk together the flour, baking soda, salt, cinnamon, and nutmeg if you’re using it. Mix well so everything’s evenly distributed. This helps ensure your bread rises evenly and has that perfect crumb we’re aiming for.
Step 3: Mix Wet Ingredients
In a larger bowl, mash the bananas with a fork until smooth. I like leaving a few small chunks for texture. Then, add the grated zucchini (don’t forget to squeeze out the excess moisture—I learned this the hard way!), oil, eggs, and vanilla. Whisk everything until combined; it should look like a thick, slightly lumpy batter that smells amazing.
Step 4: Combine
Pour the dry ingredients into the wet and fold gently with a spatula. Be careful not to overmix—just until it’s barely combined. Overmixing can make the bread dense. If you’re adding chocolate chips or nuts, fold them in now for that perfect surprise in every slice.
Step 5: Prepare Filling
If you’re using any extras like chocolate or nuts, sprinkle a few into the center of the batter or swirl them in. I love swirling chocolate through the batter—makes it look pretty and adds that extra indulgence.
Step 6: Layer & Swirl
Pour half the batter into your prepared pan, add your filling mixture in the middle, then top with the remaining batter. Use a toothpick or skewer to swirl gently, creating a marbled look—trust me, this makes it a showstopper when sliced.
Step 7: Bake
Place the pan in the oven and bake for 55-65 minutes. Start checking around 55 minutes by inserting a toothpick in the center; it should come out clean or with just a few moist crumbs. If the top browns too quickly, tent with foil for the last few minutes. Every oven is a little different, so don’t be discouraged if it takes a bit longer!
Step 8: Cool & Glaze
Let the bread cool in the pan for about 15 minutes, then transfer to a wire rack. Once cooled slightly, drizzle with your favorite glaze—optionally, you can add cinnamon or lemon zest for extra flavor. I love that this step lets you customize every batch.
Step 9: Slice & Serve
Use a serrated knife to slice once the loaf is completely cooled. Warm slices are tempting, but they tend to fall apart before slicing—patience pays off! Serve it plain, topped with a smear of butter, or with a big dollop of yogurt. Truly, it’s good any time of day.
What to Serve It With
Honestly, this zucchini banana bread is flexible—my favorite way is with a hot cup of coffee or a tall glass of milk. It’s perfect for a weekend brunch, especially when I add a side of scrambled eggs and fresh fruit—think blueberries or sliced strawberries. If I’m making it for the kids’ school snack, I often cut it into thick slices and pack it with a tiny container of peanut butter or almond butter for dipping. Want to make it a fancy dessert? Serve slices warmed with a scoop of vanilla ice cream or a drizzle of caramel. For a cozy afternoon tea, a spread of cream cheese topped with honey and chopped nuts pairs beautifully. Honestly, this bread’s the kind of thing that makes ordinary moments special.
Top Tips for Perfecting Your Zucchini Banana Bread
Over the years, I’ve picked up a few tricks that consistently yield perfect slices. First, always squeeze out excess moisture from the zucchini—if not, your bread can turn out soggy, and nobody wants that. I test my bananas at different stages; super ripe bananas will make the bread extra flavorful and moist, so don’t skip ripening them in a paper bag overnight if they’re not quite there yet. For mixing, I sometimes switch to a gentle folding instead of vigorous stirring—it preserves the fluffiness. When swirling in toppings or creating marbled patterns, take your time. I find that a light swirl with a skewer or toothpick gives just enough visual interest without over-mixing. And don’t forget to rotate your loaf during baking if you notice uneven browning. When it comes out golden and the toothpick comes out clean, you’re golden! Oh, and on glaze—don’t overdo it; a light drizzle is enough and keeps the bread feeling fresh, not weighed down. These little tips add up, making every loaf better than the last.
Storing and Reheating Tips
This bread is best enjoyed within the first 2-3 days. Keep it wrapped tightly with plastic wrap or stored in an airtight container at room temperature; it stays moist and fresh that way. If I want to extend its life, I pop slices into a zip-top bag and refrigerate—just make sure it’s well sealed to prevent it from drying out. Reheating is simple—just warm slices in the microwave for about 15 seconds or in a low oven, and it’s almost like fresh. For longer storage, I recommend freezing slices individually wrapped in plastic wrap then placed in a freezer bag—they’ll last a month or so. When ready to eat, thaw at room temperature or heat briefly in the microwave. Adding a quick warm-up revives the smell and the taste, making it almost impossible to resist. I’ve found that glazing just before serving keeps it looking pretty and fresh, especially if it’s been refrigerated or frozen.
Frequently Asked Questions
Final Thoughts
If you’re looking for a cozy baked treat that combines the familiar sweetness of banana bread with a little veggie hidden in the mix, this zucchini banana bread is your new best friend. It’s incredibly forgiving—great for bakers of all levels—and endlessly customizable. The smell alone will have everyone in your house wandering into the kitchen, and before you know it, there’ll be happy faces ready for seconds. I’ve made this countless times, and each batch turns out just wonderful. It’s perfect for breakfast, brunch, or a sneaky snack when I need something sweet but don’t want to overindulge. Plus, I love knowing I’m giving my family a bit of extra veggies without any fuss. Once you get the hang of it, I’m pretty sure you’ll be making this for years to come. I can’t wait to hear how yours turns out—trust me, once you try this, it’s gonna be a go-to!
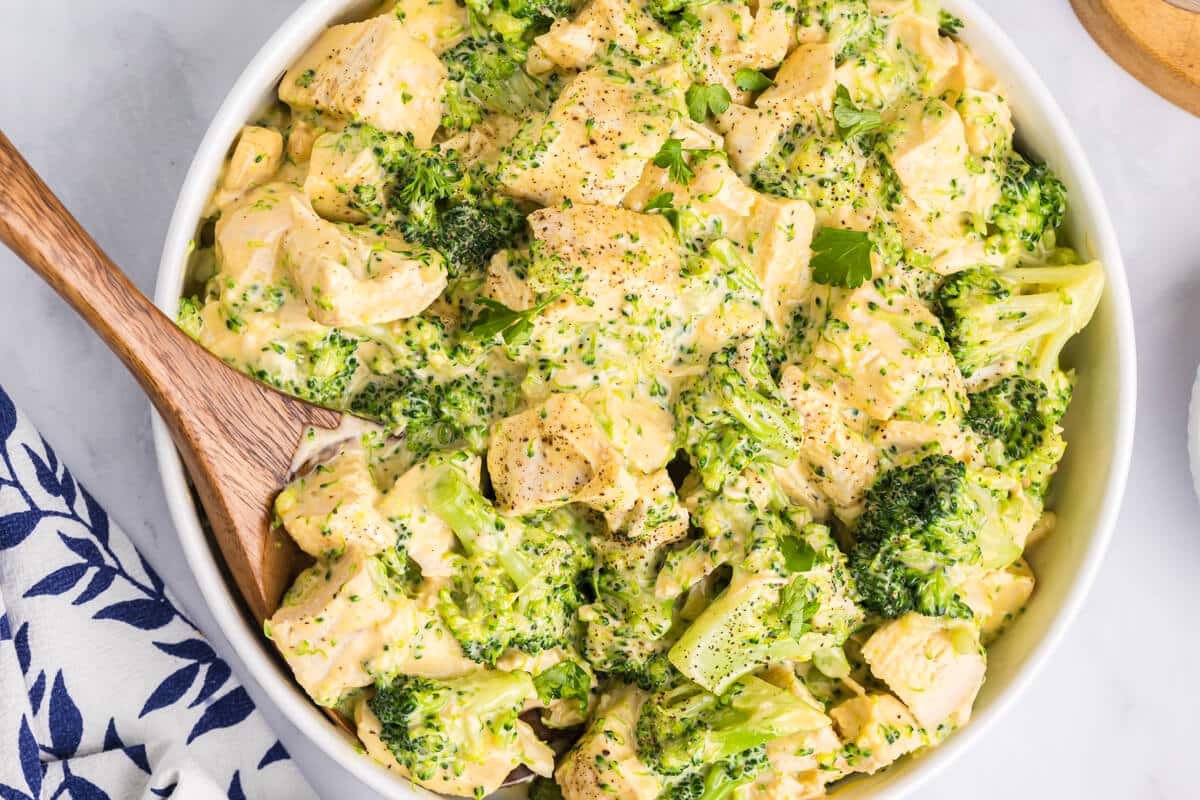
cheesy chicken broccoli
Ingredients
Method
- Bring a large pot of salted water to a boil. Add broccoli and boil for 5 minutes. Drain and set aside.
- Add mayonnaise, milk, cheese, pepper, and nutmeg to a pot over medium heat stirring constantly until cheese has melted. Add in broccoli and chicken and stir to coat and cook until heated through.