Zesty Lemon Garlic Pasta Salad Recipe
There’s something about the smell of baking zucchini that instantly takes me back to childhood summers spent in my grandma’s kitchen. I remember sneaking bites of sweet, freshly grated zucchini while she mixed batter, and even though I didn’t realize it at the time, that tender, subtly sweet flavor has stayed with me ever since. Fast forward to today, and I keep coming back to this zucchini and cream cheese swirl cake because it’s like comfort food in cake form—moist, flavorful, and a tiny surprise of creaminess in every slice. If you’re like me and love a good fruit-and-vegetable combo that doesn’t feel sneaky but actually makes the whole dessert more interesting, then you’re in for a treat. Honestly, I’ve made this countless times, and it never fails to disappear in minutes at my house—my kids ask for seconds, and friends always leave with a slice leftover (which is basically an invitation to indulge again!) This one’s a lifesaver on busy nights or when I want something sweet and a little different from the usual cake fare. Trust me, once you try it, it’ll become a staple in your baking lineup too.
What is Zucchini & Cream Cheese Swirl Cake?
This cake is kind of like a naughty secret—best of both worlds. Think of it as a classic moist zucchini bread transformed into a luscious cake with a swirl of cream cheese running through the center. It’s essentially a marriage of zucchini bread and a cheesecake vibe, but so much easier to whip up. The name might sound fancy, but it’s really just a simple batter with grated zucchini mixed in, topped with a decadent cream cheese mixture, then swirled right before baking. The idea of adding zucchini might throw some people off, but I promise it’s a game-changer—moisture-rich, tender, and subtly sweet, with just enough vegetable to make it feel healthier without losing that rich cake texture. The swirl of cream cheese is what makes this a little more luxe—perfect for brunch, snacktime, or even dessert. It’s kind of like a hidden gem—one that your family will ask for again and again.
Why you’ll love this recipe?
What I love most about this zucchini & cream cheese swirl cake is how it balances everything I look for in a cozy bake. First, the flavor profile is incredible—fresh zucchini keeps it light and subtly sweet, while the cream cheese swirl adds that tangy, indulgent punch. The smell alone when this is baking is enough to turn anyone into a die-hard fan. Plus, it’s surprisingly simple. You just need one bowl for the batter, a few ingredients, and minimal fuss. My kids actually ask for this all the time, and I’ve even made it for friends who aren’t big veggie eaters—they never guess there’s zucchini baked right into the cake. Cost-wise, it’s budget-friendly because the ingredients are pantry staples: flour, sugar, eggs, and zucchini, which I always have in my fridge. And the versatility is what really seals the deal—serve it sliced with a dusting of powdered sugar, drizzle with a simple glaze, or just enjoy it as is. It’s perfect for breakfast, brunch, or a cozy snack with coffee, and the fact that it’s so adaptable makes it a pantry hero. Honestly, what I love most is how it feels like a little homemade hug—simple, comforting, and totally delicious.
How do you make Zucchini & Cream Cheese Swirl Cake?
Quick Overview
This cake comes together fast, which is what makes it such a weekday hero. You’ll start by preheating your oven and preparing your pan—trust me, using parchment makes everything smoother. Then, whisk together the dry ingredients; in another bowl, mix the wet ingredients, including some grated zucchini that I always squeeze out a little excess water from so it doesn’t make the batter too runny. Mix everything together gently—don’t overmix or the cake gets tough. While the batter is getting cozy, whip up a simple cream cheese filling, which you’ll swirl into the batter right before baking. Bake it until a toothpick comes out clean and the house smells like a bakery. Cool it adequately—this is key—then drizzle with glaze or dust with powdered sugar, and you’re ready to dig in. It’s honestly foolproof once you get the hang of that swirl—you want it to be gorgeous, but also so tasty that no one cares about Instagram-perfect presentation!
Ingredients
For the Main Batter:
– 2 cups all-purpose flour (or whole wheat for a nuttier taste)
– 1 1/2 teaspoons baking powder
– 1/2 teaspoon baking soda
– 1/4 teaspoon salt
– 1 teaspoon ground cinnamon (if you love a spicy hint)
– 1/2 cup packed light brown sugar
– 1/2 cup granulated sugar
– 1/2 cup vegetable oil or melted butter
– 3 large eggs
– 1 teaspoon vanilla extract
– 1 1/2 cups grated zucchini (squeeze out excess moisture for a better batter)
For the Filling:
– 4 oz cream cheese (softened)
– 1/4 cup powdered sugar
– 1 teaspoon vanilla
– Optional: zest of 1 lemon for brightness
For the Glaze:
– 1/2 cup powdered sugar
– 1-2 teaspoons milk or lemon juice
– A few drops of vanilla flavor (or almond extract if you like this stronger)
Step-by-Step Instructions
Step 1: Preheat & Prep Pan
Set your oven to 350°F (175°C). Line a loaf pan or an 8-inch square baking dish with parchment paper—this makes removal so much easier—and give it a light spray if you want an extra non-stick boost. I always do this when I’m making a dessert I love, so nothing sticks or tears apart.
Step 2: Mix Dry Ingredients
In a large bowl, whisk together the flour, baking powder, baking soda, salt, and cinnamon. This step ensures everything is evenly distributed, preventing clumps and helping your cake rise beautifully. I always do this first so I don’t forget—which I’ve definitely done—trust me, it’s worth the little extra effort.
Step 3: Mix Wet Ingredients
In a separate bowl, beat the eggs with the sugars, then add the oil and vanilla. Mix until smooth—this might take a minute or two—then stir in the grated zucchini. I squeeze out the zucchini in a kitchen towel or paper towel just to remove excess moisture, or else the batter turns out a little too wet and sticky, which messes with baking time. Once everything is combined, you’ll notice the batter is thick but pourable.
Step 4: Combine
Add the wet ingredients to the dry, gently folding until just combined. Overmixing makes this cake dense, and nobody wants that! The batter should look moist and thick but not gloopy. This is when I add a few extra shreds of zucchini on top for a little surprise in every bite.
Step 5: Prepare Filling
Mix the softened cream cheese with powdered sugar, vanilla, and lemon zest if using. Whip it for about a minute until smooth. It should be creamy but still hold shape. I like to taste a tiny bit—trust me, a little more vanilla or lemon can lift the whole flavor.
Step 6: Layer & Swirl
Pour about half the batter into your prepared pan, then dollop spoonfuls of the cream cheese mixture on top. Use a skewer or a butter knife to swirl the cheese into the batter—don’t overdo it, just a few swirls and you’ll get that gorgeous marbled effect. Repeat with the rest of the batter, and swirl again for the perfect visual pattern.
Step 7: Bake
Pop it in your oven and bake for 45-50 minutes. Keep an eye on it around the 45-minute mark—insert a toothpick in the center, and if it comes out clean, it’s done! The top should be a lovely golden brown. Ovens vary, so I always check a minute or two early just in case.
Step 8: Cool & Glaze
Let the cake sit in the pan for about 15 minutes, then transfer it to a wire rack. Cool completely before glazing—this prevents the glaze from melting or sliding off. Mix your powdered sugar with milk or lemon juice to get a glossy, slightly thick consistency, then drizzle generously over the cooled cake. Alternatively, a dusting of powdered sugar is simple and pretty.
Step 9: Slice & Serve
Use a sharp knife—preferably warmed a little under hot water—then wipe clean between cuts for perfect slices. Serve it on a pretty plate, maybe with a sprig of mint or a handful of fresh berries. I love it slightly warm with a dollop of whipped cream, but honestly, cold or at room temperature works equally well.
What to Serve It With
This cake is so versatile—my family loves it as a cozy breakfast, paired with hot coffee and a smear of butter. For brunch, I like serving it with fresh fruit and a drizzle of honey, maybe a splash of sparkling water on the side. It’s a hit after dinner, too—cut a slice and add some vanilla ice cream or whipped cream, and it becomes a mini cheesecake. If you’re just craving a quick snack, a simple cup of tea and a small square of this cake is pure comfort. I’ve even taken leftovers to picnics—trust me, it keeps well and tastes even better the next day, thanks to the flavors settling in together. The kids love it warm, and I’ve learned to prepare the batter early—then bake almost on demand.
Top Tips for Perfecting Your Zucchini & Cream Cheese Swirl Cake
After making this a dozen times, I’ve picked up a few tricks. First, squeezing out excess moisture from the zucchini is key—trust me, a soggy cake is no fun. I like to do it in a clean kitchen towel, pressing out the water until the zucchini feels just a little drier. Second, don’t overmix once you combine wet and dry ingredients; a gentle fold is all it takes to keep that tender crumb. When swirling the cream cheese, I suggest dropping spoonfuls randomly and then using a skewer or toothpick to create a beautiful marbled pattern—this looks pretty and makes each slice feel special. If you want to switch things up, try adding a handful of chopped nuts or blueberries into the batter before baking. I’ve also tested baking at a slightly lower temperature (340°F) for a longer time, which produces an incredibly moist cake with a tender crumb. For the glaze, I love adding a splash of vanilla or a sprinkle of cinnamon to the sugar and milk—it makes a simple topping feel extra special. The biggest lesson I’ve learned is to cool the cake thoroughly before glazing or slicing—rushing this step can cause cracking and mess up those beautiful swirls. I’ve also tested this with almond milk, and honestly, it made the cake slightly richer and creamier. This recipe is forgiving, flexible, and perfect for experimenting—so don’t be afraid to make it your own!
Storing and Reheating Tips
This cake keeps really well and is actually better the next day, so don’t worry if you can’t eat it all immediately. At room temperature, it’s best enjoyed within 1-2 days—cover tightly with foil or store in an airtight container. I find that wrapping it well keeps it moist and fresh. If I want to keep it longer, the fridge is a good call—just make sure to bring it to room temperature before slicing to keep that tender crumb. For longer storage, I wrap slices individually in plastic wrap and freeze—perfect for a quick snack later on. Thaw at room temperature or in the microwave for about 20 seconds—trust me, there’s nothing quite like a half-thawed slice with a hot cup of coffee. If you’ve glazed it, I recommend adding the glaze after reheating because it sets better and looks prettier when freshly applied. I’ve learned that this cake also travels well if wrapped carefully—great for bringing to potlucks or family visits. The key is to keep it well wrapped so it doesn’t dry out or pick up fridge odors. It’s honestly a flexible, forgiving treat that tastes just as good as the day it’s baked.
Frequently Asked Questions
Final Thoughts
Honestly, this zucchini & cream cheese swirl cake has become a favorite in my house because it’s so much more than just a quick dessert—it’s cozy, a little fancy, and so versatile that I find myself making it all year round. The combination of moist zucchini and that creamy swirl is just irresistible, and I love how easy it is to adapt—adding nuts, berries, or even a splash of liqueur if I want to get fancy. I also love that it’s a sneaky way to get more veggies into my family without anyone batting an eye. Whether you’re baking it for brunch, a weekend treat, or just because you’re craving something sweet but not overly decadent, I promise this one will become a go-to. I’d love to hear how yours turns out—leave a comment or tag me on socials if you try it. Happy baking, and enjoy every bite of this simple, soulful cake—you deserve it!
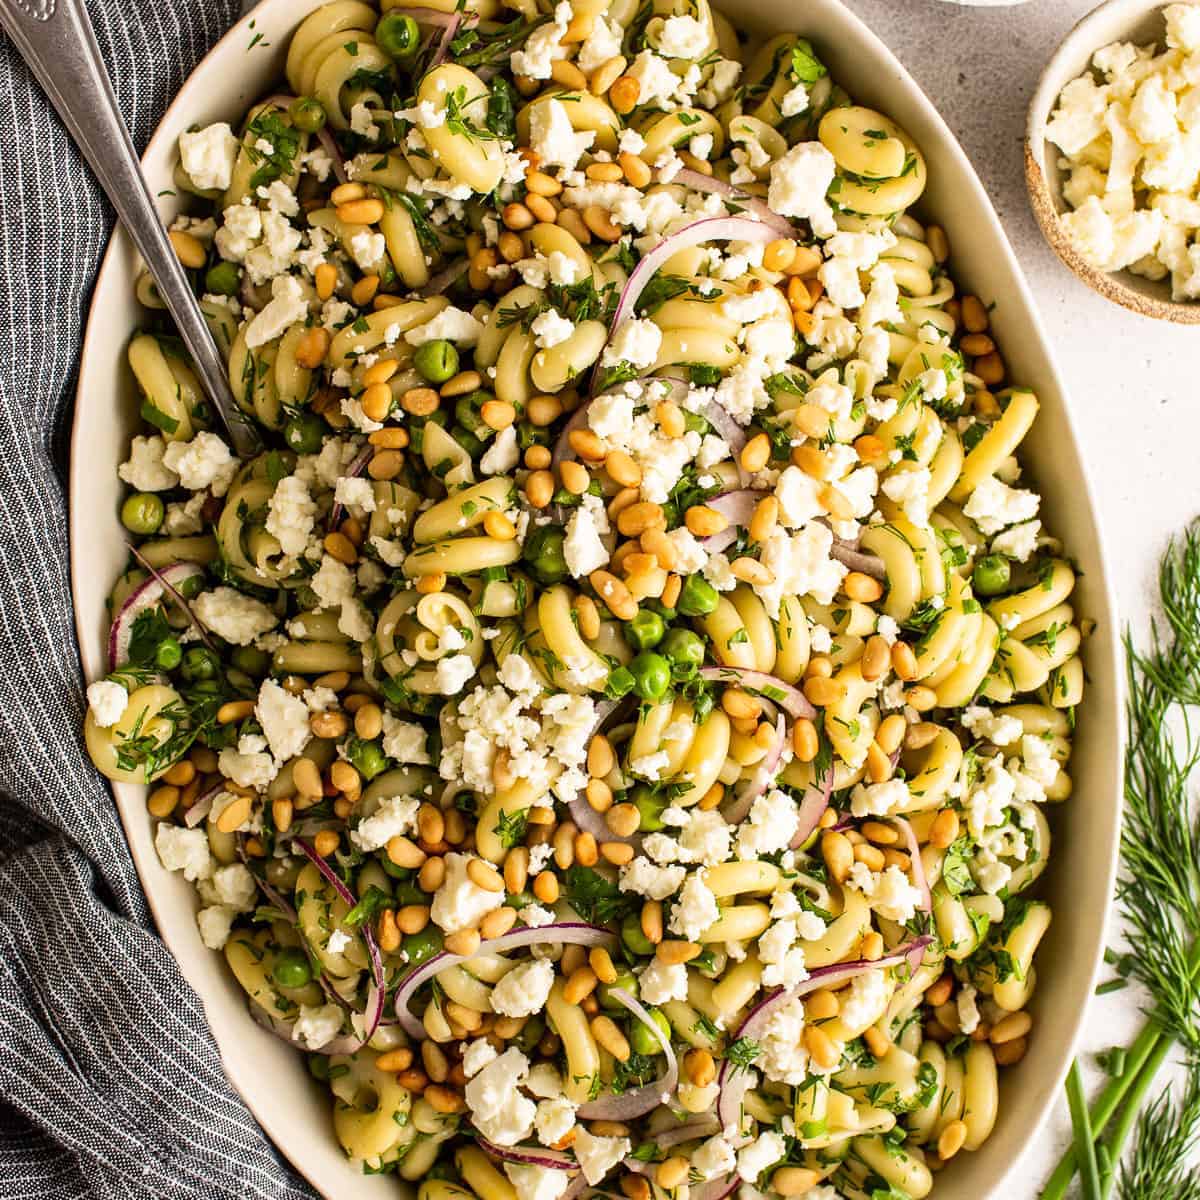
garlic lemon pasta salad
Ingredients
Method
- Bring a large pot of salted water to a boil. Add the pasta and cook until al dente.
- Strain the pasta and rinse with cold water until the pasta is cold. Let sit to drain excess water.
- Heat olive oil in a small skillet over medium/high heat.
- Add minced garlic to the skillet; sprinkle with ¼ teaspoon salt and toss. Sauté for 4-5 minutes until browned. Remove from heat and cool.
- Whisk rice vinegar, red wine vinegar, lemon juice, dijon mustard, honey, and mayo in a bowl until combined. Add lemon zest and remaining salt.
- Slowly pour cooled garlic oil into dressing while whisking.
- Add cooled pasta to a large bowl. Pour dressing over and toss to coat.
- Add herbs, red onion, peas, feta, pine nuts, and pepper. Toss again.
- Top with feta crumbles, toasted pine nuts, and freshly ground pepper.
- Serve immediately or refrigerate to chill.