How to Make Delicious Marzipan Toffee Bites
If I’m honest, my love for zucchini coffee cake started almost by accident. One rainy Sunday, I raided my fridge and noticed a handful of zucchini lingering from last week’s garden harvest—perfect for sneaking into something sweet, right? I’ve always loved the idea of turning vegetables into desserts — it sounds so rebellious but totally genius. The smell of fresh zucchini baking with cinnamon and brown sugar is one of those nostalgic scents that instantly takes me back to Sunday mornings at grandma’s house. And let me tell you — this zucchini coffee cake is pretty much my family’s new favorite. My kids ask for this all the time, especially when they want a treat that feels indulgent but isn’t loaded with guilt. It’s kind of like a warm hug in cake form, and I promise, once you try it, it’ll be on your regular rotation too. Trust me on this one — it’s a lifesaver on busy nights when I need something quick, comforting, and secretly healthy enough for my kids to accept.
What is Zucchini Coffee Cake?
Think of zucchini coffee cake as the lovechild of a cinnamon swirl muffin and a moist, tender cake. It’s essentially a fluffy batter infused with grated zucchini—think of it as sneaking a veggie into your breakfast without anyone noticing—dressed up with a swirl of cinnamon sugar that melts into every bite. Named because it pairs perfectly with a steaming cup of coffee or tea, this cake is more than just a snack; it’s comfort food that’s surprisingly easy to make. The zucchini keeps the cake extra moist and tender, making every slice feel decadent yet light enough that you don’t feel like you’re overloading on sugar. It’s sort of like a humble veggie hiding a secret — because honestly, once it’s baked, nobody can tell it’s there, but everyone loves how soft and flavorful each piece is. Think of it as a way to start your day with a slice of something nearly guilt-free but still completely satisfying.
Why you’ll love this recipe?
One of the things I love most about this zucchini coffee cake is how it magically balances flavor, texture, and simplicity. The first time I made it, I was amazed at how the zucchini disappeared into the batter—no gritty bits, just pure moistness that makes every bite melt in your mouth. The cinnamon swirl adds just enough spice to make it feel special, without being overpowering. Plus, it’s a real showstopper for breakfast or brunch — and I swear, it makes the house smell like heaven. What’s more, it’s incredibly budget-friendly. The ingredients are staples I always keep on hand—flour, sugar, zucchini, cinnamon—and it’s perfect when you want something quickly after a hectic day. I’ve tested it with various modifications, like replacing half the oil with applesauce or adding chopped walnuts for crunch, and it always turns out beautifully. This one’s a true multitasker: perfect for breakfast, a casual snack, or even as a dessert for a get-together. Trust me, once you make this a few times, your family will be requesting it on repeat. It’s a classic in the making, for sure.
How do I make Zucchini Coffee Cake?
Quick Overview
This zucchini coffee cake is about as fuss-free as it gets. You start by preheating your oven, then mix the dry ingredients in one bowl and the wet in another. After that, it’s just a matter of folding everything together—don’t overmix, or you’ll get a dense cake instead of that light, airy crumb we’re aiming for. While the batter rests for a few minutes, I usually prepare my cinnamon sugar swirl — a simple combo of cinnamon, brown sugar, and melted butter. Pour half of the batter into your greased pan, sprinkle with the cinnamon swirl, then add the remaining batter on top and swirl gently with a knife to create pretty ribbons of cinnamon goodness. Bake until the top is golden and a toothpick inserted in the center comes out clean. Once cooled a little, I drizzle with a simple glaze or dust with powdered sugar. Easy, flavorful, and totally addictive.
Ingredients
For the Main Batter:
– 2 cups all-purpose flour (I like using unbleached for flavor)
– 1 ½ teaspoons baking powder
– ½ teaspoon baking soda
– ¼ teaspoon salt
– 1 teaspoon cinnamon (because cinnamon makes everything better)
– ¾ cup granulated sugar
– ½ cup brown sugar
– ½ cup vegetable oil (or melted coconut oil for a tropical twist)
– 2 large eggs
– 1 teaspoon vanilla extract
– 1 cup grated zucchini (squeeze out excess moisture—trust me on this)
For the Filling:
– ¼ cup brown sugar
– 1 tablespoon cinnamon
– 2 tablespoons melted butter (for stirring into the sugar)
*(Optional: add chopped walnuts or raisins here)*
For the Glaze:
– ½ cup powdered sugar
– 1-2 teaspoons milk (or almond milk)
– A drop of vanilla extract or lemon juice for zing
*(Adjust for your preferred drizzle consistency)*
Step-by-Step Instructions
Step 1: Preheat & Prep Pan
I always do this first — set my oven to 350°F and grease a 9-inch springform pan or square baking dish. Lining it with parchment paper makes removal a breeze. If you forget this step, the cake might stick — and nobody wants that. While the oven warms up, grate your zucchini and give it a good squeeze with a clean towel or paper towel to remove excess moisture. Moist zucchini is what keeps this cake so moist and tender, but too much water can make it dense, so don’t skip this part.
Step 2: Mix Dry Ingredients
In a medium bowl, whisk together the flour, baking powder, baking soda, salt, and cinnamon. I do this just to make sure everything is evenly distributed — trust me, this small step makes the batter come out perfectly fluffy. Set this aside and get ready for the wet ingredients.
Step 3: Mix Wet Ingredients
In a large bowl, whisk the eggs, sugar, and brown sugar until smooth and fragrant. Then add the oil and vanilla, whisking until combined. I prefer using a warm vanilla bean or a splash of almond extract sometimes, just to boost the flavor. Now, fold in the grated zucchini. It might look a little shaggy at first, but keep going—it all comes together beautifully.
Step 4: Combine
Pour the dry ingredients into the wet, mixing gently with a spatula just until you see no more flour streaks. Don’t overmix — this is the secret to that light crumb. Overmixing can create a dense cake, and nobody wants heavy slices when we’re aiming for tender bites. When it’s combined, the batter should be thick but scoopable.
Step 5: Prepare Filling
In a small bowl, mix together the brown sugar, cinnamon, and melted butter. If you’re adding nuts or raisins, fold them in here. This cinnamon sugar swirl is what makes each slice so fragrant and sweet—kind of like the cinnamon rolls of your childhood, but way easier.
Step 6: Layer & Swirl
Pour half of the batter into your prepared pan, spreading it evenly. Sprinkle half of the cinnamon sugar mixture over, then add the remaining batter on top. Use a butter knife or skewer to swirl the cinnamon through the batter, creating pretty ribbons. This marbling effect is what makes this cake look as gorgeous as it tastes. It’s a little messy, but trust me—those swirls make the flavor pop.
Step 7: Bake
Place the cake in your preheated oven and bake for about 35-40 minutes. The top should be golden and a toothpick inserted in the center should come out clean. If the edges brown too quickly, tent it with foil and keep baking. Every oven is different, so start checking around 35 minutes. Once done, let it cool in the pan for 10-15 minutes. This rest period helps everything set nicely before you remove it.
Step 8: Cool & Glaze
Transfer your cake to a wire rack and cool completely before glazing — this prevents the glaze from melting off. Mix your powdered sugar with milk and vanilla until smooth. Drizzle it over the cooled cake; I love to use a spoon or a piping bag if I’m feeling fancy. The glaze adds a touch of sweetness and a glossy finish that really makes it Instagram-worthy.
Step 9: Slice & Serve
Use a sharp serrated knife to cut beautiful slices, wiping it clean between cuts for the perfect presentation. Serve warm or at room temperature. I actually love this cake the next day — the flavors really develop overnight. Pair it with a steaming cup of coffee, and you’ve got a winning breakfast or brunch treat that’s hard to beat.
What to Serve It With
This zucchini coffee cake is so versatile, I could go on forever about pairing options. For breakfast, I love pairing it with a hot cup of coffee—anytime I bake this, my kitchen fills with that irresistible aroma. The smell alone brings everyone to the table. It’s also fantastic for brunch, perhaps with a dollop of whipped cream or a handful of fresh berries on the side. As a dessert, I sometimes serve slices warm with a scoop of vanilla ice cream or a drizzle of caramel sauce—my kids think it’s a decadent treat that’s still healthy-ish, and honestly, I don’t argue. For a cozy snack, it’s perfect with a mug of herbal tea or even a glass of cold milk. Honestly, once you make this a few times, you’ll find it’s a clearest winner for any occasion—treating friends, family, or just yourself on a lazy weekend afternoon.
Top Tips for Perfecting Your Zucchini Coffee Cake
Over the years, I’ve picked up a few tricks that make this cake turn out perfectly every time. First off, always squeeze out as much moisture from your zucchini as possible—it makes all the difference, or you’ll end up with a soggy crumb. I like to grate the zucchini, then set it in a paper towel or clean dish towel and give it a good squeeze, almost like wringing out a sponge. It only takes a minute but really improves the texture. Second, don’t overmix once you add the flour — a few lumps are okay! Overmixing can develop gluten and lead to a dense, rubbery cake, and nobody wants that. When swirling in the cinnamon sugar, use a gentle figure-eight pattern to get beautiful streaks without mixing everything together into a muddy mess. Want to make it healthier? I’ve swapped out half the oil for applesauce, and it stays so moist. I also tested different fillings—adding chopped walnuts or a handful of blueberries, both work beautifully, giving a different twist each time. If you’re baking for kids, keep the sugar a little lower or add a pinch more cinnamon for a cozy, spicy punch. Remember, baking is all about balance and personalization—once you get the hang of it, you’ll can adapt this cake to your taste perfectly. The key is measuring carefully, but not stressing when you deviate — sometimes a little improvisation turns out the best.
Storing and Reheating Tips
This cake is actually better the next day, once the flavors meld. Keep leftovers in an airtight container at room temperature if you plan to eat it within two days. I cover it loosely with foil or plastic wrap — just enough to keep it fresh but not so tight that it traps moisture. For longer storage, pop it in the refrigerator for up to four days. To keep it extra moist, I sometimes wrap individual slices tightly in foil before refrigerating. If you want to freeze it, wrap the whole cake (or slices) in plastic wrap and aluminum foil—this keeps it fresh for up to three months. Just make sure to thaw it at room temperature or gently reheat in the oven. If it’s been in the fridge, warm a slice in the microwave for about 20 seconds or until just warmed through. If you’re adding the glaze later, do that just before serving, so it stays shiny and fresh.
Frequently Asked Questions
Final Thoughts
This zucchini coffee cake is one of those recipes that makes me feel good every time I bake it. It’s simple, cozy, and adaptable — perfect for busy mornings or lazy weekend afternoons. I love how the zucchini keeps it moist and the swirl of cinnamon adds that warm, inviting aroma. Over the years, I’ve tweaked this recipe and made it my own, adding nuts here, swapping sugars there, and always finding joy in its forgiving nature. If you’re looking for a way to sneak in some extra veggies without sacrificing flavor, I promise this will become a staple in your home too. The best part? It disappears pretty quickly — I always do a double batch now! My hope is that you’ll enjoy baking this as much as I do, and maybe even get your family excited to see the oven door open. Happy baking — can’t wait to hear how yours turns out! And remember, food is about sharing love, stories, and a little bit of magic — so don’t forget to leave a comment or share your twists on this recipe. Cheers to good, honest baking from the heart!
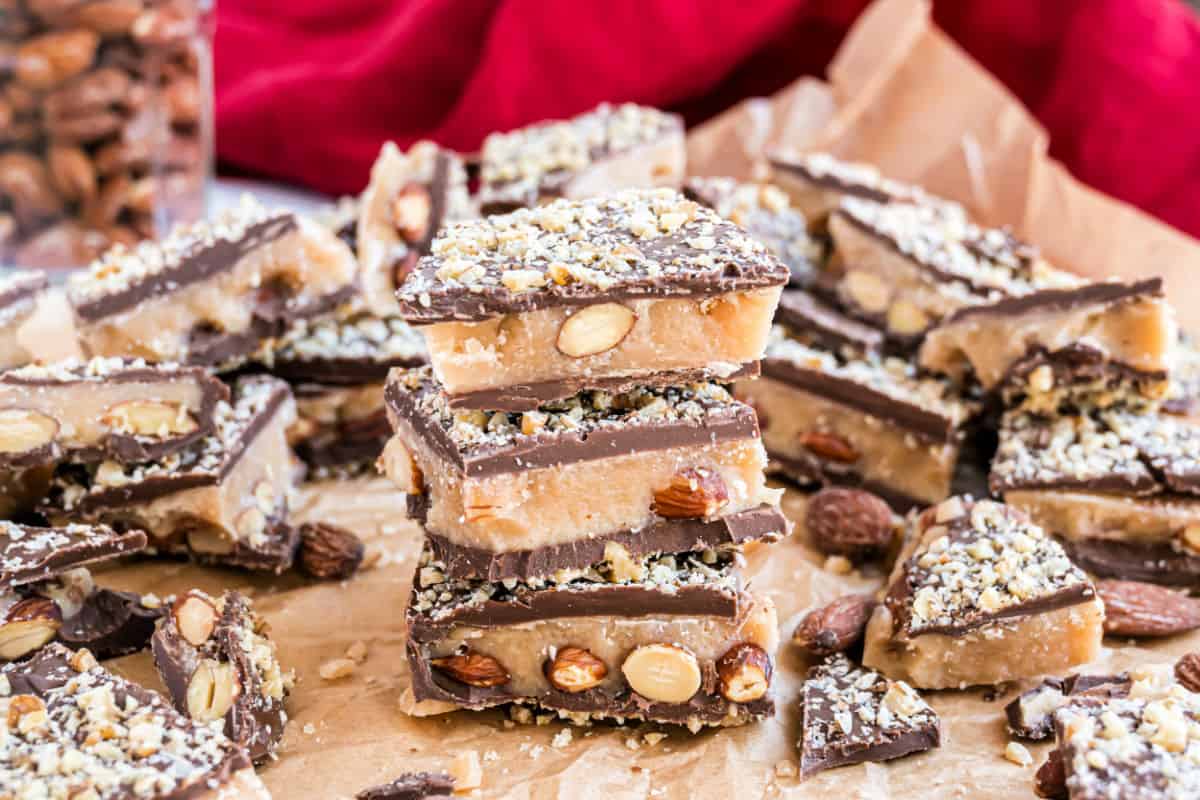
almond toffee
Ingredients
Method
- Arrange almonds in a single layer on a foil-lined baking dish or in a silicone brownie bite pan. Set aside.
- Combine butter, margarine, sugar, salt, and vanilla extract in a heavy pan. Cook over medium-high heat, stirring constantly until butter melts and mixture boils.
- Continue boiling and stirring for an additional 5-7 minutes until the candy turns the color of almonds, about 300 degrees. Pour over almonds and quickly transfer to each cavity of the brownie bite pan if using.
- Let the toffee cool completely, about 2 hours.
- Spread melted chocolate over the cooled toffee. Sprinkle with ground walnuts. Allow the chocolate to set before serving or storing.