Savory Mushroom Swiss Pasta Recipe
Sometimes I catch myself reminiscing about those cozy mornings in my grandma’s kitchen, the smell of warm baked goods filling the air, blending the earthiness of zucchini with the sweet aroma of ripe bananas. That comfort, that sense of home, is what I chase every time I make this zucchini banana bread. It’s honestly like a hug in loaf form — moist, tender, and bursting with flavor. I always do this when I need a little pick-me-up or want to impress friends without much fuss. My kids ask for this all the time — they say it’s “better than any store-bought snack” — and honestly, I can’t blame them. It’s surprisingly easy to make, even on busy weeknights, and it disappears in minutes at my house. Plus, I love sneaking in a little extra veggie power that somehow makes everyone feel virtuous while indulging. If you haven’t tried zucchini in bread before, trust me on this one: it’s a game-changer that will keep you coming back for more, slice after slice.
What is Moist Zucchini Banana Bread with a Sweet Cinnamon Swirl?
Think of this as a little twist on classic banana bread — with zucchini making it irresistibly moist and a hint of cinnamon adding that warm, cozy flavor everyone loves. It’s essentially a loaf that combines the subtle earthiness of zucchini with the tropical sweetness of bananas, all topped with a beautiful cinnamon swirl that’s just enough to give it that bakery-style flair. The name might sound fancy, but it’s really a simple homemade treat. I first started making this when the garden was overflowing with zucchinis, and I wanted to find a way to use them up without turning everyone’s taste buds upside down. The idea was to create bread that’s hearty yet tender, slightly sweet but balanced with the natural flavors of the ingredients. Over the years, I’ve tinkered with it — reducing sugar here, adding a touch of vanilla there — but the core remains the same: comfort in every bite, made with love and a little kitchen magic.
Why you’ll love this recipe?
What I love most about this zucchini banana bread is how it hits that sweet spot between indulgence and nourishment. The flavor? Absolutely heavenly. The bananas lend a rich, caramelized sweetness, while the zucchini keeps it super moist — I swear, this bread stays tender for days (not that it lasts that long at my house!). It’s surprisingly simple to whip up; no fancy equipment or complicated techniques needed. Just a bowl and a spatula, and you’re good to go. Plus, it’s budget-friendly — a lot of the ingredients are staples most of us keep on hand, and the zucchini almost feels like a bonus. You can customize it in so many ways: add nuts, toss in some chocolate chips, or skip the glaze altogether if you’re feeling more wholesome. What really makes this recipe stand out is how versatile it is. My kids love it as a quick breakfast, and I often serve it with coffee for over-the-top lazy brunches. It’s perfect for teatime, after-school snacks, or even as a dessert when you want something a little more special. Honestly, I keep coming back to it because it’s just that good — soft, flavorful, and irresistibly cozy.
How do I make Moist Zucchini Banana Bread with a Sweet Cinnamon Swirl?
Quick Overview
This zucchini banana bread is as easy as mixing a few basic ingredients, layering in a cinnamon sugar mixture, and baking until golden. I love how forgiving it is — even if you overmix slightly or scoop too much batter into the pan, it still turns out perfectly moist and tender. The key is to not overbake; you want it just done so it stays beautifully moist, not dry. I tested this with a handful of variations, like swapping almond flour or adding walnuts, and it still comes out great — that’s what makes it a real kitchen staple. Plus, the swirl of cinnamon gives it a little extra wow factor, making each bite both cozy and a bit indulgent. Trust me, this one’s a lifesaver on busy nights when you want something homemade that feels special but takes almost no effort.
Ingredients
For the Main Batter:
- 2 cups grated zucchini (about 2 small zucchinis, shredded and well-drained)
- 3 ripe bananas, mashed (the riper, the better — they add amazing sweetness)
- 1/2 cup vegetable oil or melted coconut oil
- 1/2 cup honey or maple syrup (for that touch of natural sweetness)
- 3 large eggs
- 1 teaspoon vanilla extract
- 2 1/2 cups all-purpose flour (or gluten-free blend if you prefer)
- 1 teaspoon baking soda
- 1 teaspoon baking powder
- 1/2 teaspoon salt
- 1 teaspoon cinnamon (plus extra for the swirl)
For the Filling (Cinnamon Sugar Mixture):
- 1/4 cup packed brown sugar
- 2 teaspoons ground cinnamon
For the Glaze (Optional):
- 1/2 cup powdered sugar
- 1-2 teaspoons milk or cream
- 1/4 teaspoon vanilla extract
Step-by-Step Instructions
Step 1: Preheat & Prep Pan
Set your oven to 350°F (175°C). Lightly grease a loaf pan with butter or non-stick spray, then line it with parchment paper if you like. This helps with neat removal. I always do this because I hate struggling to get the crust off in one piece. Keep your zucchinis handy, and grate them finely — squeezing out excess moisture is key to avoiding a soggy bread.
Step 2: Mix Dry Ingredients
In a bowl, whisk together the flour, baking soda, baking powder, salt, and cinnamon. This step ensures everything’s evenly distributed. I’ve made the mistake of scooping in everything at once — it’s better to do this first so your baking soda doesn’t clump or settle.
Step 3: Mix Wet Ingredients
In a separate large bowl, mash the bananas until smooth. Add the eggs, oil, honey, and vanilla — whisk until everything’s combined and a little frothy. The bananas give it a nice natural sweetness and moisture. I always test the temperature of the eggs beforehand because cold eggs can make the batter lumpy. To speed things up, I sometimes use a hand mixer for this step, but a regular whisk works perfectly too.
Step 4: Combine
Gradually fold the dry ingredients into the wet mixture, just until everything is combined. Be careful not to overmix — a few lumps are okay. Overmixing can make the bread tough, and nobody wants that!
Step 5: Prepare Filling
Mix the brown sugar and cinnamon together in a small bowl. This will be layered in the batter for a lovely swirl. I often add chopped nuts or chocolate chips here if I’m feeling playful. I’ve learned that sprinkling the cinnamon sugar on top instead of mixing it in gives a prettier, more defined swirl — so try both!
Step 6: Layer & Swirl
Pour half the batter into your prepared pan, then sprinkle half the cinnamon sugar evenly over it. Add the remaining batter on top and carefully swirl a butter knife through the batter to create a marbled effect. Don’t overdo it — you want to see nice streaks, not a complete mash.
Step 7: Bake
Bake for about 50-60 minutes, or until a toothpick inserted in the center comes out clean. My oven runs a bit hot, so I start checking around 48 minutes. If your loaf starts browning too fast, tent it with foil to prevent burning. The smell alone will draw everyone to the kitchen!
Step 8: Cool & Glaze
Allow the bread to cool in the pan for about 15 minutes, then transfer to a wire rack. Drizzle with the glaze if you like a little extra sweetness — mix powdered sugar, milk, and vanilla until smooth. I prefer to do this once the bread is cool, so the glaze doesn’t melt away too quickly. Trust me, a little drizzle makes it look bakery-fancy!
Step 9: Slice & Serve
Slice with a serrated knife for clean cuts. Serve warm or at room temperature; I love it toasted the next day with a pat of butter. It’s great with a cup of coffee or a glass of cold milk. Honestly, nothing beats that first bite — moist, fragrant, with that cinnamon swirl peeking through. Double or triple the batch, and watch it disappear fast.
What to Serve It With
This bread is so versatile, I often serve it in a bunch of different ways. For a cozy breakfast, pair slices with a dollop of Greek yogurt or a smear of nut butter — it’s perfect with my morning coffee. On brunch days, I love serving it alongside fresh fruit and a hot cup of tea or a spiced chai latte. My family’s favorite way to finish it? Toasted with a little butter and honey — trust me, it’s dangerously addictive. Sometimes I warm a slice and spread cream cheese on top for an afternoon snack. It’s also fantastic as a light dessert, perhaps with a dollop of whipped cream or a scoop of vanilla ice cream on the side. Regardless of how you enjoy it, this bread always makes the moment feel special, like a tiny celebration of comfort and home cooking.
Top Tips for Perfecting Your Moist Zucchini Banana Bread with a Sweet Cinnamon Swirl
After making this countless times, I’ve learned a few tricks to elevate it from good to downright addictive:
- Zucchini Prep: Always squeeze out excess moisture after grating. Moisture is the enemy of a good loaf—it can make it dense or gummy. I use a clean kitchen towel or paper towels to gently press and get rid of extra water. Fresh zucchini works best, but frozen and thawed will do if you squeeze well.
- Mixing Advice: Overmixing is a common pitfall. When combining wet and dry, fold gently until just incorporated. Look for a slightly lumpy batter; that’s a good sign you haven’t overdone it.
- Swirl Customization: Don’t be shy with your cinnamon sugar — sprinkle generously for more variation. To get distinct swirling patterns, add the cinnamon mixture in layers and use a toothpick or skewer to create ribbons.
- Ingredient Swaps: I’ve tested swapping half the flour with whole wheat or almond flour — just adjust the liquid slightly, as these tend to absorb more moisture. For a dairy-free version, coconut oil and plant-based milk work beautifully.
- Baking Tips: Ovens vary; start checking around 48 minutes. Insert a toothpick in the center — if it comes out with moist crumbs, give it a few more minutes. Cooling in the pan for 15 minutes allows the loaf to set, making slicing neater.
- Glaze Variations: For a coconut version, mix powdered sugar with a splash of coconut milk and a sprinkle of toasted coconut flakes on top. It adds a tropical twist that everyone loves!
Trying different techniques and ingredients has helped me make this bread consistently perfect. Don’t be discouraged if it’s a little off at first — every bake is a learning experience. The key is to keep the batter moist, not overmix, and watch your baking time.
Storing and Reheating Tips
This bread is best enjoyed fresh, but it keeps nicely for a couple of days. Wrap it tightly in plastic wrap or store in an airtight container at room temperature for up to two days. After that, pop it in the fridge — just be aware it might get a little denser but still keep that moistness. To extend its life, freeze slices individually wrapped for up to three months. Thaw at room temperature or warm gently in the microwave. If you’re adding glaze or frosting, do so just before serving — that way it stays glossy and inviting. I’ve learned that if you plan to reheat, a quick warm-up in the oven at 350°F for 10 minutes keeps it nice and fresh. Never microwave for too long, or the bread can turn rubbery. For maximum moistness, I sometimes toast slices lightly before serving — it transforms the texture and brings out the aroma even more.
Frequently Asked Questions
Final Thoughts
This zucchini banana bread is one of those recipes I keep coming back to because it’s just that good — comforting, moist, and bursting with flavors that remind me of home. Whether I’m making it for a quick breakfast, a family gathering, or just to keep my kids happy after school, it’s always a hit. I love how adaptable it is, whether you add nuts, berries, or even a splash of citrus. The cinnamon swirl adds a little something extra that elevates it beyond your everyday loaf, making it feel special without any fuss. If you’re new to baking with zucchini, give this a try — I promise it’s easier than it sounds and totally worth it. Happy baking, and I can’t wait to hear how yours turns out! Don’t forget to leave a comment or share your own tweaks — I love getting new ideas from fellow food lovers like you.
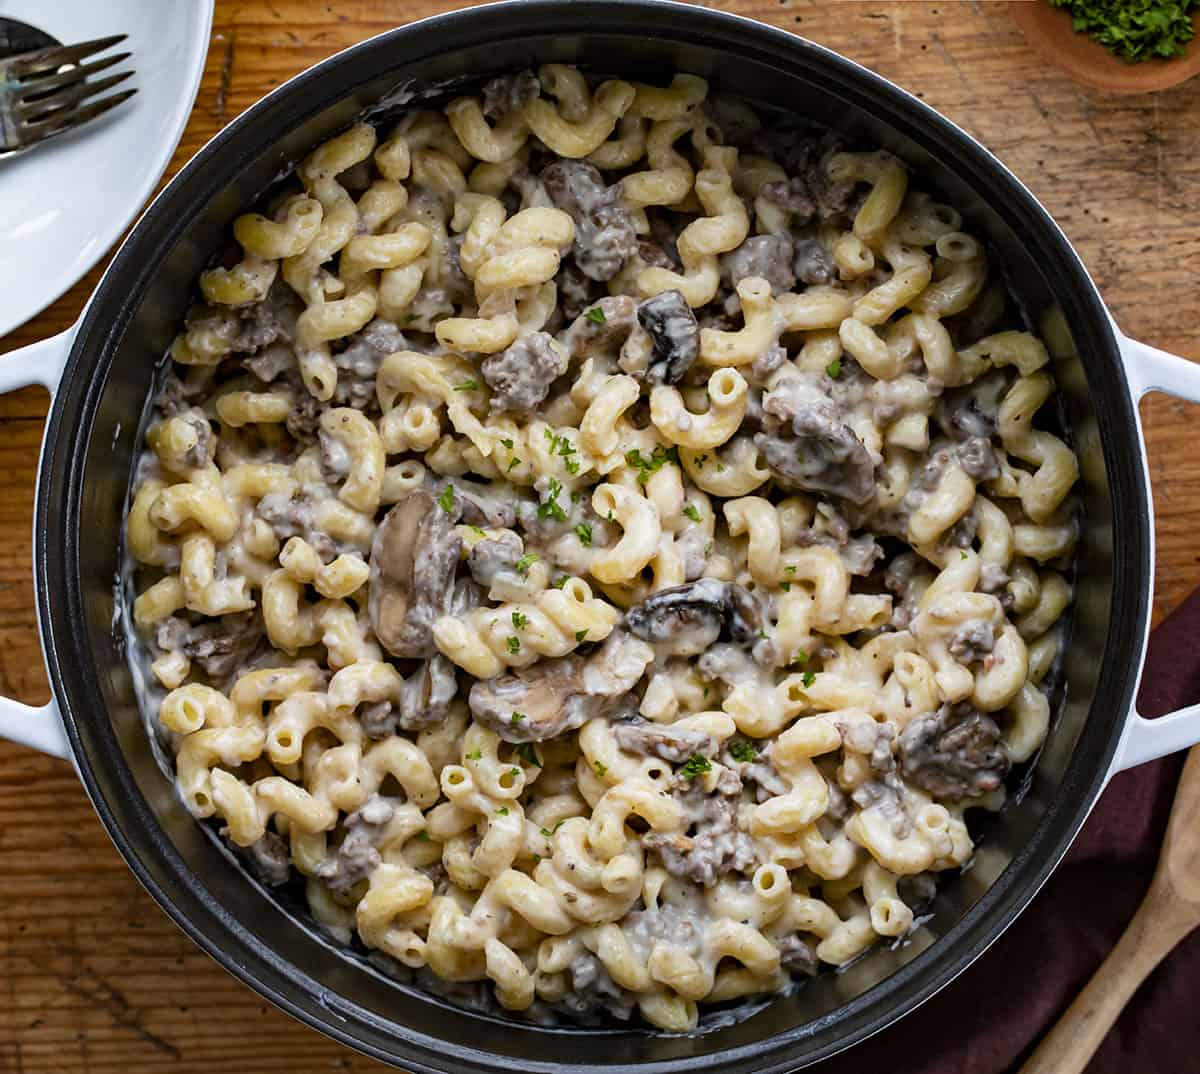
mushroom swiss pasta
Ingredients
Method
- Cook the pasta in a large pot of salted boiling water until al dente, about 9 minutes. Drain and set aside.
- In a large skillet over medium heat, melt 2 tbsp of butter. Add sliced mushrooms and cook for 8-10 minutes until tender and slightly browned. Transfer mushrooms to a small bowl and keep warm.
- In the same skillet, add diced onion and minced garlic. Cook for 3-5 minutes until softened.
- Add ground beef to the skillet along with Worcestershire sauce, seasoned salt, and hamburger seasoning. Cook until beef is no longer pink, about 8-10 minutes. Drain excess grease.
- Stir in cooked mushrooms into the beef mixture and set aside.
- Prepare the cheese sauce: In a saucepan over medium heat, melt 0.5 cup of butter. Whisk in flour and cook for 1-2 minutes until slightly browned. Gradually whisk in milk and cook for 3-5 minutes until thickened. Stir in grated Swiss and mozzarella cheeses until melted. Season with salt and garlic powder.
- Combine cooked pasta with the beef and mushroom mixture. Pour cheese sauce over and stir to combine. Serve immediately.