Autumn Sweetness Best Candy Corn Cookies
If you’re anything like me, you probably have that moment where you’re craving something sweet but don’t want to spend hours in the kitchen. Or maybe you’ve got a bunch of zucchini from the garden or the farmer’s market, and you’re wondering what to do with it before it wilts. That’s when I turn to my favorite Chocolate Zucchini Coffee Cake — it’s basically a cozy hug in dessert form, and you’d never guess how simple it really is to pull together. I always do this when I want a quick treat that feels indulgent but isn’t overly complicated. It’s so good that my kids ask for it all the time, and honestly, I’m happy to indulge because it’s made with ingredients I always keep on hand. Plus, the aroma alone when it’s baking? Everyone in the house just sort of floats toward the oven, like bees to honey. Trust me, this recipe is a true comfort — it’s moist, chocolatey, and packed with zucchini goodness. Perfect for a lazy weekend brunch, an after-dinner sweet, or even part of a casual breakfast. I promise, once you try it, it’s going to be a go-to behind closed doors or for when guests come over unexpectedly. And yes, I’ve made this countless times and never get tired of it—because it’s that kind of special. Ready to get your hands dirty in the best way? Let’s do this!
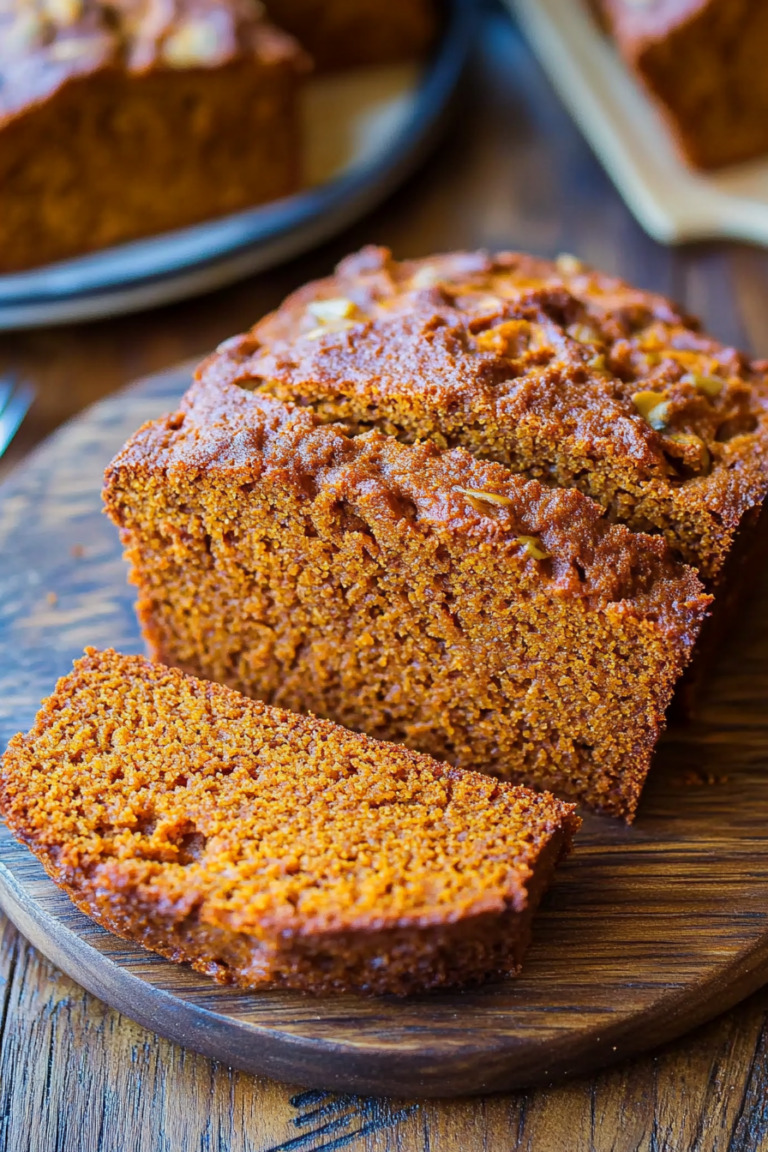
What is chocolate Zucchini coffee cake?
Think of this as the lovechild of a rich chocolate loaf and a morning coffee cake—only it’s secretly packed with zucchini. The name says it all: it’s a cake that was born to be enjoyed with a cup of coffee or tea, and it’s full of moist, tender crumb with swirls of chocolate throughout. The “coffee cake” part is kind of a throwback—it’s about that relaxed vibe, the kind you’d serve at breakfast, brunch, or even dessert. The zucchini? Well, it’s the star in disguise, adding moisture and a touch of health without sacrificing any flavor. I like to think of it as a sneaky veggie that actually makes the cake better. This recipe’s origin is kind of fuzzy — I think of it as a comforting family classic that I’ve tweaked over the years, making it more chocolatey, more moist, and, well, more addictive. It’s essentially a cross between a quick bread and a cake, making it super versatile. The batter is simple enough for a beginner, but the end result looks pretty enough to impress anyone sitting at your table. The thing is, you don’t need fancy ingredients here — just zucchini, cocoa, a few staples, and a love of baking that’s a little playful. It’s basically the perfect way to turn a vegetable into a dessert, and I hope it becomes as beloved in your home as it is in mine!
Why you’ll love this recipe?
What I love most about this chocolate zucchini coffee cake is how it manages to be both indulgent and sneaky healthy at the same time — it’s a tactic I’ve refined after countless bake-offs. The flavor? Oh, it’s decadent. The chocolate swirl runs through every bite, making it irresistibly rich without feeling overly sweet or heavy. The zucchini keeps everything so moist that I’ve learned to cut back on butter or oil pretty significantly. Plus, it’s budget-friendly — I usually have everything in my pantry, and the zucchini is just a bonus. This is one of those recipes that’s perfect for multitasking: it’s quick to put together, forgiving if you miss a beat, and it freezes beautifully. I especially love making it on busy Saturday mornings when I want something special but don’t want to spend hours in the kitchen. The kids love it with a splash of milk or a dollop of whipped cream, and I enjoy a slice with my morning coffee or afternoon tea. And honestly, what really gets me is that the taste surpasses any guilt — it’s moist, with a delicate chocolate flavor, and the zucchini adds a subtle veggie boost. It’s a wonderful way to sneak a little extra nutrition into dessert — my favorite kind of baking! What’s even better? It’s surprisingly versatile—swap the chocolate chips for nuts or add a dash of cinnamon, and you’ve got a whole new twist. Trust me, once you make this, it’ll become a treasured go-to for those “what’s for dessert” moments. My family’s been raving about it for years, and I’ve never once regretted scooping up an extra zucchini at the farmer’s market.
How do I make Zucchini Chocolate Cake?
Quick Overview
This cake basically comes together in one bowl, which is my favorite kind of baking. The batter is a simple mash-up of grated zucchini, cocoa, sugar, eggs, and a few pantry staples. You swirl in the chocolate chips or chunks, pour it into a prepared pan, then bake until golden. The best part? It’s so moist that you’ll want to cut thick slices, and it’s honestly hard to believe how easy it is to get such an impressive result. I love that the zucchini—after a quick squeeze to remove excess moisture—distributes evenly, keeping the cake tender and flavorful. Just a heads-up, the batter will be a little thick; that’s normal. I like to add chopped dark chocolate or mini chips for that melty, gooey goodness. A quick cool, a drizzle of glaze if you’re feeling fancy, and it’s ready to serve. This recipe is flexible enough to tweak—add nuts, switch out the cocoa for a little coffee flavor, or even make muffins if you’re in a rush. And trust me, the smell that fills the kitchen while baking? It’s pure comfort. That’s why I’ve stuck with this recipe for years: reliable, delicious, and a total crowd-pleaser. Let’s get those zucchinis prepped!
Ingredients
For the Main Batter:
- 2 cups grated zucchini (about 2 medium zucchinis, grated and well-drained)
- 1 ½ cups all-purpose flour (or almond flour for a gluten-free twist)
- ¾ cup unsweetened cocoa powder (preferably Dutch-processed for richness)
- 1 cup granulated sugar (can reduce to ¾ cup if you prefer slightly less sweet)
- 2 large eggs, at room temperature
- ½ cup vegetable oil or melted butter
- 1 teaspoon vanilla extract
- 1 teaspoon baking powder
- ½ teaspoon baking soda
- ¼ teaspoon salt
For the Filling:
- ½ cup mini chocolate chips or chopped dark chocolate
For the Glaze (optional but recommended):
- 1 cup powdered sugar
- 2-3 teaspoons milk or cream
- ½ teaspoon vanilla extract
- Extra chocolate drizzle or sprinkles for finishing
Step-by-Step Instructions
Step 1: Preheat & Prep Pan
Start by preheating your oven to 350°F (175°C). Grease your 8×8 or 9-inch square baking pan with butter or non-stick spray. To prevent sticking, I like to line mine with parchment paper — makes cleanup a breeze and ensures easy slicing. Set your pan aside while you gather your ingredients. Since zucchini releases a lot of moisture, I always drain and pat it dry with paper towels after grating. This keeps the batter from getting too wet and helps the cake hold its structure. I’ve learned this trick after a few failed attempts at soggy cakes. The smell of this cake baking is honestly what makes the whole house smell like a cozy bakery — rich cocoa and warm zucchini, filling every corner!
Step 2: Mix Dry Ingredients
In a big mixing bowl, whisk together the flour, cocoa powder, baking powder, baking soda, and salt. Sifting the cocoa makes it easier to mix evenly, and it prevents lumps. This step ensures your cake rises beautifully and has a uniform texture. I always do this first so everything is ready to go when I add the wet ingredients. The dry mix should be light and airy, a little chocolate cloud in my kitchen—so satisfying!
Step 3: Mix Wet Ingredients
In a separate bowl, beat the eggs, then add the sugar, oil (or melted butter), and vanilla. Whisk until smooth — I always do this with a fork or a hand whisk, which feels nostalgic and quick. The mixture should look glossy and a little frothy. Then, gently fold in the grated zucchini, making sure it’s well incorporated. If your zucchini is very watery, give it a quick squeeze or press it between paper towels to remove excess moisture. This keeps your batter from being overly wet, which can cause the cake to sink in the middle. I’ve tested this trick with and without extra moisture removal, and trust me on this — it makes a big difference!
Step 4: Combine
Add the wet ingredients to the dry mixture, folding gently until just combined. Don’t overmix — this is crucial for a tender crumb. A few lumps are okay, and they’ll hydrate during baking. If you overmix, you risk a dense, rubbery cake, which is not what we want. Think of it as folding in your favorite chocolate chips gently, love in every scoop.
Step 5: Prepare Filling
Sprinkle in the mini chocolate chips into the batter, folding them in evenly. If you want more chocolate flavor, feel free to add a handful more or toss some into the swirl. Alternatively, you can reserve some chips to sprinkle on top before baking for a crispy, melty crust. I’ve experimented with adding chopped nuts or a dash of cinnamon, and it adds a lovely twist — so don’t be shy about customizing!
Step 6: Layer & Swirl
Pour half of the batter into your prepared pan. Spread it evenly with a spatula, then add the rest on top. For a marble effect, drop spoonfuls of the remaining batter on top, then use a skewer or the tip of a knife to swirl gently. This creates a beautiful marbled look and bursts of chocolate as you slice. Trust me, this swirl technique makes a humble cake look professional — like you bought it from a bakery.
Step 7: Bake
Pop it into the oven and bake for 35-40 minutes. Test for doneness by inserting a toothpick in the center — it should come out with a few moist crumbs but no wet batter. Ovens vary, so start checking at the 35-minute mark. Letting it cool in the pan for about 10 minutes helps it set a bit, then transfer to a wire rack to cool completely. The smell that wafts out during baking? Pure heavenly chocolate-cocoa goodness.
Step 8: Cool & Glaze
Once cooled, mix the powdered sugar, vanilla, and milk to make a glaze. You want it thick but pourable — I usually add a teaspoon more of milk if it’s too stiff or a touch more powdered sugar if it’s too runny. Drizzle this over the cooled cake — it’s the perfect finishing touch that makes it look tempting and adds a little extra sweetness. If you’re feeling extra, sprinkle some chocolate shavings or sprinkles on top. The glaze sets up in just a few minutes, sealing in moisture and flavor beautifully.
Step 9: Slice & Serve
Use a sharp knife to cut clean slices, wiping it between cuts for neat presentation. I love serving this with a dollop of whipped cream or a scoop of vanilla ice cream — or just a simple cup of coffee. It’s best enjoyed slightly warm or at room temperature. The moist crumb, rich chocolate, and subtle zucchini brightness make this cake a real star. Trust me, the first slice always disappears faster than I expect!
What to Serve It With
This cake is versatile enough to be a breakfast treat, a brunch centerpiece, or a decadent dessert. I often serve it warm with a splash of cold milk and a dusting of powdered sugar — it’s my kids’ favorite weekend breakfast. For brunch, consider pairing it with Greek yogurt and fresh berries, maybe a drizzle of honey for a bit of contrast. As a showstopper dessert, it’s fantastic with vanilla ice cream or a drizzle of caramel sauce — honestly, my family fights over the last slice! If I want something more casual, I’ll cut thick squares and pack them for picnics or snacks — it travels well. My tradition is to do a big batch, because once you taste it, everyone asks for seconds — and thirds! I love how the zucchini sneaks its way into sweet treats, making everyone feel a little healthier while indulging. Plus, the chocolate makes it feel just naughty enough, don’t you think? I’ve even added a splash of espresso or cinnamon for a little extra depth — every variation is a new adventure. This cake has become my secret weapon for turning simple ingredients into a smile-inducing moment for friends and family alike.
Top Tips for Perfecting Your Chocolate Zucchini Coffee Cake
Over the years, I’ve picked up a few tricks that make all the difference with this cake.
Zucchini Prep: Always choose young, firm zucchinis. Grate, then give it a quick squeeze in a dish towel or paper towels to remove extra moisture. Moisture is the enemy of fluffy baking — trust me on this, I learned it the hard way! The drier the zucchini, the better the texture.
Mixing Advice: When combining wet and dry, fold gently. Overmixing develops gluten and toughens the crumb — not what we want! If the batter feels too thick, a splash of milk can loosen it up without compromising the texture.
Swirl Customization: Use a toothpick or skewer to create attractive marble patterns. For more contrast, try swirling in a tablespoon of peanut butter or cinnamon before baking — that adds a lovely aroma and flavor boost.
Ingredient Swaps: Love nuts? Throw in some chopped walnuts or almonds. Prefer a dairy-free version? Use coconut oil and dairy-free chocolate chips. Want it sweeter? Increase the sugar slightly or add a drizzle of honey on top after baking.
Baking Tips: Always check your oven’s heat accuracy with an oven thermometer. If your cake browns too quickly, tent with foil. For even baking, position your rack in the middle. The toothpick test is your friend — don’t rely solely on the clock, and let the cake cool completely before glazing or slicing for perfect presentation.
Personally, I’ve tried the batter with brown sugar for deeper flavor and tested the cake with almond milk, which made it even creamier. One mistake I made early on was opening the oven door too often — patience is key for that perfect rise. No matter how many times I bake it, I still get excited to see how it turns out, and I swear the smell never gets old. I highly recommend experimenting with adding a pinch of sea salt or a dash of cinnamon — it elevates the whole thing. The best part? This cake is pretty forgiving — even if you forget to add the chocolate chips at first, a quick fold-in near the end works just fine. Every batch teaches me something new, and I love making it my own.
Storing and Reheating Tips
This cake stays moist and delicious for days, as long as you store it properly. Keep it covered at room temperature for up to two days — I use a cake dome or loosely tent it with foil, which keeps it fresh without making the top soggy. If you want to make it last longer, refrigerate it in an airtight container — just give it a few minutes at room temp before serving; the flavors tend to mellow and the texture stays moist. For freezing, wrap slices tightly in plastic wrap and then foil or stash them in a freezer bag for up to three months. Thaw at room temperature or microwave on a low setting for a quick warm-up. When redoing the glaze, I recommend adding it just before serving — if you reheat the cake with glaze, the texture might change, and the glaze can become gloopy. Instead, pour fresh glaze over slightly warmed slices for that gooey, delicious finish. Honestly, I’ve reheated slices in the microwave (cover loosely with a paper towel), and it comes out just as tender and flavorful as fresh. The aroma of a warm slice melts away any leftovers’ cold vibe. I’ve learned that keeping the glaze separate until serving keeps the cake looking pretty and tasting fresh.
Frequently Asked Questions
Final Thoughts
This Chocolate Zucchini Coffee Cake has become a sort of lifeline in my kitchen. It’s that perfect balance of homemade comfort and a little bit of cleverness — sneaking a healthy veggie into something so irresistibly chocolatey. Every time I bake it, I think about the happy faces waiting at the table, eager for that first slice. It’s moist, rich, and just sweet enough to satisfy that craving without feeling heavy. What I love most is how forgiving it is; even if you’re short on time or ingredients, you can tweak it easily without sacrificing flavor. It’s a fantastic way to get kids (and grown-ups) to eat their zucchini, and it’s a hit at gatherings — trust me, everyone asks for seconds. My advice? Double the batch — it’s that good. And don’t forget to share it with someone you love, because nothing beats that warm, homemade feeling when you’re baking from the heart. I can’t wait to hear how yours turns out — happy baking! And if you try any fun twists, share your tips below. Your new favorite recipe might just become theirs, too.