Decadent Chocolate Cheesecake Delight
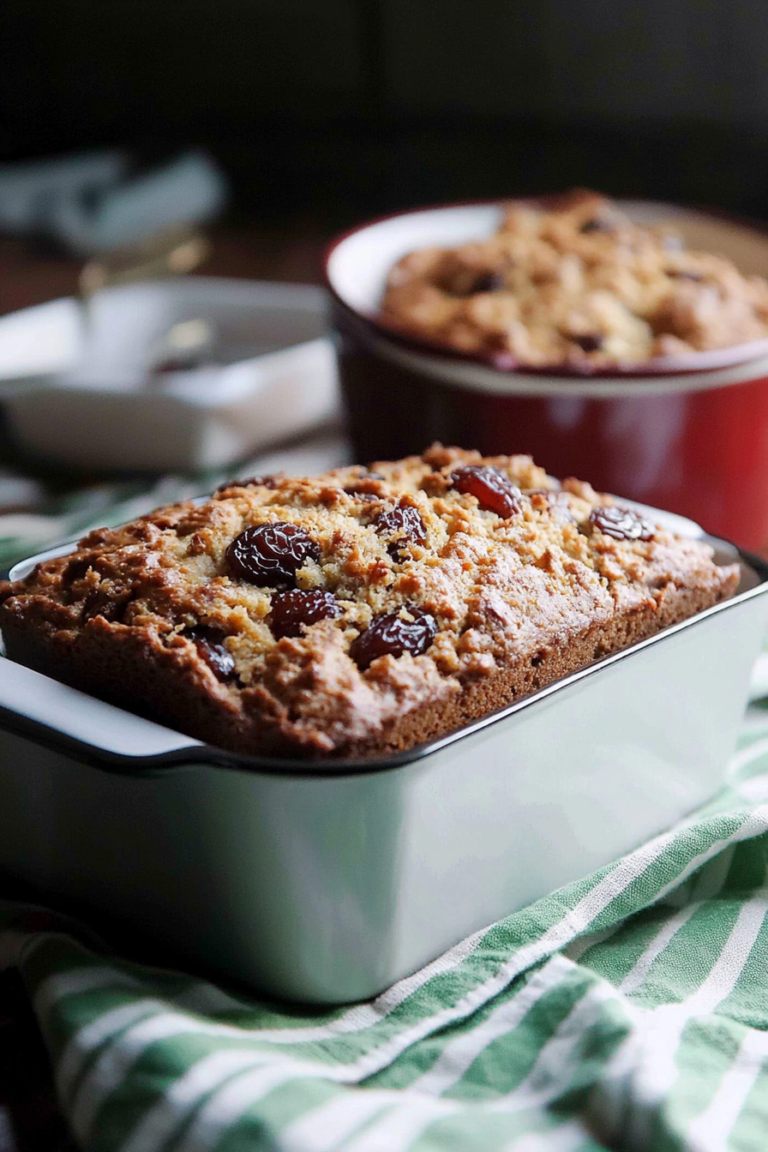
If I had to pick one recipe that feels like a warm hug on a busy day, it’s my zucchini lemon pound cake. I know, I know—zucchini in cake? But trust me, this one’s a lifesaver on busy nights when the craving hits for something sweet, but I want to keep it simple. I first made this when I had a giant zucchini from my garden, and honestly, it looked at me with those big green eyes, begging to be used. I threw together some basic ingredients, added a splash of lemon to brighten everything up, and this cake magically appeared—moist, flavorful, and not too sweet. My kids ask for this all the time, especially when I tell them “it’s sneaky veggie cake,” and they never guess! The smell alone brings everyone to the kitchen, and I swear, it disappears in minutes at my house. If you’re looking for something cozy yet fresh, easy to make, and utterly satisfying, this zucchini lemon pound cake is your new best friend.
What is Zucchini Lemon Pound Cake?
Think of it as a deeply tender, lemon-infused loaf that hides a vegetable secret inside. It’s essentially a pound cake, but with a veggie twist—zucchini grated into the batter—keeping it super moist and meaty without any fuss. The name might throw you off, but it’s all about that lovely tang of fresh lemon paired with the subtle earthiness of zucchini. The “pound cake” part? That’s because it’s rich, dense, and slice-able, perfect for breakfast, a teatime treat, or even dessert. The best part? It’s approachable enough for beginner bakers but impressive enough to serve when someone special stops by. I always do this when I want something quick and comforting that also feels a little fancy. It’s one of those recipes that gets better with age, so feel free to make it the night before—trust me, it just gets more flavorful overnight!
Why you’ll love this recipe?
What I love most about this zucchini lemon pound cake is how it’s secretly healthy but tastes indulgent. The zucchini keeps it incredibly moist, so even if you’re not a big baker, you’ll find this super forgiving—you can’t really mess it up. Plus, it’s budget-friendly, using everyday ingredients I usually keep in my pantry: flour, sugar, eggs, and those lonely zucchinis hiding in the fridge. The lemon zest and juice punch it up with a bright, fresh flavor that stands out from your typical sweet bread. Best of all, this is versatile—I’ve served it with whipped cream, dollops of ricotta, or just a dusting of powdered sugar; it pairs beautifully with tea or coffee. And if you want to switch things up, I’ve tested this with almond milk and it made the texture even creamier. Honestly, I keep this on repeat because it’s such a hit, especially when I need a quick, satisfying bake that everyone loves, including my pickiest eaters.
How do I make Zucchini Lemon Pound Cake?
Quick Overview
This cake comes together in a breeze—mix the dry ingredients, whisk up the wet, fold in the grated zucchini and lemon, then layer everything into a loaf pan. The secret to perfect texture? Don’t overmix after combining the wet and dry. A quick swirl to marinate the batter with the filling gives it a beautiful marbled look and bursts of lemon across every slice. Bake until golden, cool slightly, then drizzle with a tangy glaze. That’s it! It’s truly one of the easiest cakes you’ll make, but the taste and presentation feel so special. Plus, the batter is so forgiving; it’s practically foolproof.
Ingredients
For the Main Batter:
• 2 cups all-purpose flour (I swear by unbleached organic if I can find it)
• 1 ½ teaspoons baking powder
• ½ teaspoon salt
• 1 cup sugar
• ½ cup unsalted butter, softened (or coconut oil for a dairy-free option)
• 3 large eggs
• 1 teaspoon vanilla extract
• Zest of 2 lemons
• ¼ cup fresh lemon juice
• 1 cup grated zucchini (squeeze out excess moisture—trust me, soggy cake is a no-go!)
For the Filling:
• ½ cup lemon curd or thickened lemon marmalade (optional but so good for that tart surprise!)
For the Glaze:
• ½ cup powdered sugar
• 2-3 tablespoons lemon juice
• A touch of lemon zest for extra zing (optional)
Step-by-Step Instructions
Step 1: Preheat & Prep Pan
Heat your oven to 350°F (175°C). Grease a loaf pan with butter or non-stick spray and line it with parchment paper if you like for easy removal. This cake bakes up tall, so make sure your pan is the right size—an 8×4 inch is perfect. I always do this while the oven preheats; it makes the process feel peaceful and unhurried. Plus, a well-prepped pan is your best friend for a clean slice.
Step 2: Mix Dry Ingredients
In a large bowl, whisk together the flour, baking powder, and salt. This step ensures everything is evenly distributed—no pockets of baking soda or salt ruining your bites. I find it easiest with a gentle whisk, and it’s helpful to sift if your flour tends to clump. Set aside!
Step 3: Mix Wet Ingredients
In another bowl, beat the softened butter and sugar until light and fluffy—about 2-3 minutes. It should look a bit creamy and smell buttery. Add eggs one at a time, beating well after each. Stir in vanilla, lemon zest, and lemon juice. I like to use fresh lemons—they add a burst of freshness you can really taste. The batter might look a little curdled at first, but that’s normal; it’ll come together nicely later.
Step 4: Combine
Gradually add the dry ingredients into the wet, folding gently with a spatula just until combined. Be careful not to overmix—this is where gluten can develop, making your cake dense instead of tender. The batter will be thick but silky. Now, fold in the grated zucchini—it should be well-drained so your batter isn’t watery.
Step 5: Prepare Filling
If you’re using lemon curd, have it ready. It’s optional but adds a lovely tangy surprise in the middle if you swirl it in now. Just dollop spoonfuls onto the batter in the pan, then use a skewer or knife to swirl gently. Don’t overdo it—just enough for that marbled effect and flavor burst.
Step 6: Layer & Swirl
Pour the batter into your prepared pan. Drop spoonfuls of lemon curd in a few spots, then swirl carefully. The pretty marbled look makes this cake stand out, and each slice gets a hint of tartness that balances the sweetness.
Step 7: Bake
Bake for about 50-60 minutes, or until the top is golden and a toothpick inserted in the center comes out clean. If the top browns too quickly, loosely tent with foil and continue baking. My oven runs a bit hot, so I check around the 45-minute mark to avoid overbaking. A little jiggle in the center is okay—just don’t overcook! Let it cool in the pan for at least 15 minutes before transferring to a wire rack.
Step 8: Cool & Glaze
While the cake cools, whisk together your glaze ingredients. It should be pourable but not runny. Drizzle generously over the warm cake—this step makes it look irresistible and adds that extra lemon hit. Let the glaze set for about 10 minutes before slicing—patience is key! If I want to make it extra pretty, I add a tiny sprinkle of lemon zest on top.
Step 9: Slice & Serve
Use a serrated knife for neat slices—this cake’s tender but slightly dense texture needs a gentle touch. Serve it warm or at room temperature with a dusting of powdered sugar or a dollop of whipped cream. I love it with a cup of strong coffee or a glass of cold milk. It’s equally charming for breakfast, teatime, or dessert.
What to Serve It With
This cake is so versatile, I make it for pretty much every occasion. For breakfast, I’ll serve a slice with black coffee and maybe some fresh berries—I swear it’s like a grown-up muffin. When friends come over for brunch, I plate it with a swirl of whipped cream and a sprig of mint, and a glass of simple homemade lemonade or a light tea works beautifully. As an after-dinner treat, I like to pair it with a scoop of vanilla ice cream or a dab of mascarpone—it’s a cozy, comforting combo. My family’s favorite is just slicing it warm, spreading a little butter, and enjoying it with a cup of tea. It’s my go-to for spontaneous get-togethers or when I want to impress someone without breaking a sweat. Plus, it travels well—perfect for potlucks or weekend picnics. Honestly, this cake just makes everyone happy, no matter how you serve it.
Top Tips for Perfecting Your Zucchini Lemon Pound Cake
Every time I make this, I learn a little more. Here are some of my top tips:
- Zucchini Prep: Always squeeze out excess moisture after grating—moisture is the enemy of a dense cake. I roll the grated zucchini in a clean kitchen towel or cheesecloth and give it a good squeeze. This small step makes a huge difference.
- Mixing Advice: Don’t overmix the batter after adding the dry ingredients. A few lumps are okay—they keep the cake tender. Overmixing leads to tough texture, and nobody wants that.
- Swirl Customization: Use a toothpick or skewer for swirling—the more organic, the better. Try zigzags or loops for fun designs that look professional, but still homemade.
- Ingredient Swaps: Want to make it gluten-free? Swap out the all-purpose flour with a 1-to-1 gluten-free blend. The texture stays soft and moist. For a dairy-free version, use coconut oil and almond milk, and it’s just as delicious.
- Baking Tips: Check doneness with a toothpick—if it comes out with moist crumbs, it’s perfect. Ovens vary; if yours tends to run hot, reduce temperature slightly or cover the top with foil halfway through baking.
- Glaze Variations: For a chocolate twist, melt dark chocolate and mix it into the glaze. For a more intense lemon punch, add lemon extract or candied lemon zest. Experimenting is half the fun!
After years of baking, I’ve found these little tricks help me get that perfect bite every time. Remember, patience and a gentle touch are your best tools. Trust me, the first slice might be a little tricky, but after a few tries, you’ll own this recipe.
Storing and Reheating Tips
This cake actually gets better the next day, which is such a bonus. Wrap it tightly in plastic wrap or store in an airtight container—it stays fresh at room temperature for about 2 days. If I want to keep it longer, I pop it in the refrigerator for up to 5 days; just bring it to room temp before slicing for the best texture. For freezing, I double-wrap slices with plastic wrap and foil, and it’ll last for up to 3 months. Thaw at room temperature—no fuss. If it’s been in the fridge, you can warm slices gently in the microwave or oven for a cozy, just-baked feel. As for the glaze, it’s best added right before serving to keep that glossy shine and fresh flavor. I’ve found that a quick reheat doesn’t hurt, but I prefer serving it slightly chilled or at room temp—it’s all about your mood!
Frequently Asked Questions
Final Thoughts
This zucchini lemon pound cake has become a staple in my kitchen—I love how versatile and forgiving it is, perfect for everything from a quick breakfast to a cozy weekend treat. The secret to its charm is in the balance of fresh lemon and tender zucchini—ingredients that make you feel good about indulging a little. Once you get the hang of it, I bet you’ll find yourself making this at least once a month, sneaking zucchini into dessert without anyone ever knowing! Trust me, it’s an instant crowd-pleaser, and I love that it combines simple ingredients in a way that’s both homey and special. I hope you try it soon—and don’t forget to share your version with me. Happy baking, and may each slice bring a little sunshine to your day!

German chocolate cheesecake
Ingredients
Method
- Preheat the oven to 325°F and prepare your springform pan with parchment and grease.
- Combine crushed Oreo crumbs and melted butter to make the crust. Press into the bottom of the pan.
- Bake the crust for 8-10 minutes, then set aside to cool.
- In a large mixing bowl, beat cream cheese and sugar until smooth.
- Add eggs one at a time, mixing after each addition.
- Melt the German chocolate and incorporate into the cream cheese mixture. Add sour cream and vanilla, mixing well.
- Pour batter into prepared crust and bake for about 1 hour and 25 minutes.
- While baking, prepare coconut pecan topping by cooking shredded coconut and pecans with a portion of sugar and butter until golden.
- Cool the cheesecake and top with coconut pecan topping. Refrigerate for at least 4 hours before serving.