Easy Cookie Cups Delight
There’s something about the smell of baking that just pulls me right back to my childhood kitchen—like a warm hug from the past. I still remember my grandma’s old oven humming in the background while she whipped up her famous zucchini bread, which, believe it or not, wasn’t too different from this zucchini chocolate swirl loaf I’m about to share. It’s kind of funny how a simple vegetable can turn into something so indulgent and delicious. I always do this when I want a little treat that’s more than just a cookie or a piece of cake—it’s the kind of dessert that sneaks in some veggies without anyone batting an eye. Honestly, this loaf is a lifesaver on busy weeknights when I need something sweet but don’t want to spend hours in the kitchen. Plus, my kids ask for it all the time—my little chocoholics—so I figured I’d better perfect the recipe. Trust me, the aroma alone will make your house smell like heaven, and the first slice? It’s pure comfort in every bite.
What is Zucchini Chocolate Swirl Loaf?
This zucchini chocolate swirl loaf is essentially a moist, tender bread infused with grated zucchini and swirled with rich cocoa. It’s like a homemade, slightly healthier brownie meets bread, but with a charming rustic look that I swear makes every slice feel special. Think of it as a great way to sneak in some greens for your kids or yourself without sacrificing flavor. The name might sound fancy, but honestly, it’s one of the easiest baked goods I make—no crazy equipment needed, just basic ingredients and a little bit of love. I came up with this when I was experimenting with ways to use up an extra zucchini from my garden, and let’s just say, it’s become a regular at my breakfast table and after-school snack rotation. Its popularity skyrocketed once I threw in a handful of chocolate chips and a swirl of cocoa that makes each bite feel like a chocolate lover’s dream.
Why you’ll love this recipe?
What I love most about this zucchini chocolate swirl loaf is how it balances indulgence with a hint of healthiness, which makes me feel better about serving it to my family. The flavor? Oh, it’s divine—rich, chocolaty, with just enough sweetness to satisfy that craving without feeling overly desserty. The subtle zucchini flavor actually just adds moisture and a tiny bit of earthy balance, so the chocolate really shines. And let me tell you, the smell when this is baking? It’s pure magic—like walking into a cozy café. This recipe is crazy simple—basically mixing, swirling, and baking—which makes it perfect even on your busiest days. Plus, it’s budget-friendly because most of the ingredients are pantry staples, and the zucchini keeps it super moist without adding butter or oil. I’ve made this with different types of chocolate chips—dark, semi-sweet, even white—and each variation turns out delicious. My kids ask for seconds, and honestly, I don’t blame them. It’s a slice of happiness.
How do you make Zucchini Chocolate Swirl Loaf?
Quick Overview
This zucchini chocolate swirl loaf comes together in a flash. You start by grating fresh zucchini—no need to peel, just rinse it well—and squeezing out excess moisture. Then, you mix the dry ingredients, whip up wet ingredients, fold everything together, and pour part of the batter into your loaf pan. Next, you spoon in a rich cocoa swirl, add the rest of the batter, and swirl again for that beautiful marbled effect. Bake until golden and a toothpick comes out clean. It’s honestly one of the simplest baking projects—it’s like a one-bowl wonder with minimal mess, and you get a show-stopping dessert that looks fancy but is totally foolproof.
Ingredients
For the Main Batter:
– 1 1/2 cups all-purpose flour (I always use unbleached for a slightly richer flavor)
– 1 teaspoon baking powder
– 1/2 teaspoon baking soda
– 1/4 teaspoon salt
– 1/2 cup granulated sugar
– 1/2 cup brown sugar (for depth and chewiness)
– 1/3 cup vegetable oil or melted coconut oil
– 2 large eggs (preferably at room temperature)
– 1 teaspoon vanilla extract
– 1 1/2 cups grated zucchini (from about 2 small zucchinis)
– 1/2 cup plain Greek yogurt or sour cream (for extra moisture and creaminess)
For the Filling:
– 1/4 cup unsweetened cocoa powder
– 3 tablespoons hot water (to make a smooth cocoa paste)
– 1/4 cup chocolate chips or chopped chocolate (optional, for extra gooeyness)
For the Glaze:
– 1/2 cup powdered sugar
– 1-2 teaspoons milk or cream
– A splash of vanilla (if you like)
Step-by-Step Instructions
Step 1: Preheat & Prep Pan
Preheat your oven to 350°F (180°C). Grease your loaf pan well—it helps to line it with parchment paper so the loaf comes out easy. I usually spray with baking spray and then dust with flour, or just use parchment. Set everything aside; we’re about to start creating delicious magic.
Step 2: Mix Dry Ingredients
In a medium bowl, whisk together the flour, baking powder, baking soda, salt, and sugars. Sifting the cocoa powder into the mixture prevents lumps and ensures a smooth swirl later. This step gives the batter that nice, even rise and texture I love in quick breads.
Step 3: Mix Wet Ingredients
In a large mixing bowl, beat the eggs, oil, vanilla, and Greek yogurt until well combined. I always do this with a whisk—by hand, because it’s relaxing—and then fold in the grated zucchini. Make sure the zucchini is squeezed of excess moisture so your batter doesn’t become too watery. I’ve learned this trick after a few early attempts—less moisture makes all the difference.
Step 4: Combine
Add the dry ingredients to the wet ingredients in batches, gently folding just until combined. Overmixing can lead to a dense loaf, so I take care not to beat it too much. The batter should be thick but still moist—perfect for spooning into the pan.
Step 5: Prepare Filling
Mix the cocoa powder with hot water to create a smooth paste. If you’re feeling extra indulgent, stir in the chocolate chips. This swirl will add that gorgeous chocolatey ribbon through the bread, making every slice pretty and tasty.
Step 6: Layer & Swirl
Pour about half of the batter into your prepared loaf pan. Spoon dollops of the cocoa mixture on top, then add the remaining batter. Using a butter knife or toothpick, gently swirl the cocoa into the batter—don’t overdo it, or you’ll lose the pretty marbled effect. I love watching the cocoa swirl create those beautiful ribbons as it bakes.
Step 7: Bake
Pop it in the oven and bake for about 50-60 minutes, or until a toothpick inserted in the center comes out clean. I always check around the 50-minute mark—ovens vary, and I’ve learned to trust my nose as well. The top should be golden and slightly cracked, just like a classic quick bread.
Step 8: Cool & Glaze
Let it cool in the pan for about 15 minutes, then transfer to a wire rack. While it cools, mix the powdered sugar with milk and vanilla until smooth—adjust thickness as needed. Drizzle it over the loaf while it’s still slightly warm. The glaze sets nicely, giving each slice an extra touch of sweetness.
Step 9: Slice & Serve
Wait until the loaf is completely cooled—patience is key here, or the slices might fall apart. Then, using a serrated bread knife, cut thick slices for that rustic feel. Serve with a cup of coffee or tea, and watch everyone’s eyes light up. I think what makes this so addictive is how the chocolate and zucchini play off each other—moist, flavorful, with a hint of earthiness that grounds the sweetness.
What to Serve It With
This loaf is so versatile, I could talk about serving ideas all day. For breakfast, it’s perfect toasted with a smear of butter and a hot cup of coffee—my favorite way to start a slow weekend morning. It also makes a lovely addition to brunch tables, paired with fresh berries or a dollop of whipped cream. My family loves it as a simple snack—a slice with milk or a glass of cold almond milk. If you’re feeling fancy, warm slices with a drizzle of caramel sauce or a dusting of powdered sugar look pretty and taste amazing. It’s also great as an after-dinner treat, especially when served with a scoop of vanilla ice cream or a side of whipped cream. Essentially, this loaf is a cozy, satisfying way to end any meal or simply enjoy a quiet moment with a book on a lazy afternoon. Over the years, I’ve made it for school parties, weekend picnics, and even as a last-minute gift for neighbors—everyone always asks for the recipe!
Top Tips for Perfecting Your Zucchini Chocolate Swirl Loaf
The secret to making this loaf truly spectacular is paying attention to a few details. First, always squeeze out excess moisture from the zucchini—this simple step keeps your bread from becoming soggy and ruins the structure. I’ve tried grating zucchini and skipping that step—trust me, it’s a mistake I learned the hard way. Moisture is sneaky! When mixing, fold gently to keep the batter light and airy—overmixing harms the rise and can make it dense. As for the swirl, don’t stress about perfect lines—just gently spoon and swirl to get that marbled look, which makes every slice look pretty. I tested this with different chocolates—bittersweet, milk, even a mix—and honestly, it all works beautifully, so don’t be shy about experimenting. Baking time is flexible with individual ovens, so start checking around 50 minutes. If you see the edges browning too fast, tent it with foil. The glaze—oh, that’s just a quick touch—adjust the consistency with more powdered sugar or a splash more milk. A tip I swear by is adding a pinch of cinnamon to the batter if you love warm spice notes; it adds another layer of cozy flavor. After many tries, I’ve learned that patience and gentle handling result in the most tender, chocolate-infused zucchini bread you’ll ever make.
Storing and Reheating Tips
This loaf stays fresh for a few days if wrapped tightly in plastic wrap or kept in an airtight container. I usually store it at room temperature if I plan to enjoy it within two days—they stay soft and moist that way. For longer storage, pop slices in the fridge; they’ll stay good for about five days. Just reheat slices in the microwave for about 10-15 seconds—it warms up quickly and keeps the moisture intact. Want to keep it even longer? Freeze slices individually wrapped in plastic and then placed in a resealable bag. They’ll last about a month that way. When you’re ready to enjoy, just thaw at room temp or reheat briefly. I usually add the glaze just before serving because it’s the perfect finishing touch—kind of like that glossy bakery look. If you’re serving bread straight from the fridge, warm it up first so the chocolate chips get melty again, and the bread’s soft and welcoming.
Frequently Asked Questions
Final Thoughts
I truly believe this zucchini chocolate swirl loaf is one of those backyard, family-favorite recipes that you’ll keep coming back to. It’s cozy, indulgent, and surprisingly simple to make—perfect for whenever you want a little moment of sweetness without the fuss. Every batch I make seems to disappear in minutes at my house, and I’ve even had neighbors ask for the recipe (which I happily share, of course). It’s satisfying to see how a humble zucchini can turn into something so special, especially when paired with that irresistible cocoa swirl. Honestly, I hope you give this a try and make it your own—swap out dark chocolate for white, add a handful of nuts, or experiment with spices. The only rule is to enjoy every bite, and don’t forget the coffee—you’re going to want it perfectly brewed. Happy baking! I can’t wait to hear how yours turns out, so leave a comment or share your pics—I love seeing what you create.
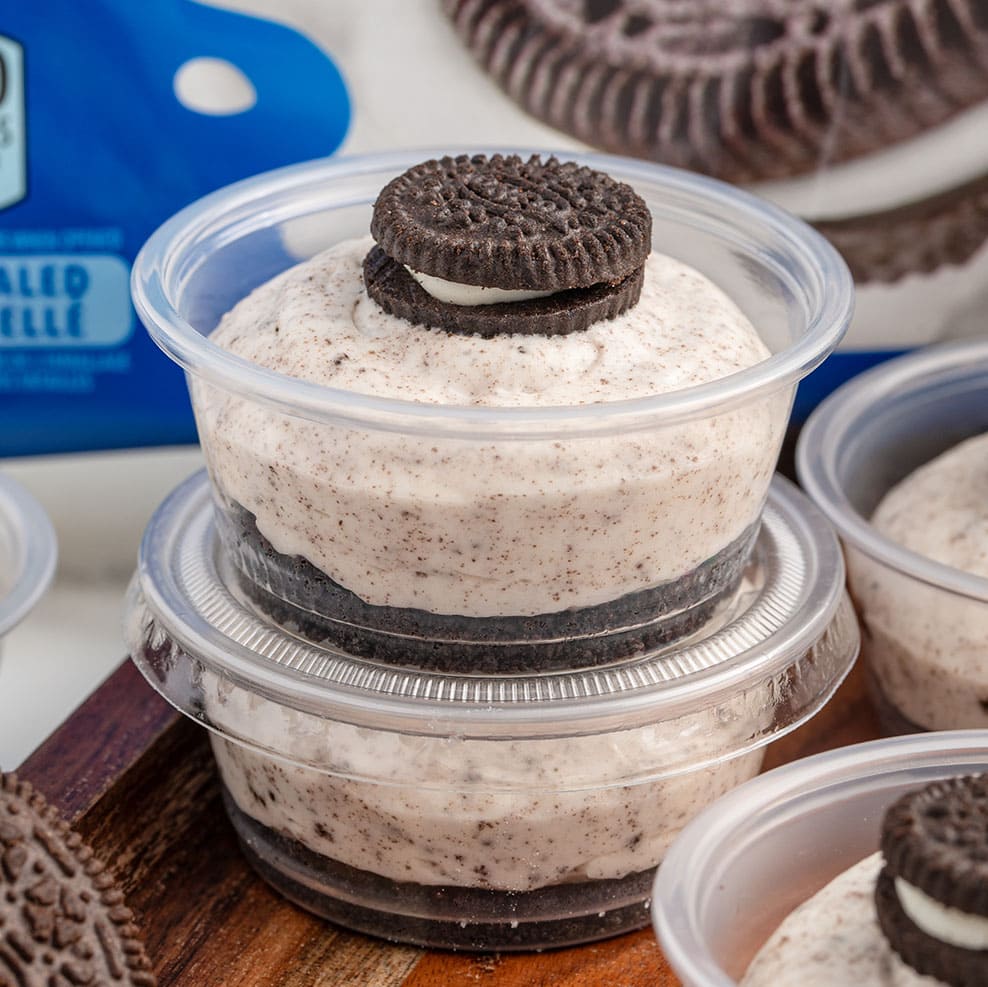
Oreo dessert cups
Ingredients
Method
- Add 2.5 cups of crushed Oreo cookie crumbs and 0.25 cups of melted butter in a small mixing bowl. Stir to coat the crumbs completely.
- Divide the crumb mixture evenly into cups. Use a spoon or the back of another cup to press down firmly.
- Using a stand mixer or handheld mixer on medium speed, beat softened cream cheese for about 1 minute until smooth.
- Add powdered sugar gradually, 0.5 cup at a time, mixing well after each addition.
- Pour in cold heavy cream and vanilla; whip for 2-3 minutes until thickened and piping consistency is achieved.
- Gently fold in remaining crushed Oreo crumbs into the filling.
- Transfer filling into a piping bag with a decorative tip and pipe over the crumb base in each cup.
- Top each cup with a mini Oreo cookie. Cover and refrigerate for at least 2 hours before serving.