Easy Ground Chicken Bolognese Recipe
There’s something about baking bread that just warms the soul, isn’t there? I remember growing up in a house filled with the smell of freshly baked bread, and somehow, it made everything feel more cozy and special. Over the years, I’ve tried all kinds of recipes, but nothing beats a good banana bread—except maybe this zucchini banana bread with cinnamon swirl I’ve perfected. It’s incredibly moist, bursting with flavor, and secretly sneaks in some healthy zucchini—that’s my little trick to make it feel a bit more wholesome. I always do this when I want a comforting treat that doesn’t feel completely indulgent, and honestly, it’s become a family favorite. My kids ask for this all the time, and I love how it disappears from the oven in minutes! This recipe is one of those lifesavers on busy nights—you get that comforting aroma and a slice of happiness in under an hour. Trust me, once you try it, it’ll be part of your regular baking lineup, and I’ll bet you’ll be making it at least twice a month. The best part? It’s so easy to customize—add walnuts, sprinkle extra cinnamon, or even swap out the sugar for honey. It’s a cozy hug in bread form, and I can’t wait for you to give it a try!
What is Zucchini Banana Bread with Cinnamon Swirl?
Think of zucchini banana bread as a sort of magic trick in the kitchen. It’s essentially a moist, tender loaf that combines ripe bananas and shredded zucchini—yes, zucchini!—for a healthy twist, with a gorgeous cinnamon swirl running through the middle. The name might sound fancy, but really, it’s just a cozy homemade bread that tastes like a comforting hug. The cinnamon swirl isn’t just for looks; it adds a warm, spicy note that elevates every bite. This bread is like those cozy sweaters you wear when it’s chilly outside—familiar, warm, and just plain good. I love that it’s adaptable too—add nuts, chocolate chips, or even dried fruit if you’re feeling adventurous. Think of it as a little healthful indulgence, perfect for breakfast, a snack, or even a quick dessert. And because it’s so forgiving, even if you’re a beginner baker, I promise you’ll nail it every time. Plus, it’s a great way to sneaky in some veggies for the kids—because who doesn’t love that?
Why you’ll love this recipe?
What I love most about this zucchini banana bread with cinnamon swirl is how it hits all the right notes—flavor, texture, and a cozy nostalgic vibe. The aroma alone is enough to make everyone come running to the kitchen, and honestly, it’s become a bit of a family tradition. The flavor? Oh, it’s divine. You get the sweetness from ripe bananas, the richness of warm cinnamon, and a subtle earthiness from the zucchini that makes it taste a little more complex than your average banana bread. The best part? It’s ridiculously easy to whip up—no fancy equipment needed. I’ve tested this with just a whisk and a spatula, and it’s foolproof. Plus, it’s budget-friendly with pantry staples most of us have on hand. The versatility is another reason I keep coming back to this recipe. You can add walnuts or chocolate chips for a little extra indulgence, or keep it simple for a wholesome feel. I also love how forgiving it is—overmixing is a common mistake, but I’ve learned to gently fold everything together and it turns out perfect every time. Honestly, this loaf is comfort food in its purest form, and I can see myself making it on lazy Sunday mornings or as a last-minute treat when I’ve got ripe bananas and zucchini needing love. It’s nice to have a recipe you trust and that makes the house smell incredible. Give it a shot—I bet it’ll become your go-to, too.
How do you make Zucchini Banana Bread with Cinnamon Swirl?
Quick Overview
This bread comes together so effortlessly—think one bowl for the wet ingredients, another for the dry, then just combine and swirl in the cinnamon. The secret to keeping it extra moist is not overmixing; just fold everything until it’s combined. The cinnamon swirl is simply a mixture of cinnamon and sugar, layered into the batter before baking—a little swirl of warm spice that makes all the difference. Once baked, you’ll want to let it cool slightly before glazing or slicing. The process is flexible, forgiving, and perfect for a stress-free weekend bake or a quick weekday treat. Best of all, it’s truly the kind of recipe that tastes like you fussed over it for hours, but really, it’s ready in under an hour from start to finish. You’ll love how the aroma fills your kitchen, and the first bite will make you wonder why you don’t bake this more often.
Ingredients
For the Main Batter:
– 3 ripe bananas, mashed (the riper, the better! They add sweetness and moisture)
– 1 cup shredded zucchini (about 1 medium zucchini, grated and lightly drained)
– 1/2 cup melted unsalted butter or neutral oil
– 3/4 cup granulated sugar (or honey/maple syrup for a natural twist)
– 2 large eggs, at room temperature
– 2 teaspoons vanilla extract
– 2 cups all-purpose flour (or gluten-free blend if needed)
– 1 teaspoon baking soda
– 1/2 teaspoon baking powder
– 1/2 teaspoon salt
– 1 teaspoon ground cinnamon
For the Filling:
– 2 tablespoons packed brown sugar
– 1 teaspoon ground cinnamon
For the Glaze (optional but highly recommended):
– 1/2 cup powdered sugar
– 1-2 teaspoons milk or lemon juice
– Extra cinnamon for sprinkling
Step-by-Step Instructions
Step 1: Preheat & Prep Pan
Preheat your oven to 350°F (175°C). Grease a standard loaf pan with butter or non-stick spray and lightly dust it with flour, or line it with parchment paper. This helps the bread come out clean and keeps it moist. I always do this first, so I don’t forget once the batter is ready. A quick tip: if your zucchini is very watery, give it a gentle squeeze in a clean towel to remove excess moisture. That little trick helps keep the bread perfectly tender without becoming soggy.
Step 2: Mix Dry Ingredients
In a medium bowl, whisk together the flour, baking soda, baking powder, salt, and cinnamon. This step ensures everything is evenly distributed, avoiding clumps or uneven rising. It’s a simple step that makes a big difference—trust me on this one. Set it aside while you prepare the wet ingredients.
Step 3: Mix Wet Ingredients
In a large bowl, mash your bananas until smooth. Add in the melted butter, sugar, eggs, and vanilla. Stir until well combined—this mixture should look a little thick and glossy. I find that letting the eggs sit at room temperature helps everything combine smoothly. If I’m in a rush, I microwave the eggs for about 10 seconds—they still work perfectly.
Step 4: Combine
Slowly fold the dry ingredients into the wet mixture—just until you see no more streaks of flour. Avoid overmixing; a few lumps are totally fine. Overmixing can make the bread dense instead of light and fluffy, and nobody wants that. Once combined, gently fold in the shredded zucchini. The batter will be quite thick, but that’s normal for a good banana bread.
Step 5: Prepare Filling
In a small bowl, mix together the brown sugar and cinnamon. This will create that lovely, spicy swirl. Set aside a tablespoon or so for sprinkling on top if you like. I sometimes sprinkle extra cinnamon sugar on the top for a slightly crispy finish—delicious!
Step 6: Layer & Swirl
Pour half of the batter into your prepared loaf pan. Sprinkle half of the cinnamon sugar mixture over it, then add the remaining batter on top. Using a butterknife or a skewer, gently swirl through the batter to create a marbled effect—think of it as painting a little cinnamon storm in the loaf. Don’t overdo it; just gentle swirls are enough to give you lovely ribboned flavor and appearance.
Step 7: Bake
Pop it into the preheated oven and bake for about 50-60 minutes. Keep an eye on it after 45 minutes—every oven is a little different. You’ll know it’s done when a toothpick inserted in the center comes out clean, and the top is golden brown. If the top gets too dark early, tent it with foil to prevent burning. I always set a timer and check around the 50-minute mark; patience pays off for moist, perfectly baked bread.
Step 8: Cool & Glaze
Remove the loaf from the oven, and let it cool in the pan for about 10 minutes before transferring it to a wire rack. If you’re glazing, wait until the bread is just warm—this helps the glaze stick without melting. Mix powdered sugar with a splash of milk or lemon juice until smooth, then drizzle it generously over the top. A sprinkle of cinnamon on the glaze looks pretty and adds an extra flavor boost.
Step 9: Slice & Serve
Use a serrated knife to cut the bread into thick slices. This bread is best enjoyed warm or at room temperature, and I love serving it with a little butter or yogurt on the side. It also makes a beautiful brunch centerpiece or a sweet snack. I like to store leftovers in an airtight container for up to 3 days or freeze slices for quick breakfasts on busy mornings.
What to Serve It With
This zucchini banana bread is so versatile that it pairs beautifully with just about anything. For breakfast, I love it alongside a hot cup of coffee or tea—trust me, the smell alone will perk you up! My kids prefer a dollop of yogurt or a smear of almond butter on their slices. When it’s brunch, I like to serve it with fresh fruit and maybe a drizzle of honey or maple syrup. For dessert, a scoop of vanilla ice cream or a dollop of whipped cream makes it feel extra special. I also serve it as a casual snack, wrapped in foil for taking on picnics or to school. It’s my secret weapon for busy mornings, and honestly, once I made it a few times, I couldn’t believe how much my family loved something so healthy-looking—it’s a total crowd-pleaser.
Top Tips for Perfecting Your Zucchini Banana Bread
Making this bread perfect takes a few little tricks I’ve learned over the years. First, grate your zucchini finely enough that it incorporates smoothly—no chunky bits! Removing excess moisture from the zucchini (by squeezing it in a towel) makes a huge difference in preventing sogginess. I’ve tested this with different zucchinis, and the drier, the better. When mixing, always fold gently—overmixing can turn this lovely tender loaf into something dense. If you want a more pronounced cinnamon swirl, sprinkle extra cinnamon sugar on top before baking—just watch it, because it can burn if left too long.
I’ve played around with different sweeteners—using honey or maple syrup makes it even more moist and adds a subtle flavor. You can swap out half the sugar for applesauce or mashed sweet potato for extra health benefits, but I warn you—don’t go too overboard, or the texture might change too much. Oven temperatures can vary, so start checking around the 45-minute mark. Every oven has its quirks! I’ve also learned that tenting the bread with foil if it browns too quickly keeps it from overbaking on top. And finally, don’t skip the glaze if you want that extra sweet zing—it makes the loaf look pretty and taste even more indulgent.
Storing and Reheating Tips
This bread keeps surprisingly well. At room temperature, wrapped tightly in plastic or stored in an airtight container, it lasts up to 2 days without drying out. I like to slice it first, then store individual pieces—perfect for quick snacks or breakfasts. If it’s too warm out, refrigerate it for up to 5 days; just bring slices to room temperature or toast them gently for maximum enjoyment. Freezing is also a great option—wrap individual slices tightly in plastic wrap, then foil, and they’ll stay fresh for up to 3 months. To reheat, just pop a slice in the microwave for 10-15 seconds, or toast it until golden. For best flavor, add the glaze just before serving or right after reheating—this keeps the topping fresh and shiny. Trust me, this bread is a keeper, and once you get the hang of storing it, you’ll be enjoying that cozy homemade goodness all week long.
Frequently Asked Questions
Final Thoughts
This zucchini banana bread with cinnamon swirl is one of those recipes that feels like a warm hug from the oven. It’s moist, flavorful, and adaptable—a true comfort food that you can tweak to suit your mood and pantry. I love how it combines the classic banana bread charm with a little twist of cinnamon and the added health perk of zucchini. It’s just as good for a quick breakfast as it is for a cozy dessert with a cup of tea. Every time I bake this, the house fills with such a lovely aroma, and I swear, no matter how busy the day has been, my family’s smiles say it all. I hope you try this and discover just how simple and satisfying homemade bread can be. Don’t forget to share your versions in the comments—I’d love to hear your twists! Happy baking, and enjoy every delicious slice!
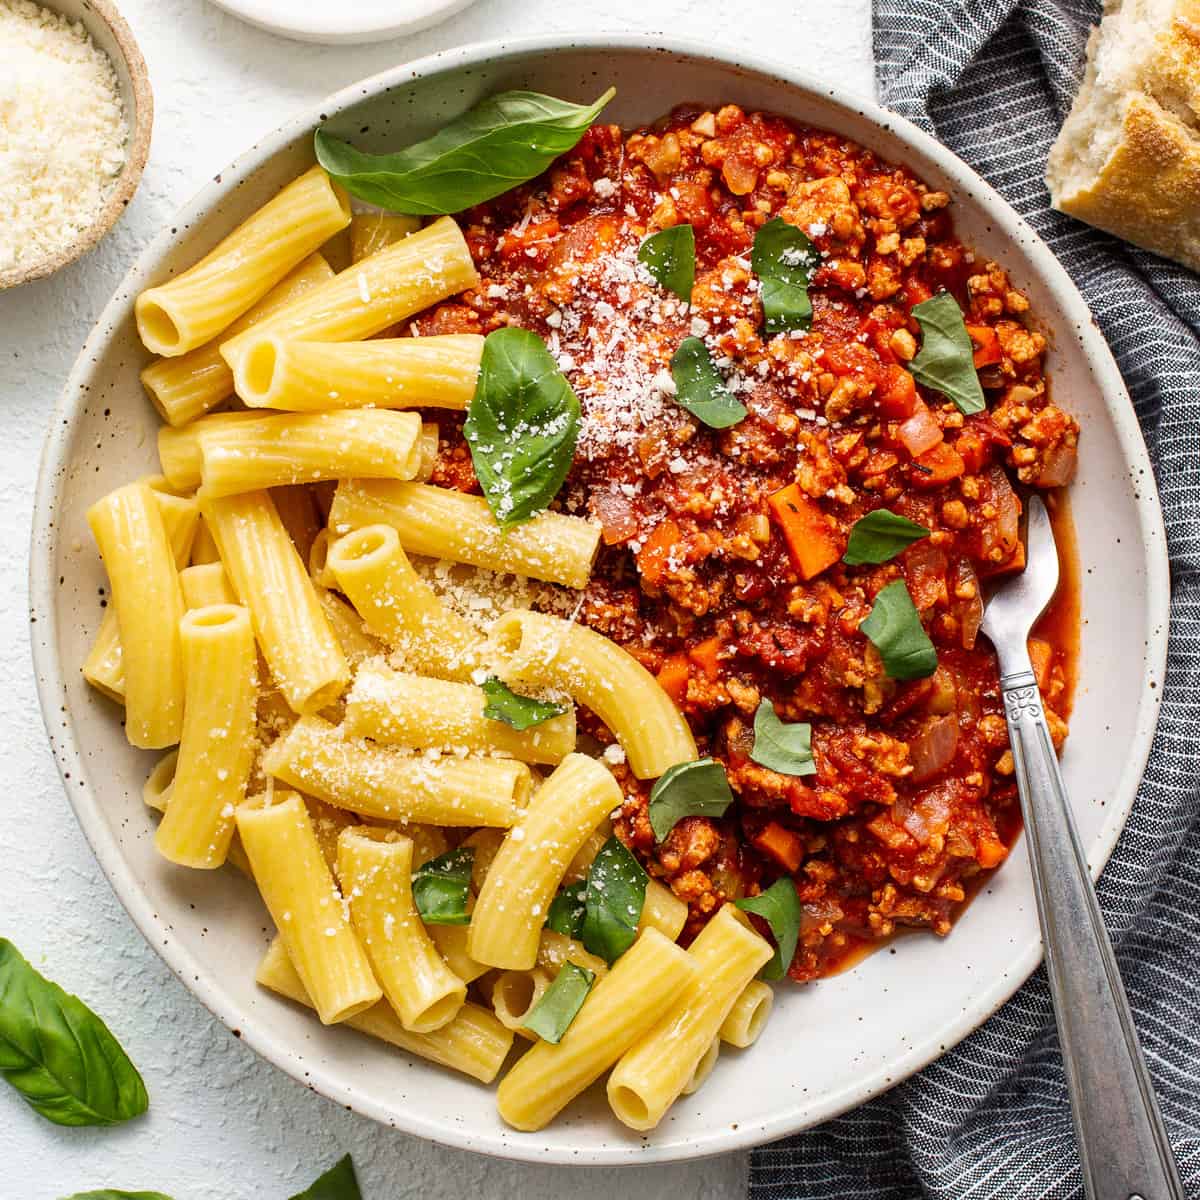
ground chicken bolognese
Ingredients
Method
- Mix 1 teaspoon of kosher salt, garlic powder, paprika, thyme, rosemary, parsley, oregano, red pepper flakes, and black pepper in a small bowl. Set aside.
- Heat 2 tablespoons of olive oil in a large Dutch oven over medium-high heat. Add ground chicken and break it into small pieces with a wooden spoon.
- Add the spice mixture to the chicken and cook for about 5 minutes until nearly cooked through. Remove the chicken and set aside.
- Keep oil in the Dutch oven. Add another tablespoon of olive oil, then sauté the onion with ¼ teaspoon salt for 4-5 minutes. Add garlic, carrots, and celery; cook for 2 more minutes.
- Add crushed tomatoes, tomato paste, brown sugar, and Worcestershire; whisk together. Bring to a boil.
- Return chicken to the Dutch oven, stir, reduce heat to low, and simmer uncovered for 1 hour and 30 minutes, stirring periodically.
- Once thickened and flavors meld, remove from heat and let rest for 10 minutes.
- While resting, cook pasta according to package instructions. Serve sauce over pasta, topped with Parmesan and chopped basil.