Easy Shrimp Fajita Bowls for a Weeknight
There’s something about a warm slice of homemade bread that just hits differently, don’t you think? I remember my grandmother’s kitchen, the scent of cinnamon and ripe bananas filling the air as I’d sit on her worn-out wooden chair, happily munching away. Over the years, I’ve learned that the secret to turning simple ingredients into comfort food isn’t just in the recipe — it’s in the love you pour into it, the little tips, and that dash of personal touch. This zucchini banana swirl bread? It’s become a family favorite around here because it’s not just incredibly flavorful — it’s also so easy to throw together, even on busy mornings or when I just want a little something sweet without much fuss. Honestly, I always do this when I have ripe bananas and a couple of zucchinis that need using up — which, let’s be honest, happens more often than I’d like. And trust me, once you taste that perfect swirl of banana and zucchini with a hint of cinnamon, you’ll be hooked, too.
What is Zucchini Banana Swirl Bread?
Think of this zucchini banana swirl bread as a cozy hybrid between a classic banana bread and a delightful zucchini loaf. It’s essentially a moist, tender bread that’s packed with the natural sweetness of ripe bananas and the subtle crunch of shredded zucchini. The magic happens in the swirling — you gently layer the banana mixture and zucchini batter, creating beautiful marbled patterns that look fancy but are super simple to do. The name might sound quirky, but it perfectly describes this glorious, slightly dense bread that’s perfect for breakfast, snacks, or a sweet treat with your afternoon coffee. It’s inspired by old family recipes, with a modern twist — because who doesn’t love sneaking in some veggies into a baked good? Plus, it’s a fantastic way to use up those overripe bananas and zucchinis lounging in your fruit basket or garden harvest. Think of it as a hug in loaf form, reliable and cozy every time.
Why you’ll love this recipe?
What I love most about this zucchini banana swirl bread is how forgiving and adaptable it is — and, of course, how it tastes. The flavor combo of sweet bananas, earthy zucchini, and warm cinnamon is simply irresistible. My kids ask for this all the time, especially when they see me chopping zucchinis — they know what’s coming! It’s also a lifesaver on busy nights because I can mix it up quickly and have a homemade treat ready in under an hour. Budget-wise, it’s fantastic — most of the ingredients are pantry staples, and the zucchinis are usually leftover from other recipes or garden bounty. This bread is versatile, too — you can tweak it with walnuts, chocolate chips, or even blueberries if you’re feeling adventurous. I’ve made this countless times, and it never fails to disappear in minutes. The smell alone — that warm cinnamon, ripe banana aroma — can bring everyone to the kitchen begging for a slice. Honestly, it’s one of those recipes that feels like a warm hug, but with a bit of that ‘wow’ factor when you slice into it and see the beautiful swirl pattern. Plus, it’s great for breakfast, tea time, or even as a quick dessert. Once you try it, I bet it’ll become a regular in your kitchen, too.
How do you make Zucchini Banana Swirl Bread?
Quick Overview
This zucchini banana swirl bread is all about ease and flavor. The batter comes together quickly — just mix dry ingredients, mash bananas, grate zucchinis, then fold everything together. The secret is in the layering: pour half the batter into your loaf pan, spread a generous layer of the banana mixture, add the remaining batter, and then create beautiful swirls with a toothpick or butter knife. Pop it in the oven, and in about 45-55 minutes, you’ve got a fragrant, moist loaf that’s perfect for slicing. What makes this method so special is how forgiving it is: overmixing isn’t a big deal, and the swirl pattern looks fancier than it actually is. Trust me, once you master this technique, it’s a total game-changer for layered baked goods.
Ingredients
For the Main Batter:
– 2 cups all-purpose flour (I like to use half whole wheat sometimes for extra fiber)
– 1 teaspoon baking soda
– 1 teaspoon baking powder
– ½ teaspoon salt
– 1 teaspoon ground cinnamon (adds that warm touch)
– ½ cup brown sugar or coconut sugar (for a touch of richness)
– 2 large eggs (or flax eggs for vegan version)
– ½ cup vegetable oil or melted coconut oil
– 1 teaspoon vanilla extract
– 1 cup mashed ripe bananas (about 2 large bananas)
– ½ cup finely grated zucchini (don’t squeeze out all the moisture; a gentle squeeze afterward is fine)
For the Filling:
– 1 ripe banana, mashed (for that gooey swirl)
– 2 tablespoons honey or maple syrup
– ½ teaspoon cinnamon (extra flavor boost)
– Optional: chopped nuts, chocolate chips — because why not?
For the Glaze:
– ½ cup powdered sugar
– 1-2 teaspoons milk or dairy-free alternative
– A splash of vanilla or lemon juice for zest
Step-by-Step Instructions
Step 1: Preheat & Prep Pan
Kick things off by setting your oven to 350°F (175°C). Grease your loaf pan with butter or line it with parchment paper. A light coating of cooking spray works, too. I always do this first — makes life easier later when you’re trying to get that perfect slice out without crumbling.
Step 2: Mix Dry Ingredients
In a big bowl, whisk together the flour, baking soda, baking powder, salt, and cinnamon. I find that breaking up any lumps early ensures a smoother batter. This part’s quick but crucial — you’re building a solid base for that tender crumb.
Step 3: Mix Wet Ingredients
In a separate bowl, mash your bananas with a fork until nice and smooth. Add the eggs, oil, vanilla, and sugars, then whisk until combined. The mixture should be fragrant and slightly frothy. Here’s a little tip — I’ve tested this with applesauce replacing some oil, and it made it even moister, though I prefer a bit of oil for that rich crumb.
Step 4: Combine
Pour the wet mixture into the dry, then gently fold until just combined — don’t overmix, or your bread might get a tougher texture. Small lumps are perfectly fine. Overmixing is a rookie mistake I learned the hard way — it can cause tunnels in the loaf.
Step 5: Prepare Filling
Mix the mashed banana, honey, and cinnamon for the swirl. Taste it — if you like it sweeter, add a touch more honey. Keep it slightly runny but spreadable. This layer adds that gooey, fruity burst with every bite.
Step 6: Layer & Swirl
Pour half the batter into your pan, then spread the banana mixture over it. Top with the remaining batter, covering the swirl layer. Use a butter knife or skewer to gently swirl the banana into the batter, creating beautiful marbled patterns. Think of it as painting with batter — no need for perfection, just a gentle swirl.
Step 7: Bake
Pop it into the oven for about 45-55 minutes. Keep an eye out after 45 minutes — insert a toothpick in the center; if it comes out clean, it’s ready. The house will smell like cinnamon and sweet bananas, I promise. Baking times vary a little depending on your oven, so trust that toothpick test.
Step 8: Cool & Glaze
Let the bread cool in the pan for about 10 minutes, then transfer it to a wire rack. Once it’s almost completely cooled, drizzle the glaze over the top. If it’s too thick, stir in a tiny splash of milk — if it’s too runny, sprinkle in a little powdered sugar. The glaze adds a shiny, sweet touch that really makes it feel special.
Step 9: Slice & Serve
Use a serrated knife for neat slices, and wait a few minutes if it’s still warm — that helps the slices hold together. This bread is lovely when slightly warm, but honestly, it’s just as good at room temperature. Serve with a hot cup of coffee or tea, and watch how everyone asks for seconds. Best enjoyed fresh but also keeps well for a couple of days wrapped tightly.
What to Serve It With
This bread’s versatility makes it a favorite for pretty much any occasion. For breakfast, I love slicing it thick and spreading a little butter or jam — it’s so comforting. It pairs beautifully with a strong black coffee or a chai latte. On a lazy weekend, I often serve it alongside fresh fruit or Greek yogurt. If you’re doing brunch, a dusting of powdered sugar and a drizzle of maple syrup turns it into something truly indulgent. At night, I’ll warm slices for a quick dessert — maybe topped with whipped cream or a scoop of vanilla ice cream. My kids? They request it as an afternoon snack, sometimes with a smear of peanut butter or nut butter — honestly, it’s all about that sweet, wholesome goodness. I’ve also cut it into smaller muffins when I needed a grab-and-go snack. Basically, this loaf is a blank canvas for your cravings and seasonal goodies — I love the flexibility!
Top Tips for Perfecting Your Zucchini Banana Swirl Bread
Over the years, I’ve picked up a few tricks that make this recipe even better. First, always squeeze out a little moisture from your grated zucchini — excess water can make the bread dense instead of tender. I keep a paper towel nearby to pat it dry — trust me, it helps. When mixing, fold gently to keep the batter fluffy; overmixing toughens the bread, which nobody wants. For the swirl, I sometimes add a splash of citrus zest or even a spoonful of nutella for a richer flavor. Using ripe bananas is key — they make the bread naturally sweet and moist. If your bananas are still slightly under ripe, pop them in the microwave for 20 seconds; it softens them if they’re stubborn. I’ve tried substituting different sugars — coconut sugar gives a lovely caramel vibe, but I prefer traditional brown sugar because it complements the warm spices perfectly. When baking, I position my rack in the center and rotate the loaf halfway through, especially if your oven runs hot on one side. For the glaze, a softer drizzle is prettier, so I add a little more milk if it thickens up too much. Lastly, don’t rush slicing — wait until it’s fully cooled; hot bread can crumble. These little tips come from years of baking — I promise they’ll save you some frustration and elevate your loaf.
Storing and Reheating Tips
This bread keeps beautifully if stored correctly. Keep it wrapped in plastic or an airtight container at room temperature for up to two days, especially if you plan to enjoy it fresh. After that, it’s best to move it to the fridge, where it’ll stay tasty for about 4 days. Just make sure it’s wrapped well or stored in a resealable bag — zucchini can make it soggy if exposed to air for too long. For longer storage, I like to freeze slices individually wrapped; they thaw quickly at room temperature or can be toasted for a warm comeback. A tip for maintaining moisture during freezing: double-wrap with freezer-safe plastic and foil. Reheating in the microwave for about 10-15 seconds restores that cozy warmth, though I also love slicing and toasting it lightly for a crispy edge. And if you’ve glazed your bread, add the glaze after reheating if needed — it’s a small step that really makes it feel fresh again. Just remember, the best way to enjoy it is still the day you bake it… but honestly, it’s so good, I’ve kept pieces for breakfasts and snacks for days without a problem!
Frequently Asked Questions
Final Thoughts
This zucchini banana swirl bread has genuinely become my go-to when I want something sweet, wholesome, and just a little special. The flavors meld beautifully, and the swirl adds that touch of elegance without any extra fuss. It’s perfect for lazy weekend mornings, school snacks, or a simple treat after dinner. I love how versatile it is — you can customize the mix-ins or toppings to match your mood or what’s in your pantry. Every time I bake this, I feel like I’m sharing a little piece of my family’s history, wrapped in a loaf. I hope you give it a try — I know you’ll love how easy it is to make and just how much everyone will rave about its tender crumb and cozy flavor. Don’t forget to let me know how yours turns out or share your favorite tweaks. Happy baking, my friend — and enjoy every warm, fragrant slice!
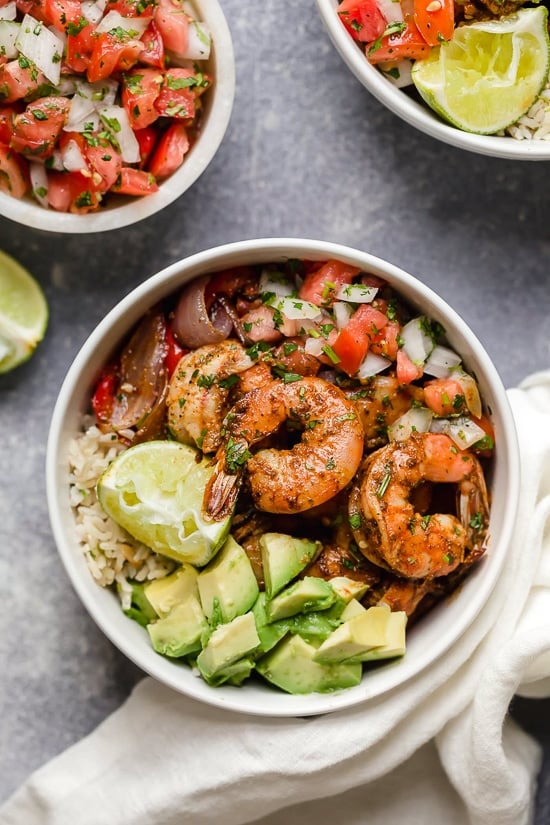
Shrimp Fajita Bowls
Ingredients
Method
- Preheat oven to 400 degrees F.
- Whisk together olive oil, lime juice, chili powder, cumin, oregano, paprika, salt, garlic powder, and onion powder in a large bowl.
- Add shrimp to the bowl and toss to coat evenly. Marinate while preparing vegetables.
- Combine sliced peppers and onions in a large bowl and toss with a tablespoon of olive oil, salt, and pepper.
- Transfer vegetables to a sheet pan and roast for 20 minutes, tossing halfway through.
- Meanwhile, cook brown rice according to package instructions and prepare fresh salsa by combining tomatoes, onion, cilantro, salt, and lime juice.
- Remove vegetables from oven. Place marinated shrimp evenly among veggies and return to oven to roast for 8 more minutes.
- Assemble bowls by placing 3/4 cup rice in each bowl, then dividing shrimp, vegetables, salsa, and sliced avocado among them. Serve immediately.