Layered Taco Delight A Simple Recipe
There’s something magical about pulling a warm slice of zucchini chocolate swirl bread out of the oven—the way the smell of cocoa and just a hint of zucchini fill the kitchen, making everyone suddenly hungry. Honestly, this recipe is one of those quiet favorites that I return to when I want a bit of comfort, a little bit indulgent, but still wholesome enough that I don’t feel guilty grabbing a second slice. I always do this when I need a quick treat for the kids after school or a sweet pick-me-up on a busy weekend. Plus, the crazy part? My kids ask for this all the time, even though it sounds fancy or complicated. It’s really just a humble loaf with a gorgeous chocolate swirl that makes every bite feel special. And trust me, once you make it a couple of times, it feels more like a warm hug from your kitchen than just a bake. I’ve tested this with almond milk, and it actually made it even creamier—so don’t be afraid to swap ingredients to suit your pantry! This one’s a lifesaver on busy nights when you want something quick yet satisfying—because who doesn’t need a little more chocolate in their life?
What is Zucchini Chocolate Swirl Loaf?
Think of this as a cross between a quick bread and a soft chocolate cake, all wrapped up in a cozy loaf that’s perfect for sharing. The name says it all: zucchini is the secret ingredient that keeps the bread moist and tender, but it’s so finely grated you don’t even notice it (at least, not until you get that sneaky hint in the background). The swirl of melted chocolate runs beautifully through the batter, making every slice look like a work of art—and taste even better. It’s essentially an indulgent treat with a whisper of healthfulness, thanks to the zucchini. The idea is to get that perfect balance of the rich, gooey chocolate and the mild, almost-neutral flavor of zucchini that keeps the loaf moist without overpowering. I love that it’s versatile: you can use dark chocolate chips, a drizzle of cocoa on top, or even swap in some chopped nuts if you’re feeling extra fancy. Whether it’s for breakfast, dessert, or a snack, this zucchini chocolate swirl loaf is low-key impressive but really simple to whip up.
Why you’ll love this recipe?
Honestly, the best part about this loaf? It’s about as straightforward as baking gets but feels surprisingly special. What I love most about this is how insanely flavorful it is—moist, chocolatey, with a subtle hint of zucchini that makes you feel like you’re sneaking in some veggies for the kids (and hey, I do that a lot). The smell alone during baking is enough to make everyone in the house come rushing to the kitchen. Plus, it’s super budget-friendly—your usual pantry staples come together in a heartbeat. No fancy ingredients or obscure items needed. The beauty is in the simplicity, and yet, you’re rewarded with a cake-like texture that feels indulgent but isn’t overly sweet. You can totally customize it too: add chopped nuts for crunch, switch out dark for milk chocolate, or go dairy-free with coconut oil and almond milk. It’s versatile enough to fit whatever mood or occasion, from a weekend brunch to a quick afternoon snack. My favorite part? The swirling chocolate that makes every slice look so pretty—like a miniature masterpiece. And honestly, once you’ve made this once, I bet you’ll find yourself craving it regularly, especially when you need a quick sweet fix that feels almost like a hug in every bite.
How do you make Zucchini Chocolate Swirl Loaf?
Quick Overview
This loaf is genuinely simple. You start by preheating your oven, then mix up your dry ingredients while grating your zucchini finely and squeezing out excess moisture—because soggy batter is no fun. Then, you whisk together wet ingredients, fold everything together gently, layer in your batter, add the chocolate swirl, and bake. The magic happens when the chocolate swirl kind of marbles through the batter, creating those beautiful ribbons. Once baked, I like to let it cool just enough so the chocolate sets a little, then drizzle a simple glaze or dust with powdered sugar if I want to dress it up. It’s a straightforward process, but the results look like you spent hours—trust me on this one. This recipe is perfect when you want something impressive but don’t want to spend ages in the kitchen. It’s pretty forgiving, too—if your batter is a little thick or thin, don’t stress. Just keep the core steps in mind, and you’ll have a loaf that’s moist, chocolatey, and totally addictive.
Ingredients
For the Main Batter:
– 2 cups all-purpose flour (or gluten-free blend if preferred)
– 1 teaspoon baking powder
– ½ teaspoon baking soda
– ½ teaspoon salt
– 1 cup granulated sugar (or coconut sugar for caramel notes)
– ½ cup vegetable oil or melted coconut oil
– 2 large eggs (or flax eggs for vegan)
– 1 teaspoon vanilla extract
– 1 cup finely grated zucchini (about 1 medium zucchini)
– ½ cup milk (dairy or plant-based like almond or oat)
– ½ teaspoon apple cider vinegar (optional but helps with rise)
For the Filling:
– ½ cup mini chocolate chips or chopped chocolate
– 2 tablespoons cocoa powder (for deeper chocolate flavor, optional)
For the Glaze:
– ½ cup powdered sugar
– 1-2 teaspoons milk or cream
– A dash of vanilla or cocoa powder for extra flavor (optional)
Step-by-Step Instructions
Step 1: Preheat & Prep Pan
Set your oven to 350°F (175°C) and line a loaf pan with parchment paper or grease it well. I always do this first—makes removing the bread so much easier. If you want a crusty top, sprinkle a little sugar on top before baking, which creates a lovely caramelization.
Step 2: Mix Dry Ingredients
In a large bowl, whisk together the flour, baking powder, baking soda, salt, and cocoa powder if using. This helps distribute everything evenly so your bread rises uniformly. I’ve learned to do this first because it prevents clumping later.
Step 3: Mix Wet Ingredients
In a separate bowl, whisk together the eggs, sugar, oil, vanilla, milk, and apple cider vinegar. The mixture should be smooth and slightly frothy—this is what gives the loaf its tender crumb. I’ve tested this with plant-based milks, and it works like a charm—plus, it keeps this vegan-friendly if you swap the eggs for flax eggs.
Step 4: Combine
Pour the wet mixture into the dry ingredients, folding gently with a spatula until just combined. Don’t overmix! It’s okay if there are a few lumps—this keeps the bread moist. Also, squeeze out some excess moisture from your grated zucchini before adding, so you don’t end up with a soggy batter.
Step 5: Prepare Filling
Mix the chocolate chips with a tablespoon of cocoa powder if you want extra chocolate flavor, then fold them into the batter. This step helps distribute the chocolate evenly and prevents it all sinking to the bottom.
Step 6: Layer & Swirl
Pour about two-thirds of the batter into your prepared loaf pan. Sprinkle the chocolate chips or chopped chocolate on top, then add the remaining batter. Use a skewer or knife to swirl the batter gently—think of it like creating pretty ribbons of chocolate and batter that will marble during baking.
Step 7: Bake
Pop it into the oven and bake for 50-60 minutes. You’ll know it’s done when a toothpick inserted in the center comes out clean or with just a few moist crumbs. If the top starts to brown too quickly, tent it with foil for the last 10 minutes. Ovens vary, so keep an eye on it!
Step 8: Cool & Glaze
Let the loaf cool in the pan for about 15 minutes, then transfer to a wire rack. I recommend waiting at least 20 minutes before glazing or slicing—gives the chocolate swirl a chance to set. If you like, mix powdered sugar with a splash of milk and drizzle over the top, creating beautiful streaks as it hardens just slightly.
Step 9: Slice & Serve
Use a sharp serrated knife for clean cuts, ideally when the bread is at room temperature. I love serving this warm with a pat of butter, but honestly, it’s just as amazing on its own or with a dollop of whipped cream. It’s such a comforting treat any time of day—you might find yourself hiding slices for later, just like I do!
What to Serve It With
This loaf really shines in a variety of settings. For breakfast, serve it alongside a cup of strong coffee or a glass of cold milk—whatever you like, really. I’ve done a slightly toasted slice with a smear of butter for that perfect morning bite, and the kids adore it as part of a brunch spread, paired with fresh berries and a fruity yogurt. As a dessert, it’s already sweet enough, but I love serving it with a dusting of powdered sugar or a drizzle of caramel sauce for a little extra indulgence. On cozy afternoons, I sometimes warm a slice and top it with vanilla ice cream or a spoonful of mascarpone. Trust me, once you bake this, it’s hard not to keep coming back to it—every bite just feels like home.
Top Tips for Perfecting Your Zucchini Chocolate Swirl Loaf
Over the years, I’ve figured out some tricks to make this loaf even better. First, always squeeze out excess moisture from your zucchini—it’s the key to avoiding a dense, wet crumb. Grating it finely helps it blend seamlessly into the batter, so it doesn’t steal attention from the chocolate. When mixing, fold gently and avoid overworking the batter—this keeps it airy and moist. Speaking of chocolate, I love using mini chips because they spread more evenly, but chopped bars work great too—just chop them small enough so they don’t sink to the bottom. You’ll notice that swirling the batter isn’t just pretty; it helps distribute the chocolate more evenly without turning the loaf into a gooey mess. For swaps, try swapping the sugar with honey or maple syrup for a richer, caramel-infused flavor. And don’t skip the cooling step—hot bread and melted chocolate are not a good mix, so patience pays off here. Baking temperature can vary slightly depending on your oven’s quirks, so start checking around the 50-minute mark. My biggest lesson? The better you prepare your ingredients, the more beautiful and delicious the loaf turns out. A little experimenting with different chocolates or add-ins like nuts or dried fruit can make this your own signature loaf.
Storing and Reheating Tips
This bread stays moist and delicious for a couple of days if stored properly. Wrap slices tightly in plastic wrap or keep the loaf in an airtight container at room temperature for up to two days—if it lasts that long! I prefer fridge storage for longer freshness; just pop slices into a sealed container or bag, and they’ll keep OK for about 4 days. To reheat, a quick 10-15 seconds in the microwave restores the cozy, just-baked warmth, or you can warm slices in a low oven (around 300°F) for 10 minutes. If you’ve added the glaze, I recommend waiting to glaze until just before serving—otherwise, the glaze can soften or melt away during storage. For the best experience, I usually refresh a slice with a quick warm-up and a drizzle of fresh glaze or dusting of powdered sugar. Freezing works beautifully, too. Wrap individual slices tightly in plastic, then foil, and freeze for up to 3 months. Thaw at room temp or warm gently in the microwave for a quick treat. Just a note: glazed bread does lose some of its shine after freezing, so add fresh glaze after reheating if you want that glossy finish. This way, your loaf stays tasty and inviting no matter how long you keep it.
Frequently Asked Questions
Final Thoughts
This zucchini chocolate swirl loaf has become a staple in my kitchen, and I honestly think it’ll find a special place in yours too. It’s one of those recipes that’s almost impossible to mess up—moist, chocolatey, and just a little bit fancy without any fuss. My kids ask for this almost weekly now, and I love how versatile it is: breakfast, snack, dessert, you name it. It’s the kind of bake that smells so good, everyone wanders in from the other room just to see what’s happening—then leaves with a happy, chocolate-stained grin. Whether you’re baking for family, friends, or just yourself on a cozy day in, this loaf hits the spot every time. I encourage you to experiment with different chocolates or add-ins—make it your own signature treat! Happy baking, and I can’t wait to hear how yours turns out—please drop a comment or share your twist! Nothing beats the warmth of a home-baked loaf, especially one this delightful.
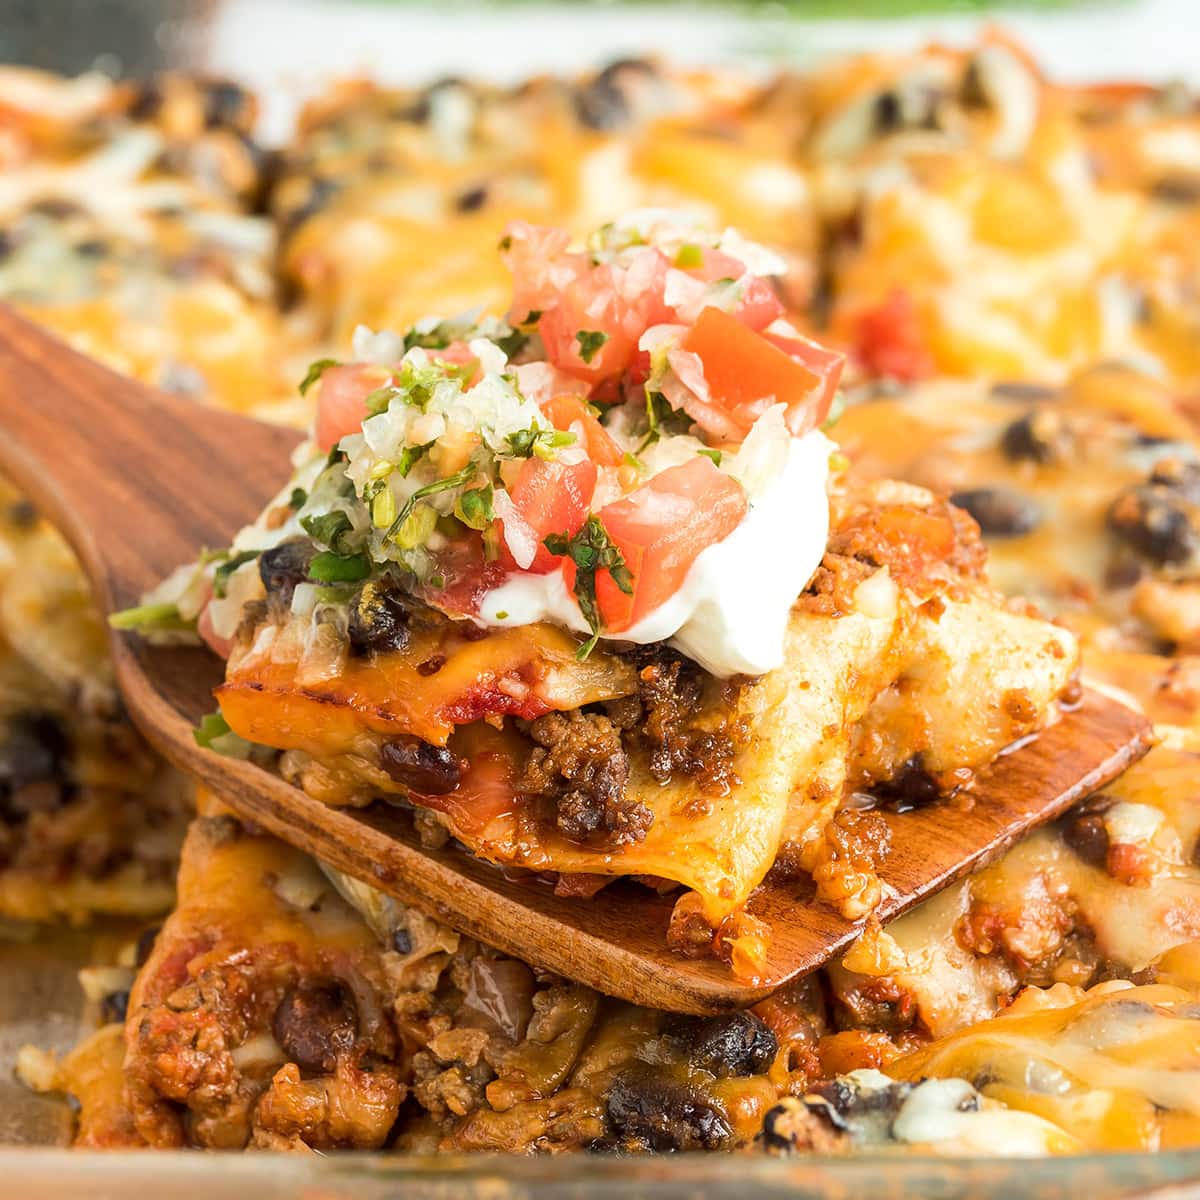
taco lasagna
Ingredients
Method
- Preheat the oven to 375 degrees Fahrenheit.
- Lay 2 of the flour tortillas into the bottom of a 9x13 baking dish. Use a knife to trim excess edges to fit the dish.
- Spray a 9x13 baking dish with nonstick spray and set aside.
- In a skillet over medium-high heat, cook ground beef, onion, and garlic until beef is browned and cooked through. Drain excess fat.
- In a small bowl, whisk together taco seasoning and water. Pour over cooked beef mixture and simmer for 2-3 minutes until thickened.
- Arrange 2 of the tortillas in the prepared dish. Spread half of the beef mixture evenly over the tortillas.
- Spread half of the salsa over the beef layer.
- Sprinkle 1.5 cups of shredded cheese over the salsa.
- Layer remaining tortillas, beef mixture, salsa, and cheese in the same order for a second layer.
- Bake in the preheated oven for 20-25 minutes until bubbly and golden. Garnish with cilantro, and serve with sour cream and pico de gallo if desired.