Lucky Irish Sugar Cookies How to Make Them
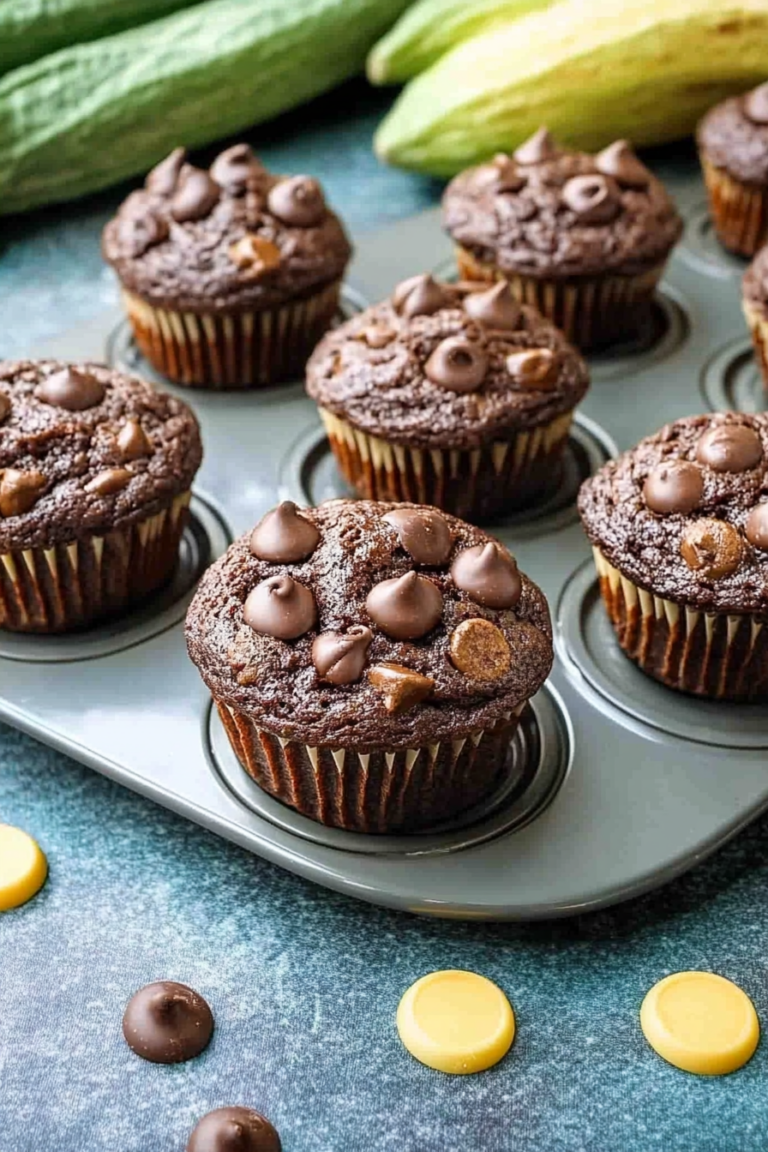
Honestly, the first time I bit into this zucchini coffee cake, I felt like I’d rediscovered a childhood memory wrapped in a fresh, new twist. It’s one of those recipes I keep in my back pocket for mornings when I want something cozy but a little indulgent — and let’s be honest, my kids ask for this all the time. It’s sweet, moist, with just the right amount of crunch on top from the streusel, and the zucchini keeps it all super tender without the vegetable flavor overpowering. I always do this when I want to surprise my family — it’s like a warm hug in baked form. Plus, it disappears in minutes at my house, which is saying something! I love that it’s forgiving — I’ve tested this with almond milk, and it made it even creamier, trust me on that. And, oh boy, it’s perfect with a cup of coffee, tea, or just plain milk. It’s basically my go-to for breakfast, brunch, or even a sneaky late-night treat when I don’t want to bake a whole cake. So, grab your zucchinis, and let’s make some magic happen! This one’s a lifesaver on busy nights, I swear.
What is Sunshine Zucchini Coffee Cake?
This sunshine zucchini coffee cake is like a warm, sunny morning in a slice. Think of it as a tender, slightly sweet cake layered with shredded zucchini — yes, zucchini! — which keeps it moist and brings a subtle earthiness that balances the sweetness. The topping is a crunchy streusel that adds a lovely contrast in texture, and the whole thing is drizzled with a glaze that’s just sweet enough. It’s essentially a cross between a classic coffee cake and a veggie-filled breakfast treat, but don’t worry — no one’s gonna taste the veggies unless they’re looking for them. The name “sunshine” comes from how the golden streusel and bright flavors just seem to lift your spirits. It’s a cake that feels fancy yet is incredibly easy to throw together. Think of it as a breakfast, brunch, or dessert — because honestly, I’ve eaten this for all three!
Why you’ll love this recipe?
What I love most about this sunshine zucchini coffee cake is how it hits all the right notes — sweet, crispy, moist, and just a little sneaky in the best way. The flavor is rich but not heavy, with that comforting cinnamon kick that makes it feel like a hug. If you’re like me, the simplicity of stirring everything together without fussing over complicated techniques is a game-changer — I’ve made this countless times and it never fails. The ingredients are budget-friendly, mostly pantry staples, and you can switch things up easily. Want to add some walnuts? Go for it. Craving a lemon glaze instead of vanilla? Absolutely. It’s super versatile. This cake is also great because it’s sneaky healthy, thanks to the zucchini — it adds moisture without any weird veggie taste. Plus, my kids actually ask for seconds, which is pretty much my gold standard for a kid-approved dish. It’s perfect when you want something sweet but don’t feel like baking a stressful masterpiece — this comes together in minutes, and the smell alone brings everyone to the kitchen. Honestly, what’s not to love?
How do I make a Zucchini cake?
Quick Overview
This sunshine zucchini coffee cake is a one-bowl wonder. You start by grating fresh zucchini — no need to peel — then mix it with a simple batter made from flour, sugar, eggs, milk, and a dash of cinnamon. The trick is not overmixing; you want everything just combined for that tender texture. Pour half the batter into your prepared pan, sprinkle on a gooey cinnamon-sugar mixture, add the remaining batter, then swirl some more for a marbled effect. Top with crunchy streusel, bake until golden, and finish with a simple glaze. It’s honestly foolproof once you get the hang of it, and there’s a certain satisfaction in watching it rise and turn that perfect, golden-brown. I promise, once you’ve tried this, it’ll become a regular on your baking rotation — it’s just too good and easy to resist.
Ingredients
For the Main Batter:
– 2 cups all-purpose flour (I like unbleached for better flavor)
– 1 cup granulated sugar (but you can do half brown sugar for extra richness)
– 1 teaspoon baking powder
– ½ teaspoon baking soda
– 1 teaspoon ground cinnamon
– ½ teaspoon salt
– 2 large eggs (at room temp for better mixing)
– ¾ cup milk (dairy or almond milk — I’ve tested both, and they work beautifully)
– ½ cup vegetable oil (or melted butter if you prefer richer flavor)
– 1 teaspoon vanilla extract
– 1 to 1½ cups grated zucchini (squeeze out excess moisture — I do this with a clean dish towel)
For the Filling:
– ¼ cup light brown sugar
– 1 teaspoon cinnamon
– ¼ cup chopped nuts (walnuts or pecans work great, optional)
For the Glaze:
– ½ cup powdered sugar
– 1-2 teaspoons milk or lemon juice
– A dash of vanilla or lemon zest for extra flavor
Step-by-Step Instructions
Step 1: Preheat & Prep Pan
Preheat your oven to 350°F (175°C). Grease a 9-inch round springform pan or a square baking dish with butter or non-stick spray. I like to line mine with parchment for easy removal. This cake loves to stick if you’re not careful, so don’t skip this step. Set your pan aside while you prepare your batter.
Step 2: Mix Dry Ingredients
In a large mixing bowl, whisk together the flour, sugar, baking powder, baking soda, cinnamon, and salt. This ensures everything is evenly distributed and fluffy, which means your cake gets a uniform rise. I’ve made the mistake of just throwing everything in together — trust me, whisking is your best friend here.
Step 3: Mix Wet Ingredients
In a separate bowl, beat the eggs, then add the milk, oil, and vanilla. Mix until combined. If your eggs are cold, it’s okay — just make sure everything is really blended. I tested with almond milk once, and it made the batter even creamier, so don’t be afraid to experiment here.
Step 4: Combine
Pour the wet ingredients into the dry and stir gently. Do not overmix — a few lumps are fine! Overmixing can make the cake dense, and nobody wants that. Fold in the grated zucchini last, just until evenly distributed. It’ll look a little lumpy, and that’s exactly what you want.
Step 5: Prepare Filling
In a small bowl, mix the brown sugar, cinnamon, and nuts if using. This will go in the middle of the cake, giving it that irresistible sweet and spicy surprise. If you prefer, you can skip the nuts or swap in shredded coconut or mini chocolate chips.
Step 6: Layer & Swirl
Pour half the batter into your prepared pan. Sprinkle evenly with the cinnamon-sugar mixture. Then pour the remaining batter on top. Use a butter knife or skewer to swirl the layers gently — you want a marbled look, not a mixed-up mess. Don’t overdo it — just a few zig-zags will do!
Step 7: Bake
Bake for about 40-45 minutes, or until a toothpick inserted into the center comes out clean. Every oven is different; some run hot, some cold, so keep an eye on it after 35 minutes. The top should turn a lovely golden brown, and your house will smell like cinnamon and sweet zucchini magic.
Step 8: Cool & Glaze
Let the cake cool in the pan for about 15 minutes, then transfer to a wire rack. Once cooled slightly, drizzle your glaze all over — I like to do this while it’s still warm enough to soak in a little. The glaze adds that perfect finishing touch and extra sweetness.
Step 9: Slice & Serve
Slice into squares or wedges, serve warm or at room temperature, and watch everyone’s eyes light up. A scoop of vanilla ice cream or a dollop of whipped cream pairs beautifully if you’re feeling extra indulgent. I love serving this with a big mug of coffee or even a cold glass of milk — perfect for a lazy weekend morning or a quick weekday treat.
What to Serve It With
This sunshine zucchini coffee cake is pretty adaptable. For breakfast, I love it with a strong cup of coffee and fresh fruit — maybe some sliced strawberries or blueberries. It’s also fantastic for brunch, especially when paired with a mimosa or a chai latte. If you’re thinking dessert, serve it with a little extra glaze, a dusting of powdered sugar, or a side of fresh berries and cream. During my family’s cozy weekends, I often bake this on Sunday mornings, and it’s become our traditional “treat and chat” moment. For casual snacks, it’s great sliced up for picnics or packed in lunchboxes. The subtle zucchini flavor makes it feel a little healthier too, which I guess is my secret weapon for sneaking greens into my kids’ diet. Whenever I serve this, I always get a handful of requests for the recipe — it’s one of those that instantly makes everyone smile!
Top Tips for Perfecting Your Sunshine Zucchini Coffee Cake
Over the years, I’ve learned a few tricks to get this just right. First, squeeze out as much moisture as you can from the zucchini — a clean dish towel is perfect for this; excess water can make your cake a little too dense or soggy. When mixing, be gentle — overmixing can turn this fluffy cake into something more like bread. I’ve tested adding chopped walnuts, and trust me, it adds a lovely crunch, but you can leave them out for a nut-free version or swap with crumbled streusel on top. If your cake browns too quickly but isn’t cooked inside, try moving your oven rack lower or reducing the temperature slightly — every oven is a little different. For the glaze, I like mine a bit thicker so it won’t run off, but a thinner glaze is perfect if you want a light drizzle. I’ve also experimented with lemon zest in the glaze — it adds a fresh, tangy brightness. Honestly, don’t be afraid to play around a little — this is a forgiving recipe, and every tweak just makes it more “yours.”
Storing and Reheating Tips
This cake keeps beautifully, so I always make a little extra. To store at room temperature, cover tightly with plastic wrap for up to two days — but honestly, it’s usually all gone by then! For longer storage, pop slices into an airtight container and refrigerate for up to five days. If you want to keep it fresh a bit longer, store it in the freezer wrapped tightly in plastic and foil for up to a month. To reheat, microwave slices on medium for about 20 seconds, or warm it in the oven at 350°F for about 10 minutes. If you’re planning to add fresh glaze later, wait until it’s just out of the fridge so it’s nice and sticky. The key is not to overheat — we want that moist, tender crumb to stay just right. Trust me, this cake reheats beautifully and tastes even better the next day — if it lasts that long!
Frequently Asked Questions
Final Thoughts
This sunshine zucchini coffee cake is a true comfort in every sense of the word. It’s forgiving, charming, and packed with flavors that just make you feel good — the kind of dessert that doubles as breakfast and never feels guilty. I love how the zucchini keeps it moist and subtly nutritious, and I’ve learned that a little experimentation — like swapping walnuts for pecans or adding a splash of lemon zest — only makes it more personalized. Every time I bake this, I get such warm reactions from my family; it’s like a little hug from the oven. If you’re looking for a cozy, crowd-pleasing treat that’s easy to make but feels special, give this a try. I can’t wait to hear how yours turns out! And if you play around with it — add your own twist — I’d love to hear about it in the comments. Happy baking, friends — this one’s a keeper!

Shamrock Sugar Cookies
Ingredients
Method
- Combine all ingredients in the bowl of a stand mixer fitted with the paddle attachment or in a large mixing bowl. Mix on low speed until the mixture forms a cookie dough, scraping the bowl occasionally.
- Divide the dough in half. Place each half between sheets of waxed paper and roll out to about 1/4 inch thickness. Chill in the refrigerator for at least 30 minutes.
- Preheat the oven to 375°F. Cut out cookies into shamrock shapes or your preferred shapes and place them on a parchment-lined baking sheet.
- Bake for 6-10 minutes or until the edges are just starting to brown. Let cookies cool completely before decorating.
- For the frosting, beat softened butter until smooth, then gradually add powdered sugar, vanilla extract, and milk until reaching desired consistency. Tint the frosting green with food coloring.
- Frost the cooled cookies with green frosting and decorate with green sanding sugar. Allow frosting to set.