Sweet Holiday Trees A Simple Treat
There’s something about waking up on a lazy Sunday morning and heading into the kitchen to whip up something sweet that just feels like a warm hug. For me, it’s this zucchini swirl cake—yes, zucchini, of all things, turned into something so tender, sweet, and totally addictive. I remember my grandma making similar cakes, hiding veggies inside so we’d eat them without fuss. Over the years, I’ve tweaked it, added my own little touches, and I swear this version is a total crowd-pleaser. It’s a no-fuss recipe that’s perfect when you want a treat that’s not overly complicated but still hits all the right notes. My kids ask for this all the time, and honestly, it’s a lifesaver on busy nights when dessert feels like a rare luxury—it’s quick to throw together, and the smell alone brings everyone eagerly to the kitchen. Trust me, once you make this, it’s going to become a family favorite you’ll keep coming back to, no matter the season.
What is Zucchini Swirl Cake?
Think of zucchini swirl cake as the lovechild of a moist, fluffy cake and a beautiful marbled dessert that’s loaded with sneaky veggies. It’s essentially a soft, tender cake dotted with cinnamon-spiced zucchini, which gives it a moist texture and a subtle earthiness. The swirl part comes from mixing in a cinnamon-sugar mixture that gets gently marbled through the batter—so you get gorgeous streaks of caramel-colored goodness in every slice. The name might sound fancy, but it’s actually one of the simplest cakes you’ll ever make. The best part? It’s a fantastic way to sneak a veggie boost into a dessert—perfect for those days when you want something sweet but also want to feel a little virtuous. This cake is versatile, easy to customize, and always a hit at family gatherings or even just when I need a little comfort snack during a busy week.
Why you’ll love this recipe?
What I love most about this zucchini swirl cake is the way it combines simplicity with that wow factor—imagine a cake that’s so tender it practically melts in your mouth, with beautiful marbled swirls lending it an artisanal touch. The flavor is perfectly balanced, with just the right amount of sweetness and a gentle hint of cinnamon and nutmeg. The zucchini adds moisture like you wouldn’t believe, making every bite super soft and rich, yet light enough not to feel heavy. It’s incredibly budget-friendly, too—just some zucchinis, basic pantry staples, and a handful of spices. Plus, this cake is super versatile: you can swap in different spices, add chopped nuts or chocolate chips, or even make it gluten-free with a simple swap of flour. Honestly, the process itself is almost meditative, and what I love most is how the smell in my kitchen is enough to make everyone come running. It’s a real mood booster on gloomy days or when you just need a little slice of happiness.
How do I make Zucchini Swirl Cake?
Quick Overview
This cake comes together in just a few straightforward steps: grate your zucchini, mix up a tender batter, swirl in a cinnamon-sugar mixture, and bake until golden. I always do this when I want a homemade treat without fuss—no complicated frosting, no fancy tools needed. It’s practically foolproof, especially if you pay a little attention to the zucchini’s moisture level. The marbling effect makes it look like something you’d buy at a bakery, but honestly, it’s even better because it’s made with love. The key is to keep things light and gentle when mixing, so the cake stays airy and tender. A perfect pick-me-up for lazy mornings or quick snacks, and it keeps well for days—if it lasts that long!
Ingredients
For the Main Batter:
– 2 cups all-purpose flour (I like to use unbleached if I have it, but plain works great too)
– 1 cup sugar (white or a mix of white and brown for added depth)
– 1 teaspoon baking powder
– ½ teaspoon baking soda
– ¼ teaspoon salt
– 1 teaspoon ground cinnamon
– ½ teaspoon ground nutmeg (because everything’s better with a little spice)
– ¼ cup vegetable oil or neutral oil (trust me, vegetable oil keeps it moist)
– 1 cup buttermilk (or milk + a splash of lemon juice or vinegar if you’re out)
– 2 large eggs
– 1 teaspoon vanilla extract
For the Filling:
– ½ cup granulated sugar
– 1 teaspoon ground cinnamon
– 1 cup finely grated zucchini (squeeze out excess moisture—trust me, it makes a huge difference)
– A pinch of salt (because balance is everything)
For the Glaze:
– ½ cup powdered sugar
– 1-2 tablespoons milk or lemon juice
– Optional: a splash of vanilla or almond extract for flavor
– Sprinkles of lemon zest or chopped nuts for topping (if you’re feeling fancy)
Step-by-Step Instructions
Step 1: Preheat & Prep Pan
I always start by preheating my oven to 350°F (175°C). Greasing the baking pan—either a loaf pan or a 9-inch round cake pan—is key. I like to line mine with parchment paper for easy removal. This cake is a little sticky on the bottom, so don’t skip that step; it’ll help you get perfect slices without a mess!
Step 2: Mix Dry Ingredients
In a big bowl, whisk together the flour, sugar, baking powder, baking soda, salt, cinnamon, and nutmeg. I’ve learned the hard way that sifting these ingredients first makes mixing smoother and prevents lumps. Plus, it evenly disperses all those lovely spices—you want each bite to be flavorful!
Step 3: Mix Wet Ingredients
In another bowl, combine the eggs, vanilla, oil, and buttermilk. I always make sure the eggs are at room temperature—it mixes better and helps with a lighter batter. Whisk until smooth and slightly frothy—that’s your cue it’s ready to come together.
Step 4: Combine
Pour the wet ingredients into the dry and fold gently—don’t overmix! It’s okay if there are a few small lumps; overmixing can make the cake heavy and dense. I switch to a spatula for folding, taking my time so everything stays airy.
Step 5: Prepare Filling
Mix the sugar and cinnamon, then fold in the grated zucchini. I’ve tested this with regular zucchini and yellow squash; both work fine, but I prefer zucchini because it keeps the moistness just right. Gently squeeze out excess moisture from the zucchini before adding—it helps keep the batter from being too wet.
Step 6: Layer & Swirl
Pour half of your batter into the prepared pan. Spread half of the cinnamon-sugar-zucchini mixture over it. Repeat with the remaining batter and filling. Then, using a skewer or knife, swirl gently to create those beautiful marbled patterns. Trust me, don’t overdo it—just a few gentle swirls for a natural effect and a picture-perfect look.
Step 7: Bake
Pop it into the oven and bake for 45-50 minutes, or until a toothpick inserted in the center comes out clean. Keep an eye near the end—every oven is a little different. If the top browns too quickly, tent it with foil for the last 10 minutes so it doesn’t burn.
Step 8: Cool & Glaze
Allow the cake to cool in the pan for about 15 minutes before transferring it to a wire rack. Once cooled, whisk together your glaze ingredients and drizzle over the top. I often add a dash of lemon zest to the glaze—it brightens everything up and adds a little pop of flavor.
Step 9: Slice & Serve
Slice with a serrated knife, preferably after a little rest—hot cake can squish easily. Serve it warm or at room temperature, with a cup of coffee or tea. I swear, it’s even better the next day, and trust me, it disappears in minutes at my house!
What to Serve It With
This zucchini swirl cake is so flexible—it works for breakfast, brunch, or dessert. For breakfast, I love a dollop of Greek yogurt and a drizzle of honey on a warm slice, paired with a strong cup of coffee. It’s what I call “breakfast comfort food,” and honestly, my kids flip for it first thing in the morning. For brunch, serve it alongside fresh fruit and a mimosa, and I promise it makes a party of flavors on your plate.
If you’re craving this as a dessert, pair it with a scoop of vanilla ice cream or a dollop of whipped cream. I’ve even topped it with chopped nuts and a dusting of cinnamon for a more rustic, cozy vibe. When I want a little something special, I serve slices with a side of berry compote—bright, sweet, and a lovely contrast to the cake’s richness.
And on those days when I just need a quick snack, I cut a small piece, toast it lightly, and slather it with butter—trust me, that’s pure comfort.
Top Tips for Perfecting Your Zucchini Swirl Cake
They say the secret to great baking is patience, and I’ve learned that perfecting this cake involves a few little tricks. First, squeezing out that zucchini moisture is a game-changer—if you leave too much water, the batter gets too runny, and the cake won’t rise right. I always use a clean kitchen towel or cheesecloth to squeeze out the excess, then chop or grate again if needed.
When mixing the batter, be gentle. Overmixing can lead to a dense crumb, so fold until just combined. If you want a slightly richer flavor, swap some of the oil for melted butter—trust me, it adds a lovely nutty note.
The swirl technique is all about visual appeal. I like to reserve some of the filling to sprinkle over the top before baking, creating a crackly cinnamon crust that’s crunchy and sweet. If you want more dramatic swirls, swirl a little more with a skewer in random patterns for that rustic look.
For ingredient swaps, I’ve tested using applesauce instead of oil for an even lighter cake—works well, but cut back slightly on the sugar. Gluten-free flour blends work too, but keep an eye on the baking time—they tend to bake a little faster. And if you’re feeling creative, toss in some chocolate chips or chopped walnuts for extra texture and flavor bursts.
Trust me, every batch you make will teach you something new—like how your oven behaves or how much zucchini is too much (usually, squeeze out as much moisture as you can—less is more!). The key is to stay relaxed and enjoy the process. Nothing beats the smell of cinnamon and zucchini baking, and I promise, your family will thank you for it.
Storing and Reheating Tips
This cake keeps beautifully—I usually store slices in an airtight container at room temperature for up to two days, covered with a towel to keep it fresh. If you want to keep it longer, pop it into the fridge for about 3-4 days—just make sure it’s well wrapped. The moistness keeps it from drying out too fast, and I actually like it chilled—a different flavor experience entirely.
For longer storage, especially if you baked a big batch, wrap slices individually with plastic wrap and freeze for up to three months. Thaw at room temperature or gently reheat in the microwave for a minute or two. Honestly, it still tastes incredible reheated—moist, warm, and comforting. When reheating, I usually add a quick drizzle of glaze or a sprinkle of cinnamon to perk it up.
If you’re planning to add the glaze after storing, just give the cake a few minutes to cool completely before drizzling—it helps prevent melting and runny drips. Overall, this cake holds up well, and with proper storage, it’s like enjoying a fresh-baked treat every time.
Frequently Asked Questions
Final Thoughts
If you’re looking for a cozy, fuss-free dessert that manages to feel fancy but is super easy to make, this zucchini swirl cake is my go-to. It’s a perfect way to celebrate summer zucchinis or use up leftover produce without wasting it. The balance of sweetness, spice, and moistness makes it a hit with both kids and adults alike. Plus, it’s a reminder that sometimes, the best comfort food comes with a little surprise inside—a vegetable, no less! Every time I make this, I get reminded of those lazy afternoons baking with my grandma, the scent filling the house like a warm promise. I hope you give it a shot and find it as homemade magic as I do. Please share your tweaks and pics—I’d love to hear how yours turns out. Happy baking!
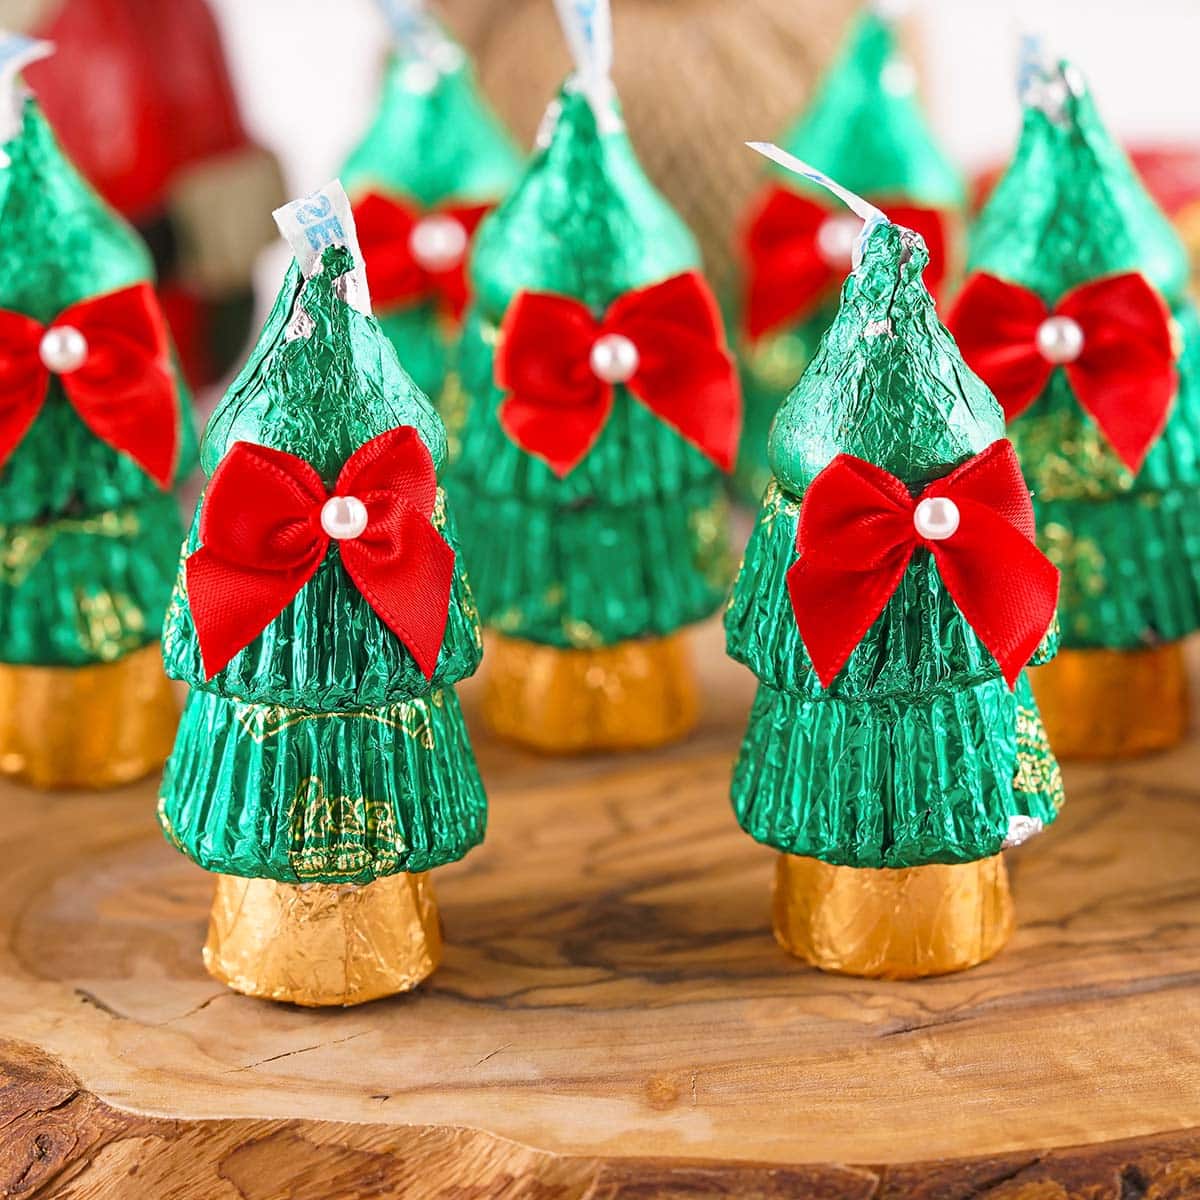
Candy Christmas Trees
Ingredients
Method
- Start by arranging Rolos at the base of your workspace.
- Use a dab of frosting to glue a mini Reese’s Cup on top of each Rolo, creating the first 'layer' of the tree.
- Stack additional mini Reese’s Cups on the previous one, forming a conical shape to resemble a Christmas tree.
- Once the tree shape is formed, attach a green Hershey’s Kiss at the top with frosting as the Christmas tree topper.
- Decorate the tree by attaching red mini marshmallows using frosting as ornaments.
- Let the frosting set for about 10 minutes before serving.