Easy Cinnamon Roll Pie Crust Delight
There’s something about the smell of freshly baked bread that feels like a warm hug, right? I’ll never forget the first time I tried to make zucchini swirl bread. It was one of those days when I just needed a little comfort—I’d been running around all morning, chasing after my kids, and by afternoon I was craving something sweet but not overly indulgent. I pulled out a stubborn zucchini from the fridge, remembered a recipe I’d bookmarked ages ago, and aaand… I ended up with this delicious, fudgy, vibrant swirl of cinnamon and zucchini goodness. Honestly, I think I’ve made this almost a dozen times now, and it never fails to bring all of us to the table, noses in the air, stealing slices while still warm. Trust me on this one—this zucchini swirl bread is the answer to those cozy, craving-filled afternoons. It’s simple, comforting, and so darn versatile. Plus, it’s packed with veggies but sneaks them in so well that even the pickiest kiddos ask for seconds! If you love quick breads, this one’s a lifesaver on busy nights or lazy weekends when you just want to bake something that feels like a hug in every bite.
What is Zucchini Swirl Bread?
Think of zucchini swirl bread as a little slice of home—rustic, moist, and bursting with flavor. It’s essentially a quick bread, meaning no yeast needed, that’s flavored with fresh zucchini, a hearty touch of cinnamon, and swirled with a lovely cinnamon sugar mixture. The name ‘swirl’ comes from the gorgeous marbled pattern you get when you gently swirl the cinnamon filling into the batter before baking. Imagine a soft, tender loaf with tiny pockets of cinnamon sweetness, balanced perfectly by the mild, almost buttery flavor of zucchini. It’s got that gorgeous golden crust on top, and inside, a moist crumb that almost melts in your mouth. The best part? It’s kind of a sneaky veggie addition that doesn’t compromise on flavor at all. Originally, I think this recipe came from my grandma’s old baking box, tweaked a bit with my own little tricks, but since then, it’s become a family favorite and now, a little staple in my kitchen. It’s perfect for breakfast, a midday snack, or even a casual dessert.”
Why you’ll love this recipe?
What I love most about this zucchini swirl bread? It’s the kind of recipe that makes you feel like a pro, even if you’re just winging it after a long day. The flavor? Oh, it’s heavenly. The sweet cinnamon swirl paired with the subtly earthy zucchini creates this lovely balance that hits all your comfort-food buttons. Plus, it’s so easy—no fancy ingredients or complicated steps. I’ve tested this with almond milk when I was out of regular milk, and honestly, it made the crumb a tiny bit creamier—I liked it even more! The ingredients are budget-friendly too; you probably already have everything in your pantry and fridge. And the best part? It’s endlessly versatile. Sometimes I add walnuts or chocolate chips (because, why not?), or I swap out the sugar for honey when I want a touch healthier. This recipe is perfect when you’re craving something sweet but don’t want to commit to a cake or a complicated dessert. It’s one of those recipes that just feels like home—warm, Welcoming, and—dare I say—addictive. I make it every season, and honestly, my kids ask for this all the time. It disappears in minutes at my house, and I always do this when I want to impress friends with something casual yet impressive. It’s cozy, wholesome, and honestly, one of the best ways to use up those extra zucchinis that are practically begging to be baked into something sweet.
How do you make Zucchini Swirl Bread?
Quick Overview
This zucchini swirl bread comes together pretty quickly—no need for complicated rising times or fancy techniques. The batter itself is simple: just toss your grated zucchini into a moist, lightly sweetened dough, swirl in a cinnamon sugar mixture, and bake. I love how forgiving this recipe is; if you overmix a little, it’s still tender, and if you add a splash more milk, it’s still perfect. The secret to that gorgeous swirl? Don’t overdo it—just enough to create beautiful marbled patterns before baking. The baking time is about 50-60 minutes, and the smell alone will lure everyone into the kitchen. My favorite part? Cooling the loaf just a bit, then drizzling the glaze—nothing fancy, just powdered sugar mixed with a splash of milk and vanilla. You’ll see, once you make this a couple of times, it’s like your new best friend—quick, forgiving, and so rewarding.
Ingredients
For the Main Batter:
– 2 cups all-purpose flour (I always buy a good quality brand, but honestly, any brand works fine)
– 1 teaspoon baking powder
– ½ teaspoon baking soda
– ½ teaspoon salt
– 1 teaspoon ground cinnamon (more if you love it spicy!)
– ½ cup granulated sugar (feel free to cut back if you want less sweet)
– ½ cup brown sugar (adds a lovely molasses-y flavor)
– ½ cup vegetable oil (or melted butter if you prefer a richer crumb)
– 2 large eggs
– 1 teaspoon vanilla extract
– 1 cup grated zucchini (about one medium zucchini, grated and drained a little)
For the Filling:
– 2 tablespoons brown sugar
– 1 teaspoon cinnamon
– 1 tablespoon melted butter (or coconut oil for a dairy-free version)
For the Glaze:
– ½ cup powdered sugar
– 1 tablespoon milk (or dairy-free alternative)
– ½ teaspoon vanilla extract
Step-by-Step Instructions
Step 1: Preheat & Prep Pan
Set your oven to 350°F (180°C). Grease your loaf pan with butter or non-stick spray, then line it with parchment paper if you like easy removal. I always do this because it’s a lifesaver—I hate fighting with sticking bread! It also helps the edges bake evenly and makes cleanup a breeze.
Step 2: Mix Dry Ingredients
In a large mixing bowl, whisk together the flour, baking powder, baking soda, salt, and cinnamon. This step ensures everything’s evenly distributed and your bread has a consistent rise. I always do this first—trust me, it makes a difference in texture!
Step 3: Mix Wet Ingredients
In a separate bowl, whisk together the sugars, oil, eggs, and vanilla. Make sure your eggs are at room temperature—this helps the batter come together smoothly. Add the grated zucchini here—I like to squeeze out a little excess moisture so the bread isn’t too dense. I always test this by giving the zucchini a quick squeeze in a towel before adding it into the batter.
Step 4: Combine
Pour the wet mixture into the dry ingredients and fold gently. Don’t overmix—just until everything is combined. I’ve learned this the hard way, and overmixing makes the bread a little tough. A few lumps are totally fine. You want it moist but not gloopy.
Step 5: Prepare Filling
Mix the brown sugar and cinnamon in a tiny bowl. Melt your butter just enough to be pourable—this will help create those lovely layers when swirling. You can also skip the butter for a healthier version, but trust me, it’s worth it for the flavor.
Step 6: Layer & Swirl
Pour half of the batter into your prepared pan. Sprinkle evenly with half of the cinnamon-sugar mixture, then add the rest of the batter on top. Use a skewer or a butter knife to swirl gently—think “S” shapes or figure eights—as you go. Be careful not to overdo it; you want nice marbled streaks, not a muddy mess.
Step 7: Bake
Pop it in the oven for about 50-60 minutes. Keep an eye on it around the 50-minute mark—your loaf is ready when a toothpick inserted in the center comes out clean. I always test a little before the time’s up; ovens can vary. The top should be golden and slightly cracked—perfect little bakery vibes.
Step 8: Cool & Glaze
Let your bread cool in the pan for at least 15 minutes, then transfer to a wire rack. Mix the powdered sugar, milk, and vanilla for the glaze. Once the bread’s just warm (not hot!), drizzle generously with the glaze. This step is so satisfying—don’t skip it!
Step 9: Slice & Serve
Use a serrated knife to slice when it’s fully cooled—if you try hot, it’ll squish. Serve with a cup of coffee or tea, and watch everyone fall in love all over again. My kids prefer it slightly warm with a pat of butter, and I like it at room temperature with a splash of extra glaze.
What to Serve It With
This zucchini swirl bread is incredibly flexible. Think of it as a brunch centerpiece or a cozy afternoon snack. I love serving it with a dollop of Greek yogurt and fresh berries for a breakfast that feels indulgent but still healthy. It also goes beautifully with a strong cup of coffee or a chai latte—something warm to balance the cinnamon aroma. For a casual family treat, I slice it thick and butter it up, then pack leftovers for the kids’ school snacks. Sometimes I pop a few slices into the toaster for extra crunch, especially if I want it to feel like a little luxury. At gatherings, I’ve decorated the slices with fresh mint leaves or edible flowers—trust me, presentation counts when you’re serving something so pretty and flavorful. We often have it with a glass of milk or even drizzle a bit of honey on top if we’re feeling extra sweet. Honestly, I find this bread works basically any way you serve it—just make sure you have plenty on hand because it disappears fast!
Top Tips for Perfecting Your Zucchini Swirl Bread
This recipe’s pretty forgiving, but a few tricks help elevate it even more:
- Zucchini Prep: Always squeeze out excess moisture after grating—this keeps your bread tender and light. Using a clean kitchen towel to press out moisture is my go-to trick—trust me, you want a moist but not soggy batter.
- Mixing Advice: Overmixing early on can toughen the crumb. Mix just until combined—think “light and fluffy” rather than “smooth as batter.”
- Swirl Pattern: Use a gentle, figure-eight motion when swirling, and don’t overdo it. You want pretty marbled streaks, not a muddy swirl of batter and cinnamon.
- Ingredient Swaps: For a healthier twist, swap half the sugar for maple syrup or honey. You can also use whole wheat flour, but reduce the flour slightly or expect slightly denser texture.
- Baking Tips: Oven temps can vary—if your bread is browning too quickly or not enough, rotate the pan halfway through baking. Also, always do the toothpick test—I learned this from years of baking—nothing beats that first perfect sweet-yet-moist bite!
- Glaze Variations: For extra flavor, add orange zest or a splash of bourbon. If you prefer not to glaze, dust the top with cinnamon sugar after baking for instant holiday vibes.
Honestly, I’ve learned from many failed attempts—like overmixing or not squeezing enough zucchini—and it’s all been part of the charm. Each tweak makes this recipe better. Just have fun, trust your instincts, and don’t stress about perfection—your kitchen’s about creating a cozy, delicious mess!
Storing and Reheating Tips
This loaf stays fresh for a few days if you store it properly. Wrap it tightly in plastic wrap or keep it in an airtight container. Honestly, I prefer it at room temperature—keeps the crust crispy and the inside moist. If you want it to last longer, pop leftovers in the fridge. It’s good for about 4 days, but if you want to keep it even longer, slice it up and freeze in zip-top bags—just pop slices into the toaster when needed. Reheating is super simple—just warm slices in the microwave for 15-20 seconds or re-toast. If you glazed your bread, just be mindful that the glaze can get soft if you refrigerate too long, so it’s best to add that fresh or serve at room temp. The smell alone will have everyone reaching in for another slice, so I find these tips help keep the goodness at its best. And if you need to reheat a whole loaf, just give it a quick oven toast at 350°F for 10 minutes wrapped in foil—trust me, it’s just as good as freshly baked.
Frequently Asked Questions
Final Thoughts
This zucchini swirl bread has truly become a comfort staple in my home. It’s soft, moist, with the perfect cinnamon swirl, and a sneaky veggie boost that I feel good about feeding my family. Every time I make it, I’m reminded that baking is a kind of magic—transforming simple ingredients into something warm, fragrant, and downright cozy. Plus, it’s so forgiving—no need to be perfect, just enjoy the process and trust that gorgeous marbled pattern will emerge. I love that it’s versatile enough to serve for breakfast, snack time, or even a casual dessert—really, it’s just a delicious excuse to celebrate the simple joy of baking. If you give this a try, I’d love to hear how it turns out—pop me a comment, or share your tweaks! Happy baking—let the comforting aroma fill your home and bring everyone together.
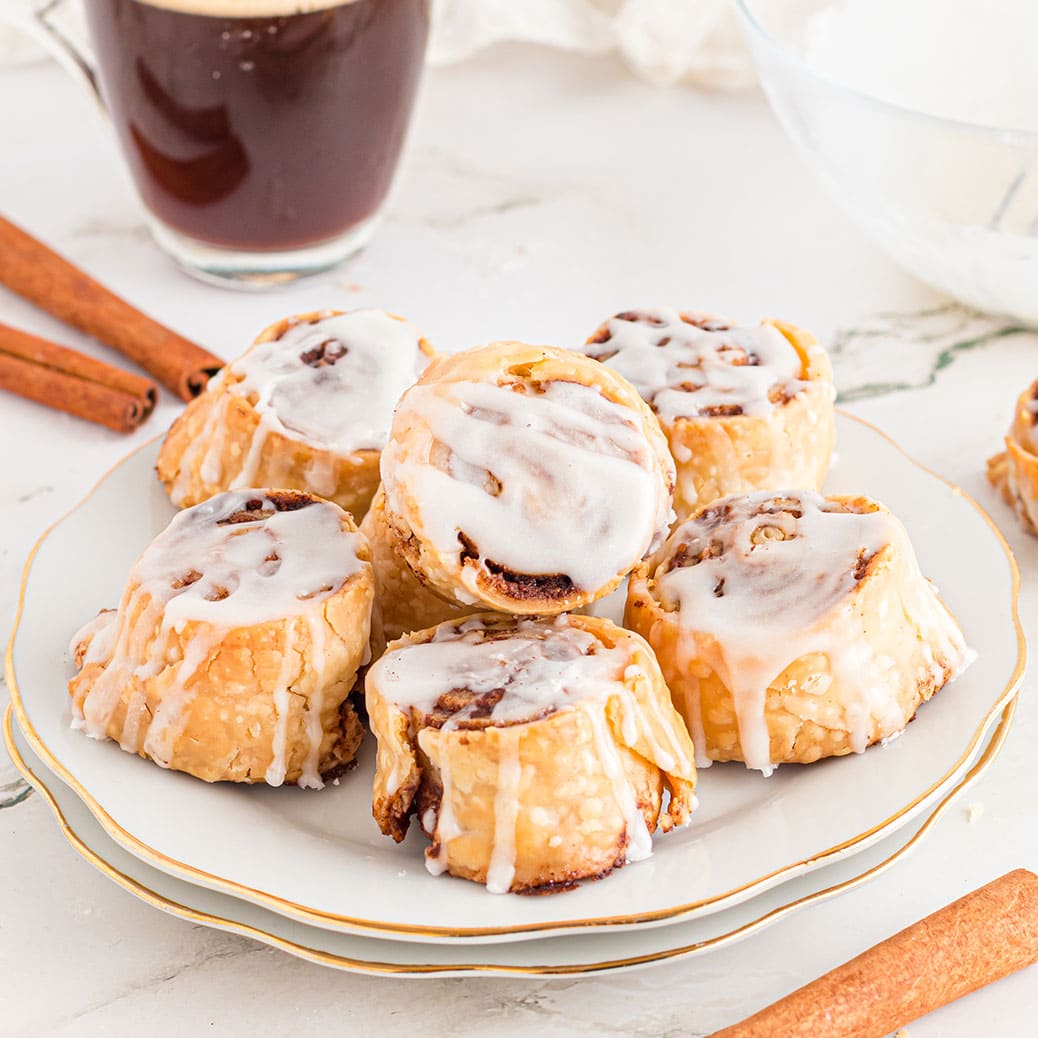
cinnamon rolls
Ingredients
Method
- Preheat oven to 350°F.
- Unroll the pie crust on a lightly floured surface.
- Spread softened butter evenly over the crust.
- Mix brown sugar with cinnamon, then sprinkle evenly over the butter layer.
- Carefully roll the dough into a log shape, starting from the short end.
- Slice the rolled dough into 8 equal pieces.
- Place the slices on a baking sheet lined with parchment paper, spaced apart.
- Bake for 20 minutes until golden brown.
- Mix powdered sugar with cream and vanilla or almond extract to make glaze.
- Drizzle glaze over warm cinnamon rolls before serving.