Crispy Stuffed Pitas How to Make Arays
If you’re like me, you probably grew up sneaking bites of your grandma’s zucchini bread and thinking it’s just a humble vegetable turned sweet. But let’s be honest — I’ve honestly never met a zucchini dessert I didn’t love, especially when it’s topped with a luscious swirl of cream cheese. This zucchini and cream cheese swirl cake has been our family’s secret weapon for cozy afternoons, potlucks, and those days when you need a little something sweet but don’t want to go all out baking a huge batch of cookies. It’s an easy-to-make treat that looks fancy but feels like home, with that perfect balance of moist zucchini and creamy richness. Plus, the kids ask for it all the time — I swear, they think it’s more cake than zucchini! And honestly? It’s one of those recipes that gets even better the next day, making it a lifesaver on busy nights when you crave something homemade but don’t have hours to spend in the kitchen.
What is Zucchini & Cream Cheese Swirl Cake?
This tasty treat is essentially a moist, tender cake made with grated zucchini, which keeps it super soft and a little sneaky—because you can’t really tell where the vegetable ends and the cake begins. Think of it as a cross between a classic coffee cake and a muffin, but with a creamy surprise swirled through the middle. The name is pretty straightforward: zucchini mixed into a cake batter, topped with dollops of sweetened cream cheese that get marbled during baking. It’s an old-fashioned type of dessert that’s been around in various forms in family kitchens for generations, but I’ve added my own little twist with a hint of vanilla and a light glaze. It’s perfect for anyone who loves a satisfying brunch treat, a cozy afternoon snack, or even a casual dessert after dinner. Think of it as comfort food that’s also just a little bit special.
Why you’ll love this recipe?
First off, the flavor — oh my gosh, the flavor! That sweet, slightly citrusy aroma of zucchini paired with the rich, tangy cream cheese swirls is just divine. My kitchen always smells like a bakery when I make this, and every time I bake it, my family circles around like little bees attracted to honey. What I love most about this recipe is how simple it is to pull together, even on my busiest mornings or after a long day. It’s honestly one of those “mix, pour, swirl, and bake” kinds of recipes that never fails. Plus, it’s budget-friendly — using pantry staples and a zucchini from the garden (or the store!) makes this feel like a real win. And the versatility? Oh, you can play with it! Swap out vanilla for lemon zest, add a handful of chopped nuts, or even use low-fat cream cheese — it all works. This cake is much more than a dessert; it’s a cozy hug on a plate, and I bet it’ll become a staple in your house too.
How do you make Zucchini & Cream Cheese Swirl Cake?
Quick Overview
This cake comes together quickly, thanks to a straightforward batter that gets stirred up in one bowl. I always do this when I want something homemade but don’t want to fuss too much — just grate the zucchini, mix the wet and dry ingredients, then layer in the filling and swirl. The magic happens in the oven, where those beautiful marbled ribbons form, and the smell alone will make you swoon. It’s perfect for busy mornings or when friends come over unexpectedly. The best part? The cream cheese swirl soaks into the batter just right, creating pockets of creamy goodness in every bite. Once baked, a simple drizzle of glaze kicks it up a notch. Trust me on this one; it’s a little slice of heaven every time.
Ingredients
For the Main Batter:
- 2 cups grated zucchini, excess moisture squeezed out (don’t skip this — it keeps the cake from being soggy!)
- 1 1/2 cups all-purpose flour (I prefer unbleached for a richer flavor)
- 1 teaspoon baking powder
- 1/2 teaspoon baking soda
- 1/4 teaspoon salt
- 1/2 cup granulated sugar
- 1/2 cup packed light brown sugar
- 1/2 cup vegetable oil or melted butter
- 3 large eggs
- 1 teaspoon vanilla extract
For the Filling:
- 8 oz cream cheese, softened
- 1/4 cup powdered sugar (or adjust to taste)
- 1 teaspoon vanilla extract
For the Glaze:
- 1 cup powdered sugar
- 2-3 tablespoons milk or cream
- Optional: a squeeze of lemon juice or vanilla for flavor
Step-by-Step Instructions
Step 1: Preheat & Prep Pan
Preheat your oven to 350°F (175°C). Grease a 9-inch loaf pan or round cake pan and line with parchment paper if you like, just to make removal easier. I always do this because it prevents sticking and gives you a cleaner slice. Set aside.
Step 2: Mix Dry Ingredients
In a large bowl, whisk together the flour, baking powder, baking soda, and salt. This step ensures everything is evenly distributed — trust me, it makes a difference in the final texture. A smooth, lump-free batter is the goal here.
Step 3: Mix Wet Ingredients
In a separate bowl, whisk together the sugars, eggs, and oil until well combined. Add the vanilla and mix again. I tested this with almond milk once, and it actually made the cake even creamier — so feel free to try different milks if you like! Then, fold in the grated zucchini. If it’s super moist, I like to give it a quick squeeze to remove excess water — no one wants a watery cake.
Step 4: Combine
Pour the wet mixture into the dry ingredients and gently fold until just combined. Be careful not to overmix; a few lumps are okay, and it keeps things tender. This batter is thick but so easy to work with.
Step 5: Prepare Filling
In a small bowl, beat the softened cream cheese with powdered sugar and vanilla until smooth. Taste it — if it’s too tangy for your liking, add a little more sugar. This step is what makes the swirl so irresistible.
Step 6: Layer & Swirl
Pour half of the batter into your prepared pan. Drop dollops of the cream cheese mixture over it in a few spots, then pour the remaining batter on top. Using a butter knife or skewer, swirl through the batter to create beautiful ribbons of cream cheese — don’t overdo it, just a gentle swirl is enough!
Step 7: Bake
Bake for about 45-50 minutes, or until a toothpick inserted in the center comes out clean. If the top is browning too fast, tent it loosely with foil. The smell during baking is heavenly — nutty, sweet, and inviting. Let it cool in the pan for about 15 minutes before transferring to a wire rack.
Step 8: Cool & Glaze
Allow the cake to cool completely before glazing. Mix powdered sugar and milk until smooth — it should be pourable but not runny. Drizzle a little over the top and let the glaze set for about 10 minutes.
Step 9: Slice & Serve
The key is to use a serrated knife for clean cuts, especially when slicing into the swirls. Serve at room temperature or slightly warmed — both ways are wonderful. I love it with a mug of coffee or a glass of cold milk, depending on the mood.
What to Serve It With
This cake is so versatile, I usually keep some for breakfast, enjoy slices with tea in the afternoon, or serve it as a light dessert after dinner. It’s perfect on a brunch table, where its golden top and marbled swirl make it look fancy but honestly, it’s so easy your kids can help. I also love to dust it with a little powdered sugar or serve it with fresh berries for a colorful contrast. My grandmother always served it slightly warm, with a dollop of whipped cream — trust me on this one; it’s divine. It’s also a great make-ahead treat. Wrap it up tightly and keep it in the fridge for a couple of days; the flavors deepen overnight, and the zucchini stays surprisingly moist. This is a recipe I keep coming back to, no matter the season. I think it will become a household favorite for you too!
Top Tips for Perfecting Your Zucchini & Cream Cheese Swirl Cake
This cake is forgiving, but here are a few tricks I’ve learned over years of making it:
- Zucchini Prep: Always squeeze out excess moisture. Grated zucchini can be surprisingly wet, and too much liquid can make the cake dense. I use a clean kitchen towel to wring out as much water as possible.
- Mixing Advice: Be gentle when folding the ingredients — overmixing can make the cake tough. The batter should be just combined with a few lumps—that’s perfect.
- Swirl Customization: Don’t rush the swirling. Drop spoonfuls of the cream cheese mixture, then use a skewer or chopstick in gentle circles to create beautiful marbling. It’s like an art project!
- Ingredient Swaps: Want to make it dairy-free? Coconut cream cheese works surprisingly well. Or swap half the sugar for honey or maple syrup for a different sweetness profile.
- Baking Tips: Every oven differs a bit; start checking around 45 minutes. The toothpick test is key: it should come out clean but with a few moist crumbs attached. If it over-bakes, it can dry out quickly.
- Glaze Variations: Add lemon zest or a splash of vanilla extract to the glaze for extra flavor. For a chocolate twist, melt a few tablespoons of chocolate into the glaze — yum!
Honestly, the more I make this cake, the more I find new ways to enjoy it. Sometimes I throw in chopped walnuts or a handful of blueberries for extra texture. The key is to trust your instincts and have fun in the kitchen. I’ve learned that imperfections often turn into happy accidents, like a little more swirl or a slightly crusty top — it just adds character!
Storing and Reheating Tips
This cake stays fresh for a couple of days if stored properly. I usually wrap it tightly in plastic wrap or store it in an airtight container. Keep it at room temperature for up to 2 days; after that, I pop it in the fridge, where it’s good for about 4-5 days. If you want to keep it longer, it freezes beautifully. Just wrap it well in plastic wrap and foil, then thaw overnight in the fridge before serving. If you’ve added the glaze, wait until the cake is defrosted completely before glazing again or adding a fresh layer of glaze. Reheat individual slices in the microwave for about 15 seconds if you like a warm dessert. Honestly, this cake reheat beautifully, maintaining its moisture and flavor.
Frequently Asked Questions
Final Thoughts
This zucchini and cream cheese swirl cake is one of those recipes that feels like a warm hug from my kitchen to yours. It’s straightforward, flexible, and absolutely delicious, full of moist zucchini and creamy swirls that turn an ordinary cake into something truly special. Whether you’re making it for a family brunch, a quick dessert, or even a snack to enjoy with coffee, I promise it’ll bring a little sunshine to your day. I’ve tested this countless times, and every batch gets a thumbs-up — trust me, it disappears in minutes at my house! Don’t be surprised if it becomes your new go-to, just like it is for me. Encourage friends and family to get involved — baking together makes it even more memorable. I’d love to hear how yours turns out, so drop a comment below or share your tweaks. Happy baking, and enjoy every tender, sweet, zucchini-filled bite!
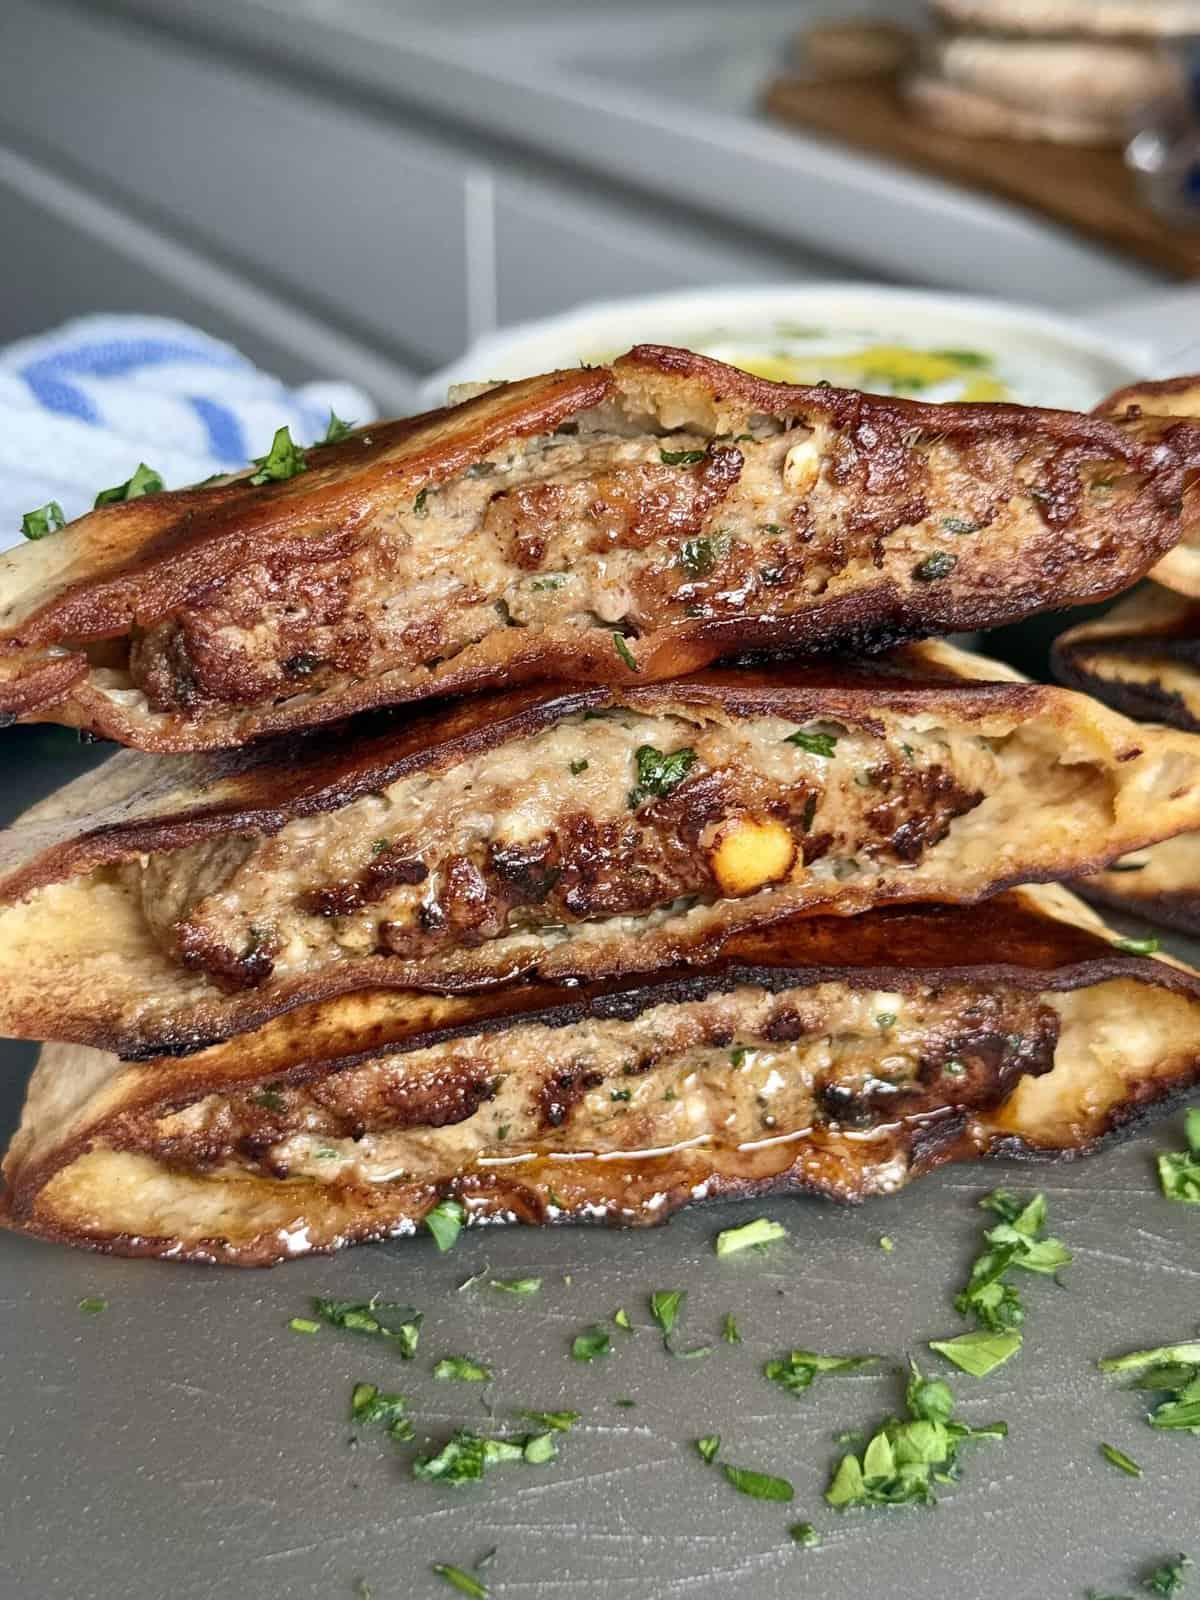
Stuffed Pitas
Ingredients
Method
- In a large bowl, combine ground beef, feta, garlic, olive oil, parsley, salt, garlic powder, onion powder, paprika, cumin, coriander, cayenne, cinnamon, and dried mint. Mix thoroughly with your hands until well combined. Shape the mixture into 8 equal small patties.
- Cut each pita bread in half to create pockets. Stuff each pita half with two meat patties and any additional desired vegetables or toppings.
- Preheat a skillet over medium heat. Lightly oil the skillet if needed. Cook the stuffed pitas for 4-5 minutes on each side until crispy and cooked through, making sure to sear the open side of each meat patty.
- Serve hot with lemon wedges and optional tzatziki dip.