Easy Roasted Butternut Squash Recipe
The first time I laid eyes on this cake, I thought, “Zucchini? in a dessert?” But let me tell you — it’s one of those recipes that sneakily become a household staple, and I swear, nobody ever guesses there’s zucchini in it. I always do this when I want something sweet but don’t want to go overboard—this cake is perfect on lazy Sunday afternoons or even after a busy week. It’s incredibly moist, bursting with rich chocolate flavor, and somehow, the zucchini keeps it so tender that my kids ask for seconds before I even set the platter down. Honestly, it’s kinda my secret weapon—my little trick for sneaking veggies into something everyone loves. Plus, it’s so easy to whip up that I’ve made it more times than I can count. The smell alone—warm chocolate and sweet baked zucchini—can literally bring everyone running into the kitchen. Trust me, this one’s a lifesaver on busy nights or when you need a cozy pick-me-up. And the best part? It’s guilt-free enough that I don’t mind if the kids go back for thirds.
What is Zucchini Chocolate Swirl Cake?
Think of this cake as a magic trick – a moist, tender chocolate-infused treat with swirls of shredded zucchini peeking through. It’s basically a cross between a quick bread and a brownie, but in cake form, with the added bonus of sneaky vegetables. The name’s pretty straightforward: zucchini (which keeps the cake super soft and a little sneaky) and the classic swirl of chocolate that makes every bite feel indulgent. It’s essentially a “healthy-ish” dessert that I love to make when I want to indulge without feeling totally guilty, especially since zucchini is so mild and blends right into the batter. This cake’s origin is kind of funny—it’s one of those ‘what’s in the fridge’ recipes that turned into a family favorite. My grandma used to say, “Hide the vegetables in the dessert, and everyone will be happy”—and she was right! This cake is a little bit rustic, a little bit fancy, and totally versatile for any occasion, from a quick snack to a party centerpiece.
Why you’ll love this recipe?
What I love most about this is how it manages to be both simple and impressive at the same time. The flavor? Rich, chocolatey, and just a hint of sweetness that hits the spot without feeling overly decadent. It’s honestly my go-to when I want a dessert that feels like a hug—cozy, moist, and packed with flavor. Plus, it’s budget-friendly too—just a few basic pantry staples and a zucchini from the garden or fridge. And let’s talk versatility: you can serve this for breakfast if you really want! My kids ask for this all the time, and I love that I can sneak in a vegetable without a fuss. It’s my secret weapon when I need a quick dessert or a snack that feels a little special. Over the years, I’ve tested this with various add-ins—like a handful of walnuts or a splash of vanilla—and each time, it’s a hit. What makes this cake stand out is its texture—moist, tender, and just slightly dense—like the kind of dessert that gets better the next day. And trust me, it won’t last long—I usually hide a slice for myself, then find it gone!
How do I make Zucchini Chocolate Swirl Cake?
Quick Overview
This cake comes together quickly, with a simple batter that uses staple ingredients like flour, sugar, eggs, and oil. The trick is in the shredded zucchini, which you want to squeeze out a little to keep the cake from becoming too watery. You prepare the batter, then swirl in melted chocolate before baking. The baking process is straightforward—just pop it in a preheated oven and wait. What’s special about this method is how the swirl of chocolate creates beautiful marbling, making it look as fancy as it tastes. The best part? It’s practically foolproof. I always do this when I need a dessert in a pinch, and it rarely lets me down. Plus, it’s forgiving enough that, if you forget to finely chop your chocolate or overmix the batter, it still turns out amazing.
Ingredients
For the Main Batter:
• 2 cups all-purpose flour (I’ve also tested with whole wheat, and it’s just as good!)
• 1 1/2 teaspoons baking powder
• 1/2 teaspoon baking soda
• 1/4 teaspoon salt
• 1/2 cup unsweetened cocoa powder (for that rich chocolate flavor)
• 3/4 cup granulated sugar
• 1/2 cup vegetable oil (or melted coconut oil for a subtle flavor)
• 3 large eggs
• 1 teaspoon vanilla extract
• 1 cup finely shredded zucchini (roughly one medium zucchini, squeezed dry)
For the Filling:
• 1/2 cup semi-sweet chocolate chips or chopped chocolate
• 1 tablespoon butter (optional, for melting)
• A pinch of sea salt (really brings out the chocolate)
For the Glaze:
• 1/2 cup powdered sugar
• 1-2 teaspoons milk (add more if you want it runny)
• A dash of vanilla or citrus zest (optional for flavor)
Step-by-Step Instructions
Step 1: Preheat & Prep Pan
Set your oven to 350°F (175°C). Grease a 9-inch loaf pan or round cake pan with butter or non-stick spray, and lightly dust with flour if you like. Lining with parchment paper makes unmolding a breeze. I always do this — it’s a small step that saves so much trouble later.
Step 2: Mix Dry Ingredients
In a large bowl, whisk together the flour, cocoa powder, baking powder, baking soda, salt, and sugar. This ensures everything is evenly distributed—trust me, it makes the batter so much smoother when all the leaveners are evenly dispersed from the start.
Step 3: Mix Wet Ingredients
In a separate bowl, beat the eggs, then stir in the oil and vanilla. I always do this with a whisk—it gives you a good, smooth mixture. If your eggs are fridge-cold, it helps to warm them slightly or crack them into a small bowl first so they don’t seize up.
Step 4: Combine
Pour the wet into the dry ingredients and gently fold until just combined. Don’t overmix—this is key to keeping the cake light and moist. Sometimes I leave the batter a little streaky; it still turns out beautifully.
Step 5: Prepare Filling
In a microwave-safe bowl, melt the chocolate chips with the butter in 20-second bursts until smooth. Let it cool just a bit—hot chocolate can mess with the batter, and we want a swirl—not a mix-in.
Step 6: Layer & Swirl
Pour half of the batter into your prepared pan. Drizzle or dollop half of the melted chocolate, then repeat with the remaining batter and chocolate. Use a toothpick or skewer to swirl gently, creating a marbled effect. I love making big sweeping zigzag patterns—they look so pretty when baked.
Step 7: Bake
Slide it into the oven and bake for about 40-45 minutes. You know it’s done when a toothpick inserted in the center comes out with a few moist crumbs—no wet batter. Keep an eye on it—every oven is a little different. If it starts to brown too quickly, tent it with foil for the rest of the baking time.
Step 8: Cool & Glaze
Let the cake cool in the pan for about 15 minutes, then transfer to a wire rack. Once cooled, mix up your glaze and drizzle over the top—this is optional but adds such a nice glossy finish and extra flavor boost. I like mine a little thick, just pouring over, then letting it set for a shiny look.
Step 9: Slice & Serve
Use a serrated knife to cut clean slices, and serve at room temperature. I love a little extra dusting of powdered sugar or a sprig of mint for presentation. This cake makes a lovely teatime treat or a lovely dessert paired with a cold glass of milk or coffee.
What to Serve It With
If you’re looking for ideas to dress this cake up, think about pairing it with whipped cream or a scoop of vanilla ice cream for an effortless dessert. For breakfast or brunch, serve slices alongside some fresh berries and a dollop of Greek yogurt. My family loves it with a cup of strong coffee or a chai latte—something warm and spicy to balance the rich chocolate.
On cozy afternoons, I like to cut thick slices, toast them slightly, and spread a little butter or nut butter on top—it’s almost like a quick bread with a decadent twist. And if you’re feeling fancy, a drizzle of caramel or a dusting of powdered sugar makes it extra special. Honestly, I’ve served this at kids’ parties, casual family dinners, and even as a last-minute gift in a pretty tin—everyone always asks for the recipe.
Top Tips for Perfecting Your Zucchini Chocolate Swirl Cake
One thing I’ve learned after making this dozens of times: moisture is key. Zucchini can be a bit tricky because it’s full of water. I always squeeze out as much moisture as I can from the shredded zucchini—this prevents a soggy cake and keeps it beautifully tender.
Another tip is in the swirling. Don’t overmix once you add the chocolate—it can turn the batter into a tough, dense mess. Just swirl gently—the more graceful your pattern, the prettier your cake looks when sliced. I once made the mistake of overswirling, and the chocolate all clumped together. Lesson learned!
If you want to vary the flavor, try adding a pinch of cinnamon or espresso powder to give a little extra depth. And trust me on this: using good-quality chocolate for the swirl makes a huge difference—cheap chips just don’t melt the same and can turn gritty.
Oven temperatures can vary, so start checking around the 35-minute mark. Your cake should be moist but not wet inside. If you notice the edges browning too fast, tent it with foil to prevent burning. And a quick tip—if you want to make mini muffins, reduce the baking time to 20-25 minutes, and keep an eye on them—they’ll disappear even faster!
Finally, the glaze. You can leave it out for a less sweet cake, or swap powdered sugar for a cream cheese frosting if you like. My personal favorite is to add just a hint of orange zest to the glaze—brightens up the richness beautifully.
This recipe has taught me so much about balancing moisture, flavor, and presentation. Every time I get it right, I feel like I’ve cracked the code for a cozy, delicious dessert that everyone loves.
Storing and Reheating Tips
This cake is a keeper! Wrap leftovers tightly in plastic wrap or store in an airtight container at room temperature for up to 2 days. I usually slice it all at once and keep portions wrapped when not serving—it stays tender and moist that way. If you need to keep it longer, pop it in the fridge, where it’ll last about 4 days. Just bring it to room temp before slicing—cold cake can be a little dense.
For longer storage, freezing works beautifully. Wrap individual slices in plastic wrap, then place in a freezer-safe bag. It’ll keep for about 2 months. To defrost, leave it at room temperature for an hour or two. I’ve even reheated slices in the microwave for 20 seconds for that freshly-baked feel.
If you’re planning to add the glaze later, I recommend freezing the cake without it, then applying the glaze after defrosting—keeps the finish looking shiny and fresh. The flavor might deepen overnight, so I often bake it a day ahead for parties or family gatherings.
Frequently Asked Questions
Final Thoughts
This zucchini chocolate swirl cake might sound a little out of the ordinary, but it’s one of those recipes I keep coming back to—trust me, you’ll want to. It captures a cozy, homey feeling with every bite, and I love how flexible it is; you can totally tweak the add-ins or flavors to suit your taste. Plus, it’s a sneaky way to get some veggies into your dessert lineup, which my kids secretly love. Over the years, I’ve made it for everything from simple weeknight treats to family gatherings, and it’s always a hit. My friends ask for the recipe, my husband always insists I make it on special occasions, and honestly, I think it’s become a little piece of my culinary comfort zone. So go ahead—rustle up that zucchini in your fridge, gather a few chocolate chips, and give this cake a try. I promise it’ll bring a smile to your face and a little warmth to your home. Happy baking!
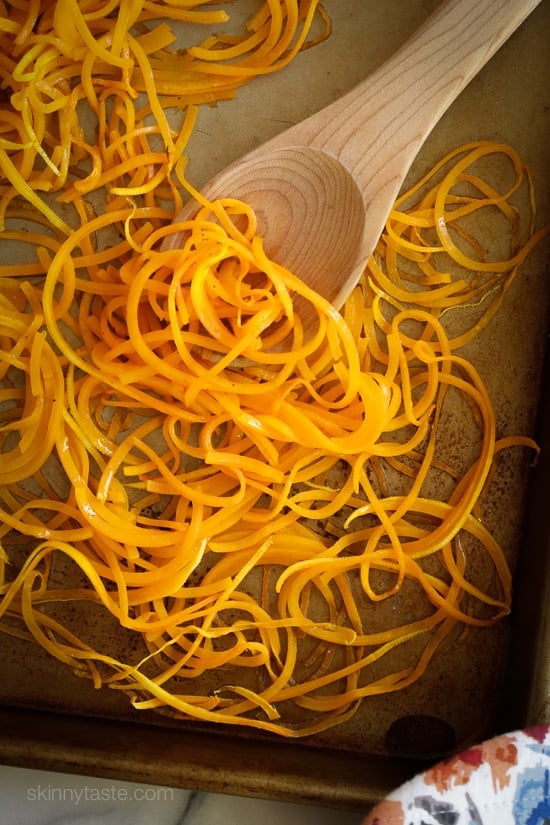
roasted butternut squash
Ingredients
Method
- Preheat the oven to 400F. Lightly spray 2 large baking sheets with oil.
- Trim the top portion of the butternut squash that can be spiralized, reserving the bottom for another recipe. Trim the top off and peel the skin off.
- Cut the butternut into 2 pieces for easier handling, then spiralize using the thickest noodle setting of your spiralizer. Cut into 6-inch lengths.
- Transfer to the prepared baking sheets and drizzle with 1 teaspoon oil, sprinkle with 1/4 teaspoon salt and black pepper to taste.
- Roast until soft, about 7 to 10 minutes.