Luscious Strawberry Chocolate Brownies Recipe
There’s something about pulling a warm slice of zucchini carrot swirl loaf from the oven that simply makes my heart happy. Maybe it’s the way the aroma fills the kitchen—warm, slightly sweet, with hints of earthy zucchini and bright carrot. I grew up snacking on something similar, and I’ve always loved how versatile it is—perfect for breakfast, a quick snack, or even a casual dessert. I remember the first time I baked this; my kids devoured it in minutes, asking when I’d make it again. If you’re looking for a treat that feels special but is surprisingly easy to whip up on a busy weeknight, this one’s a lifesaver. Plus, it’s a sneaky way to get a little veggie love into your day without anyone noticing. Trust me, once you try this, it’ll become a staple in your baking rotation, just like it is in mine.
What is Zucchini Carrot Swirl Loaf?
This zucchini carrot swirl loaf is a cozy, comforting bread that’s packed with shredded zucchini and carrots, swirled with a sweet cinnamon-spiced batter. Think of it as a cross between a moist cake and hearty bread—kind of like a breakfast muffin but in loaf form. It’s essentially a veggie-packed snack that feels indulgent but isn’t loaded with refined sugar or butter. The “swirl” part is just how the batter and filling blend together beautifully during baking, creating a gorgeous marbled effect. The name says it all: zucchini and carrots are the stars, combined in a soft, fluffy batter that’s perfect for slicing and sharing. I love how flexible it is, too—play around with the spices or add nuts if you like. The best part? It’s endlessly forgiving and tastes even better the next day, once all the flavors meld together.
Why you’ll love this recipe?
Honestly, what I love most about this zucchini carrot swirl loaf is that it hits all the right notes—delicious, nourishing, and downright cozy. The flavor profile is a warm mix of cinnamon, vanilla, and just a hint of sweetness, with the unexpected twist of fresh zucchini and carrots lending a subtle moistness and a little nutritional boost. It’s a snack that feels indulgent but isn’t loaded with fancy ingredients. Also, it’s super straightforward to make, even if you’re not a seasoned baker. I always do this when I need something quick to brighten a lazy weekend morning or when I want to impress guests with minimal effort. The cost is budget-friendly, too—except for a few fresh veggies, everything else is pantry staples. And because it’s great on its own, I often serve it plain or topped with a smear of cream cheese or a drizzle of honey for extra flair. My kids ask for this all the time, and I love how it’s a sneaky way to get them eating veggies without a fuss.
How do you make Zucchini Carrots Swirl Loaf?
Quick Overview
This zucchini carrot swirl loaf is surprisingly easy to make. You start by shredding zucchini and carrots, then mixing them into a simple batter spiced with cinnamon and vanilla. Meanwhile, you prepare a cozy cinnamon sugar filling. The batter gets poured into the loaf pan, dolloped with the filling, and then swirled to create beautiful marbling. After baking for about 50-60 minutes, you’ve got a fragrant, moist loaf that’s perfect for slicing. The key is not overmixing—just gently folding everything together—so it stays tender. Once baked, I let it cool for a bit before glazing or serving plain. This method keeps the loaf moist and fluffy, with delightful hints of spice and veggie goodness in every bite.
Ingredients
For the Main Batter:
– 2 cups all-purpose flour (or gluten-free flour blend if you prefer)
– 1 cup granulated sugar
– 1 tsp baking powder
– ½ tsp baking soda
– 1 tsp cinnamon
– ½ tsp salt
– 1 tsp vanilla extract
– ½ cup vegetable oil (or melted coconut oil)
– 3 large eggs
– 1 cup freshly grated zucchini (squeeze out excess moisture)
– 1 cup grated carrots
– ¼ cup milk (dairy or plant-based, like almond milk) – I tested this with almond milk and it actually made it even creamier!
For the Filling:
– 2 tbsp brown sugar
– 1 tsp cinnamon
– 2 tbsp melted butter or coconut oil
– Optional: chopped nuts or raisins for extra texture
For the Glaze (optional):
– ½ cup powdered sugar
– 1-2 tbsp milk
– A splash of vanilla or lemon juice for zing
Step-by-Step Instructions
Step 1: Preheat & Prep Pan
I always start by preheating my oven to 350°F (180°C). Then, I grease a standard loaf pan with butter or spray it lightly with non-stick spray. Lining it with parchment paper makes this even easier—trust me, a little prep now saves you headaches when you try to lift out the loaf later!
Step 2: Mix Dry Ingredients
In a large bowl, whisk together the flour, sugar, baking powder, baking soda, cinnamon, and salt. Combining these dry ingredients first helps prevent clumping and ensures everything is evenly distributed. I do this step first to make sure my bread bakes evenly and turns out tender.
Step 3: Mix Wet Ingredients
In a separate bowl, beat the eggs, then add the oil, vanilla, and milk. Whisk until smooth. The mixture should be a little frothy, which helps everything blend smoothly. I’ve learned that using slightly warm milk makes it easier to combine everything into a silky batter.
Step 4: Combine
Pour the wet ingredients into the dry, then fold gently until just combined. Here’s the trick: don’t overmix! It’s okay if a few lumps stay—this keeps the loaf light. Now, fold in the grated zucchini and carrots, being careful not to deflate the batter.
Step 5: Prepare Filling
Mix the brown sugar, cinnamon, and melted butter in a small bowl. If you like nuts or raisins, stir those in here, too. This sweet and spicy filling adds the perfect flavor contrast and makes every bite special.
Step 6: Layer & Swirl
Pour half the batter into your prepared loaf pan. Dot it with spoonfuls of the filling, then add the remaining batter on top. Use a toothpick or butter knife to swirl the filling into the batter—creating a marbled effect. Don’t overdo it; a few gentle swirls are enough to get those lovely patterns.
Step 7: Bake
Pop the loaf into the oven and bake for about 55 minutes. Check for doneness with a toothpick—it should come out clean. Every oven bakes a little differently, so start checking around the 50-minute mark. When I peek in, I love seeing that golden top with little crispy edges.
Step 8: Cool & Glaze
Let the loaf cool in the pan for 10-15 minutes, then transfer to a wire rack. If you’re using a glaze, mix powdered sugar with milk and vanilla, then drizzle over the loaf while it’s still slightly warm. This step really makes it feel special, but plain is delicious too—famous in my house!
Step 9: Slice & Serve
Once cooled, slice with a serrated knife to get clean cuts. Serve it slightly warm or at room temperature. I love it with a dollop of butter or a splash of honey. This loaf pairs beautifully with a cup of tea or a glass of milk and makes a lovely breakfast, snack, or dessert. My kids ask for this sometimes just as much as they do for cupcakes!
What to Serve It With
This zucchini carrot swirl loaf is so versatile, I could talk about what it pairs well with all day. In the morning, serve it with a strong cup of coffee or a glass of cold milk—it’s a perfect, wholesome start. Sometimes, I slice it thick and toast it gently, then spread a bit of cream cheese or almond butter on top for an extra indulgence. It’s also stunning when served as part of a brunch spread—maybe alongside fresh fruit, yogurt, and a drizzle of honey. As a dessert, I like to warm slices and top them with whipped cream or vanilla ice cream. For a cozy snack, it’s wonderful on its own, but I’ve even dusted off a little powdered sugar or cinnamon sugar for that bakery feel. Honestly, this loaf is a hit whether I keep it simple or dress it up. I’ve made it for family gatherings, school lunches, and just because—it’s always gone before I know it.
Top Tips for Perfecting Your Zucchini Carrot Swirl Loaf
Honing in on just a few tips makes all the difference. First, when shredding zucchini, I always do this just before mixing—it helps keep it fresh and prevents excess moisture from making the batter too wet. Squeezing out the zucchini takes a couple of extra seconds but really helps avoid a soggy loaf. Overmixing makes the texture dense, so I fold gently until just combined. For the swirl pattern, I like to start by spooning the batter carefully and then layering the filling, but don’t go overboard—less is more for that beautiful marbled look. If you want a richer flavor, try adding a splash of orange zest or swapping the cinnamon for pumpkin pie spice. I tested different flours, and honestly, gluten-free blends work great if you want to make it allergy-friendly. A little patience during baking pays off—check for doneness with a toothpick, and don’t open the oven too often or the loaf might sink a bit in the middle. When it comes to the glaze, I’ve experimented with cream cheese frosting, honey drizzle, and even lemon glaze—each adds a special touch. Just trust your senses; if it smells fragrant and looks golden, you’re in good shape. Over the years, I’ve learned that small adjustments—like a dash more spice here or a touch more milk there—make this recipe truly yours. I also learned that letting the loaf cool completely before slicing keeps it from crumbling—patience is key! Once in a while, I add a handful of chopped walnuts or cranberries for extra texture. This recipe is forgiving and adaptable, and that’s what makes it my absolute favorite. Once you master the swirl, the possibilities are endless—think chopped apples, blueberries, or even zucchini and banana combo. It’s a cozy, all-in-one treat that makes me smile every time I bake it.
Storing and Reheating Tips
This loaf stays fresh longer than you might expect. If you’re planning to enjoy it within a day or two, wrap it tightly in plastic wrap or store it in an airtight container at room temperature. It usually stays moist and delicious for about 2-3 days, especially if the weather is cool. For even longer storage, pop slices into the refrigerator—this actually helps keep the texture intact and the flavors vibrant. Just be sure to wrap each slice or place them in a sealed container to prevent drying out. When I want to reheat, I pop a slice in the microwave for about 15-20 seconds—just enough to warm it through without turning it rubbery. You can also warm slices in a toaster oven or oven at 350°F for about 5 minutes. If you want to freeze it, wrap individual slices in plastic wrap and place them in a labeled freezer-safe bag; they’ll keep for up to 3 months. Thaw at room temperature or gently reheat in the microwave. One thing I’ve learned: if you’re serving it with glaze, wait to add it until just before eating to keep that glossy, fresh look. This way, you’ll always have a piece of cozy homemade goodness ready whenever the craving strikes. Remember, the loaf tastes best fresh, but it reheats beautifully—think of it as a little slice of comfort ready for any moment.
Frequently Asked Questions
Final Thoughts
This zucchini carrot swirl loaf has become a family favorite in my house because it strikes that perfect balance between wholesome and indulgent. It’s cozy, comforting, and a little nostalgic, reminding me of childhood mornings when the smell of baked goods would drift through the house. Over the years, I’ve tinkered with the ingredients, always aiming to make it a bit healthier or more flavorful, but the core remains the same—simple ingredients, big flavor, and a whole lot of love. I genuinely believe that once you make this a few times, it’ll feel like your own. Whether you’re baking for a crowd or just a quiet moment alone, this loaf always delivers smiles. I can’t wait to hear how yours turns out! Anyway, grab some fresh zucchini and carrots—you’re in for a treat. Happy baking!
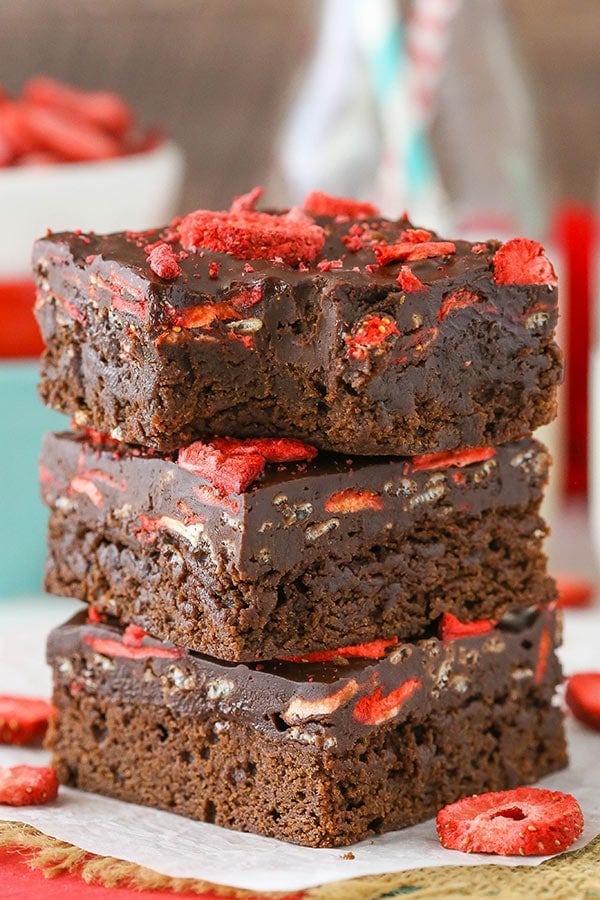
strawberry brownies
Ingredients
Method
- Preheat oven to 350°F. Grease a 9x9 baking pan or line with parchment paper.
- In a medium bowl, mix flour, cocoa, baking powder, and salt. Set aside.
- In another bowl, combine melted butter, sugar, and vanilla. Add eggs and mix well.
- Gradually add dry ingredients to wet mixture. Mix until combined.
- Pour batter into prepared pan. Bake for 18-20 minutes. Cool completely.
- In a bowl, heat heavy cream until boiling. Pour over chocolate chips and let sit for 4 minutes. Whisk until smooth.
- Stir in honey, vanilla, strawberries, and cereal into the chocolate mixture.
- Spread the topping over cooled brownies. Refrigerate for 3-4 hours until firm.
- Cut into bars and serve cold or at room temperature.